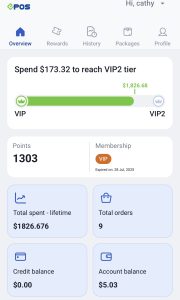
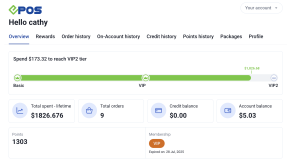
Customer Registration

⬇ Explore the functionalities of the Customer Registration page by toggling between tabs below.⬇

This section will describe in detail the feature of online registration. This feature enables customers to register themselves without being at the POS physically and also able to check account information using the URL provided.

At the EPOS Features Panel, under Customer, click on Customer Registration, users will be directed to the Online Registration Configuration page.

💡 In section 4, full name and phone number are compulsory fields for both kiosk and web ordering app. 

1. Header Image

Hover over the image area to edit your customers registration page’s header image. 

2. Manual Customer URL

Allow customers to register their information into the EPOS database.

a. QR code for customer registration link

b. Toggle to auto approve new customers

c. Print QR code

3.AI Sign-up Membership

Allow all registered customers to check account information.

a. QR code for customer login link

b. Print QR code

4. Fields for Registration Form

If selected, fields will be shown in the Register Link for Customer Users can choose whether to show / not show and also require / not require fields during registration.

a. Personal Particulars

    • Prefix
    • Gender
    • Date of Birth

b. Contact Information

    • Phone Number (required by default)
    • Email
    • Fax Number

c. Address: User to choose which address line to be required.

4. Save Changes

Click on Save Changes once done.

1. Users should provide the registration link to customers for them to enter registration information.

At the Customer Registration Configuration Page, copy the registration URL with the blue icon or print out the QR code.

2. As part of the marketing campaign, users can paste the URL/QR code in marketing emails and send to targeted customers or use the URL as a receipt footnote. 
3. Upon accessing the URL, customers will be directed to the page as shown below.

Customers are required to fill in all mandatory fields marked with (*). To configure the fields shown in Customer Registration Page.

4. Once submitted, a message will be shown.

5. Under Online Registration Configuration, users should then access the Requests tab. Here, users will be given the right to Approve/ Reject customer’s request to be registered into the EPOS Database.

💡 Customer registrations will be automatically accepted if users ☑️ the Auto Apply all Requests config.

6. Once approved, customers will be officially registered into the EPOS database based on the information entered at the Customer Registration Page.

For more information, see Customer Configurations.

7. Customers can now access the login site as shown below.

In the Customer Portal, customers are required to enter Phone Number, and Password will also be the Phone Number registered in EPOS database.

8. Once a customer is logged into the EPOS Customer Portal, customers will see the following information, similarly to the Customer Configurations as seen in Backend Portal.

Customers can view their Order History, Credit History, Account History, Point History and Package details.

Was this article helpful?
YesNo