Portrait POS Interface


⬇ Explore the functionalities of the product page by toggling between tabs below.⬇

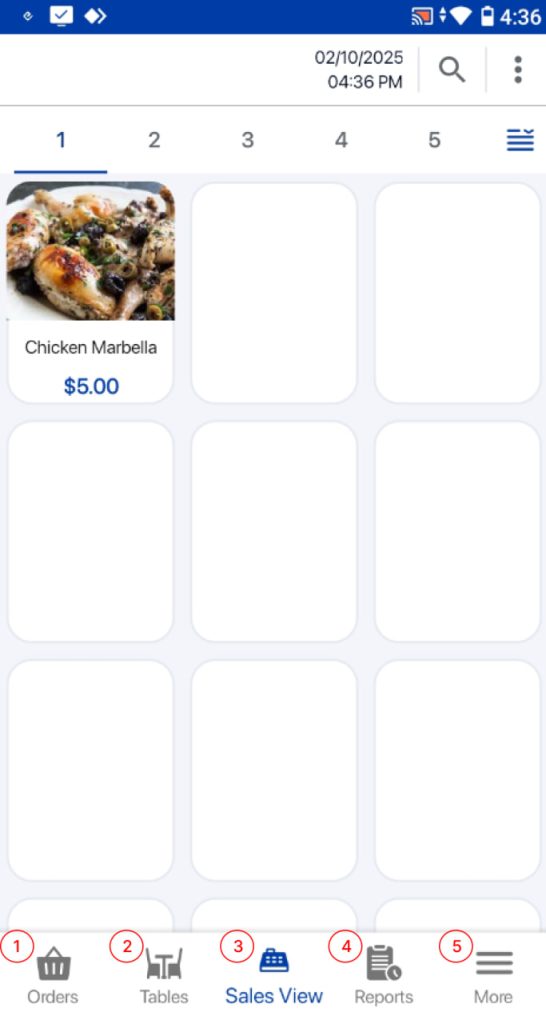
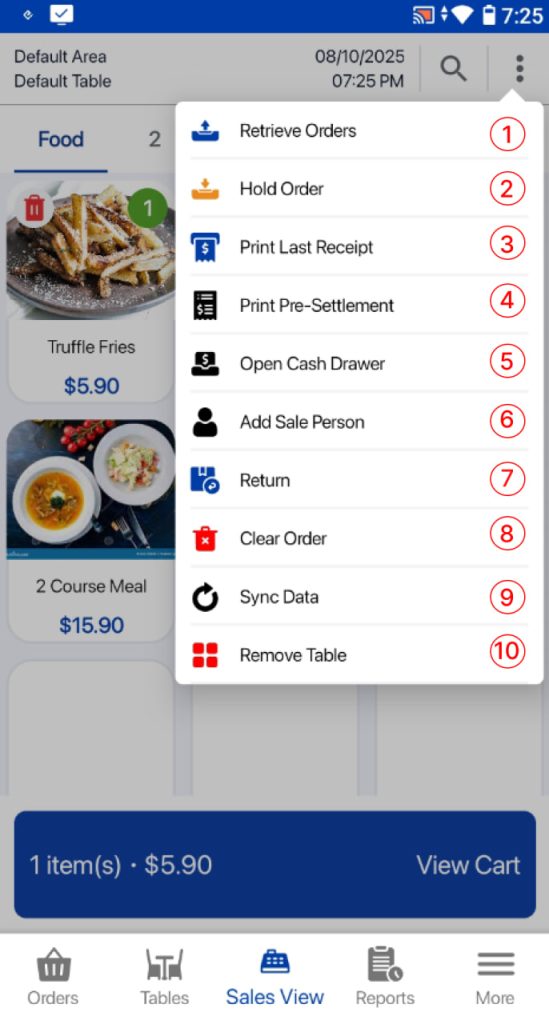
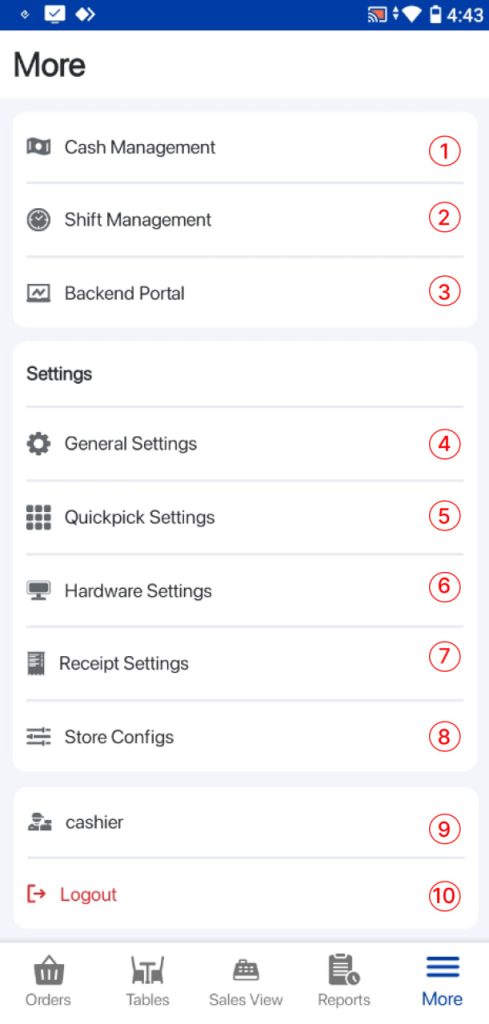
Users will be directed to the main Sales page. The image below shows each function on the main Sales page. 
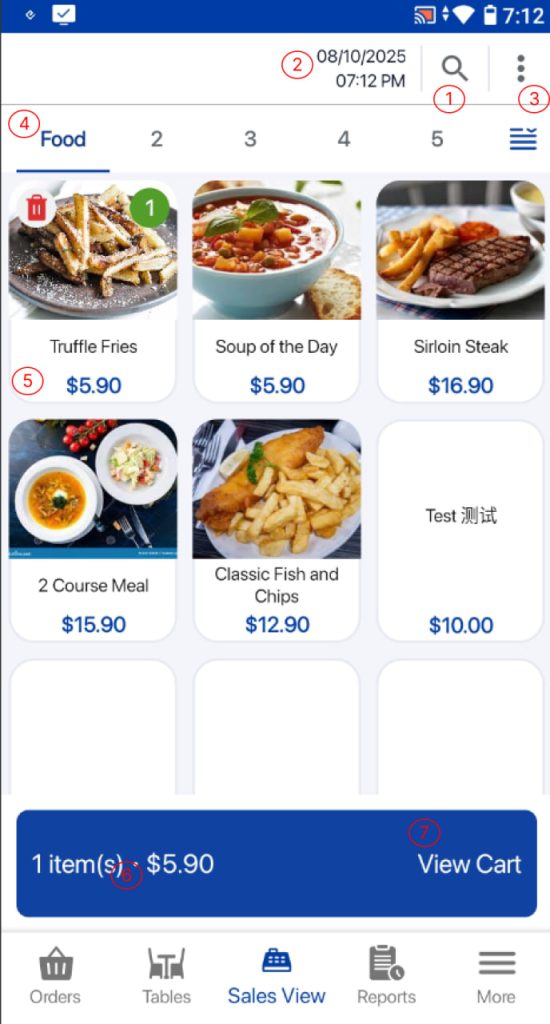
  1. Search
    – Allow users to search for existing products and create new product
    – User can search products by scanning the barcode using the built-in camera or entering the product name/SKU
  2. Date/Time
    – Display current date and time
  3. POS Order/Miscellaneous menu
    – Display menu which allow users to perform order related actions
  4. Quickpick Pages
    – Displays up to 10 QuickPick pages, allowing users to navigate between pages by choosing each tab.
  5. Quickpick Products
    – Allow users to add items/group of items into the cart
  6. Number of Items
    – Display the total number of products in the order cart
  7. View Cart Button 
    – To view the summary order page


The Taskbar menu is located at the bottom of the screen, allowing users to easily navigate 

The image below shows each function on the POS Taskbar menu. 

Orders

View and manage all previously held orders. Users can reopen, edit, or complete these orders directly from this section.

Tables

Access your restaurant’s table layout. Users can assign table, change table, or merge bills, as well as manage ongoing dine-in orders easily from here.

Sales View

Quickly navigate to the Sales Screen, where users can take new orders, process payments, and manage day-to-day transactions.

Reports

Review detailed reports of your store’s performance. This includes transaction history, tax reports, sales analysis and shift reports to help you understand your business activity better.

More

Access additional tools and settings, including cash management, hardware setup, and shift management options. Log out function is also in this page.


Users can click on the icon to access the Miscellaneous menu.

The image below shows each function on the POS Order menu.

  1. Retrieve Orders
    – Allow users to retrieve sales which are set aside
  2. Hold Order
    – Allow users to set their sales aside
  3. Print last Receipt
    – Allow users to print receipt of the most recent transaction
  4. Print Pre-Settlement
    – Allow users to print pre-settlement bill, will be shown as long as table management module is enabled for users
  5. Open Cash Drawer
    – Allow users to open the cash drawer manually. This will be recorded at the end shift report and backend shift report.
  6. Add Sales Person
    – Allow users to apply sales person to the order
  7. Return
    – Allow users to perform order returns
  8. Clear Order
    – Allow users to clear all the products in the order cart
  9. Sync data
    – Allow users to sync the changes made in the Backend to the POS
  10. Remove Table
    -Allow users to remove table tagged to the current order. Will only be shown if a table is tagged to current order.


Users can click on the icon to access the ‘More’ menu.

The image below shows each function on the more menu.

  1. Cash Management
    – Allow users to perform cash in/cash out functions
  2. Shift Management
    – Allow users to end the current shift
  3. Backend Portal
    – Direct users to EPOS Backend Portal
  4. General settings
    – Allow users manage simple general configurations 
  5. Quickpick settings
    – Allow users to add products to Quickpick 
  6. Hardware settings
    – Allow users to manage hardware related configurations 
  7. Receipt settings
    – Allow users to manage receipt printings 
  8. Store Configs
    – Displays store info and allow users to revoke the store 
  9. Staff on duty
    – Display the name of the staff logged into the POS
  10. Logout
    – Allow users to log out from current session