
June 2025
This June, several features across our POS, Android POS, Backend and Soundbox have implemented features to enhance the experience of both the users and customers.
What’s New
Not sure which affects you?
These icons indicate which group of users is impacted by each enhancement: Point of Sale (POS) users, Backend users, or Web Ordering App users.
(🖥️ POS — ⚙️ Backend — 📱 Web Ordering App — 🤖 Android POS — 👨🍳 Kitchen Display System (KDS) — 📦 Stock Take Device — 🔊Soundbox)
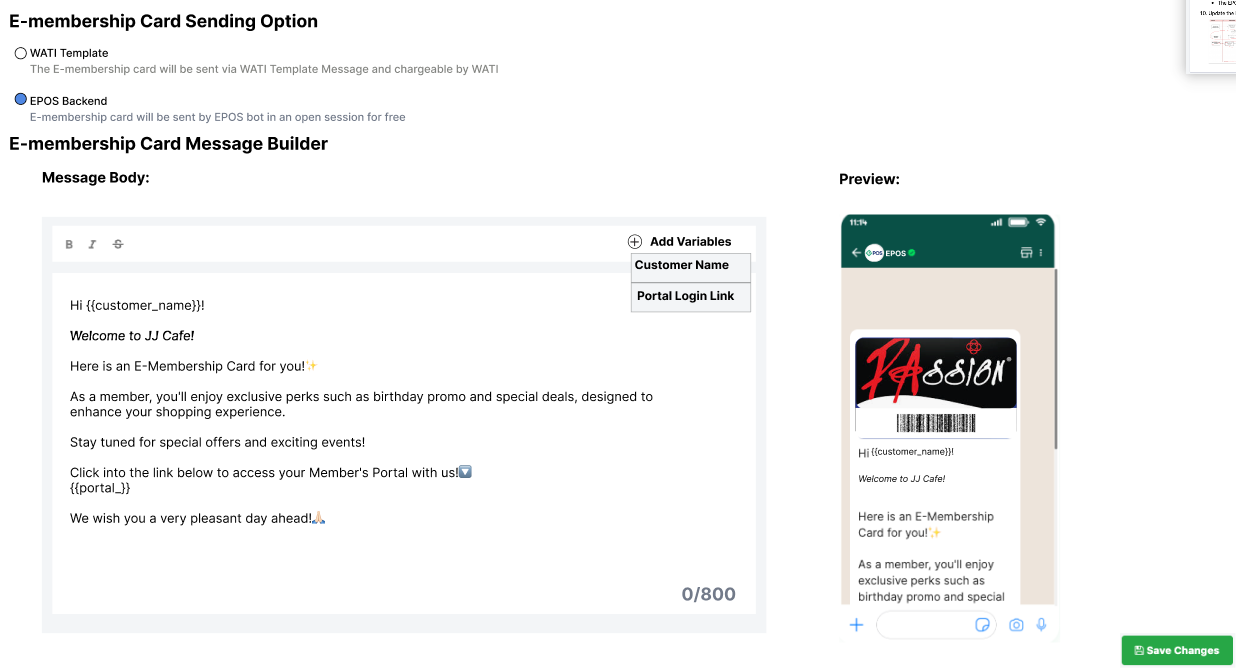
MAI clients can now personalise their E-Membership cards by uploading custom images and sending them directly from the EPOS backend for free. It supports up to 800 characters, unlimited emojis, and multiple languages.
How it works:
1. User navigates to ‘Advanced Registration’ tab in the BE
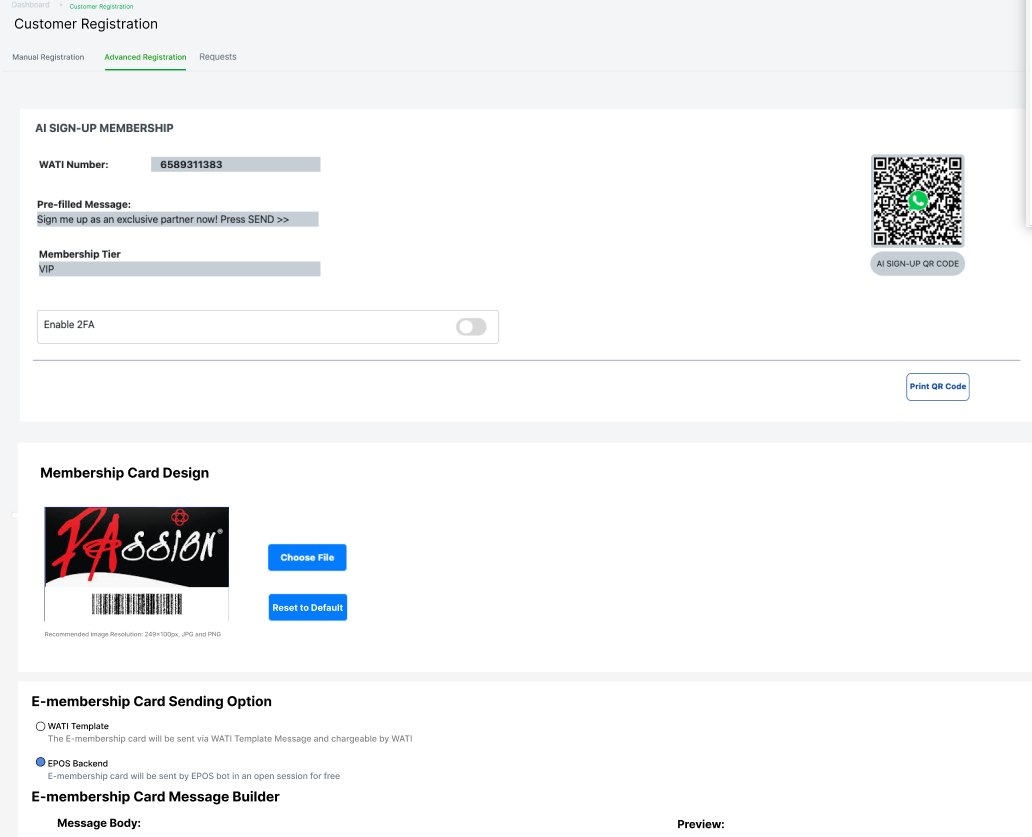
2. User uploads their custom e-membership card design file
3. User selects their preferred E-membership Card Sending Option
4. If ‘EPOS Backend’ is selected, the user configures the e-membership card message body, adds variables, and saves changes
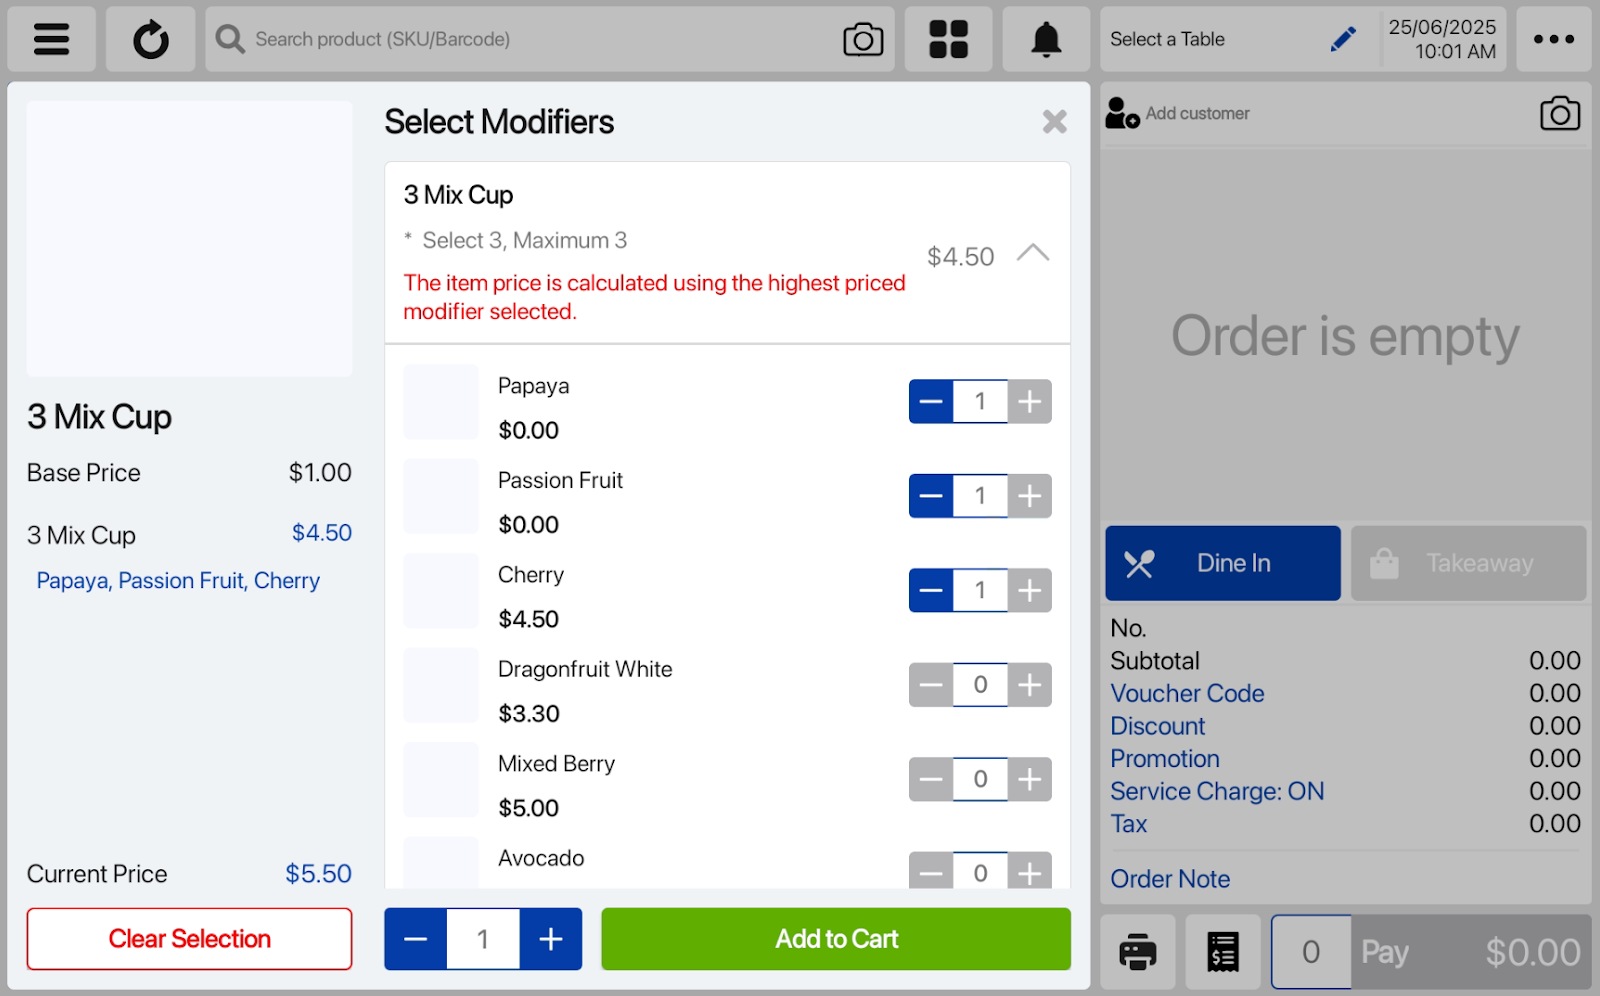
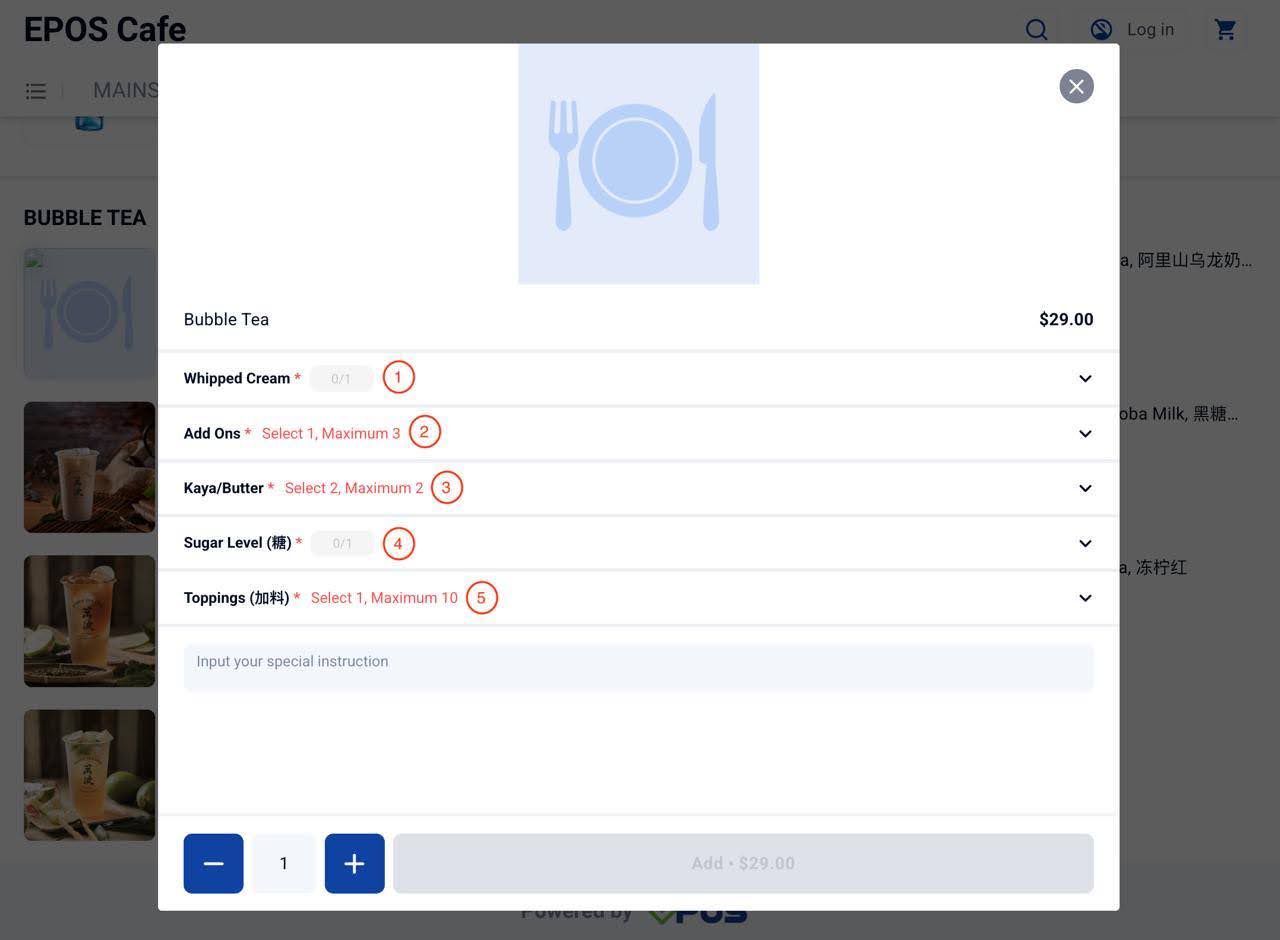
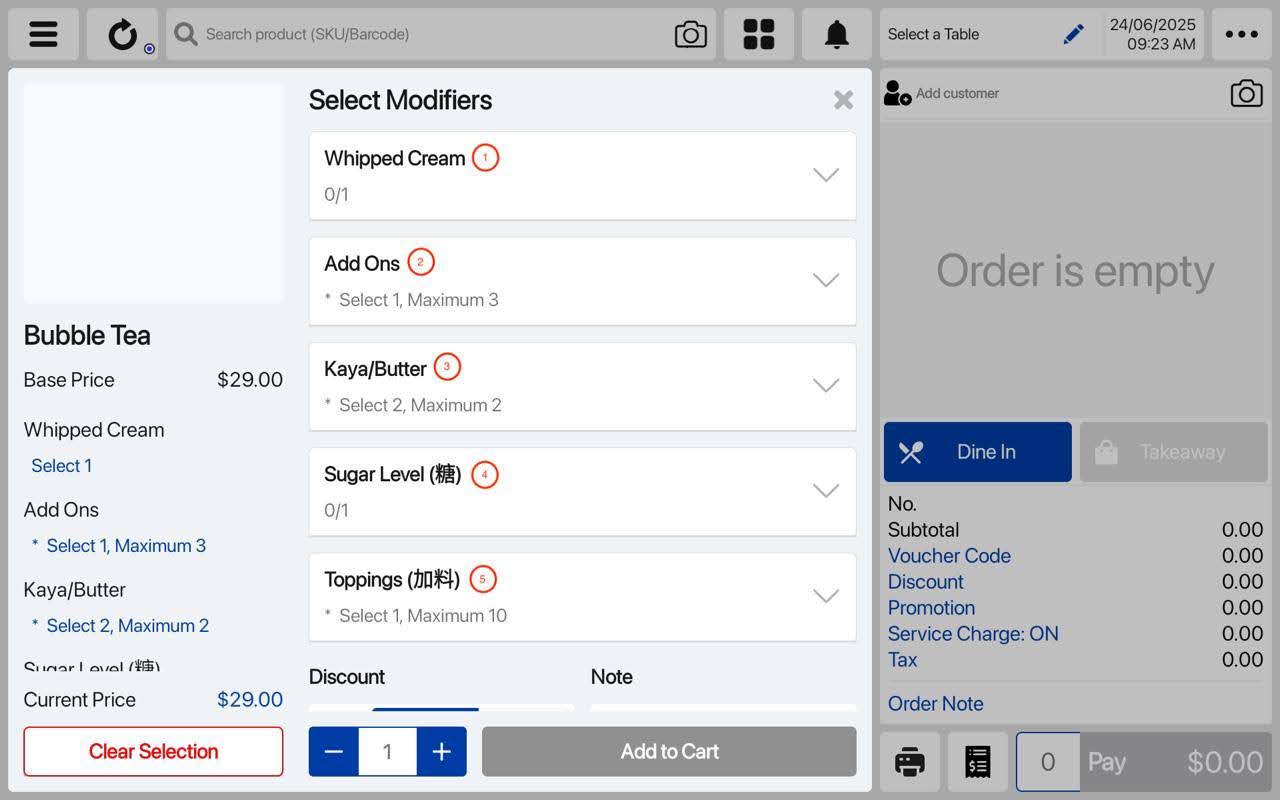
There is now an “Advanced Pricing” toggle in the Modifier setup. When enabled, user will be able to:
- Configure how many items to include in combo pricing (sum of items)
- Choose how to set the base price from selected items (Highest or Lowest)
How it works:
1. In the BE > Modifier, the user clicks on the desired modifier group name and edit the group.
2. User toggle on Advanced Pricing, and choose the number of selected items to be included and how to calculate price. (E.g. Apply the sum of “1” Highest.)
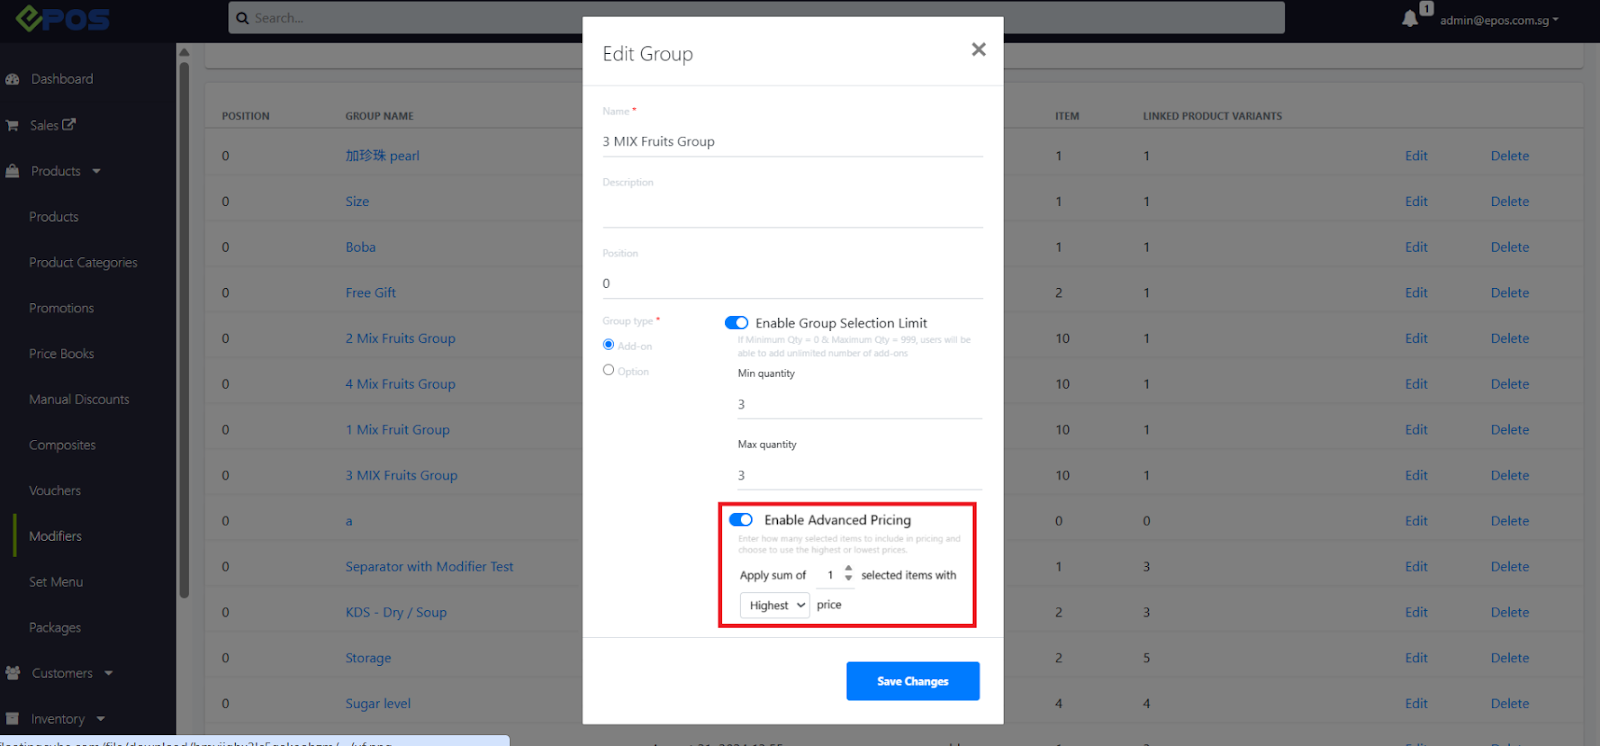
3. User then perform a sync on POS for changes to take effect.
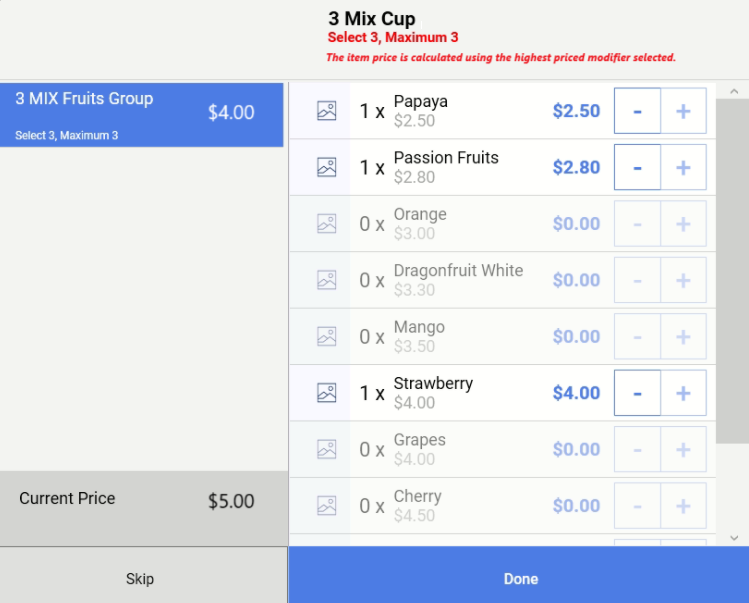
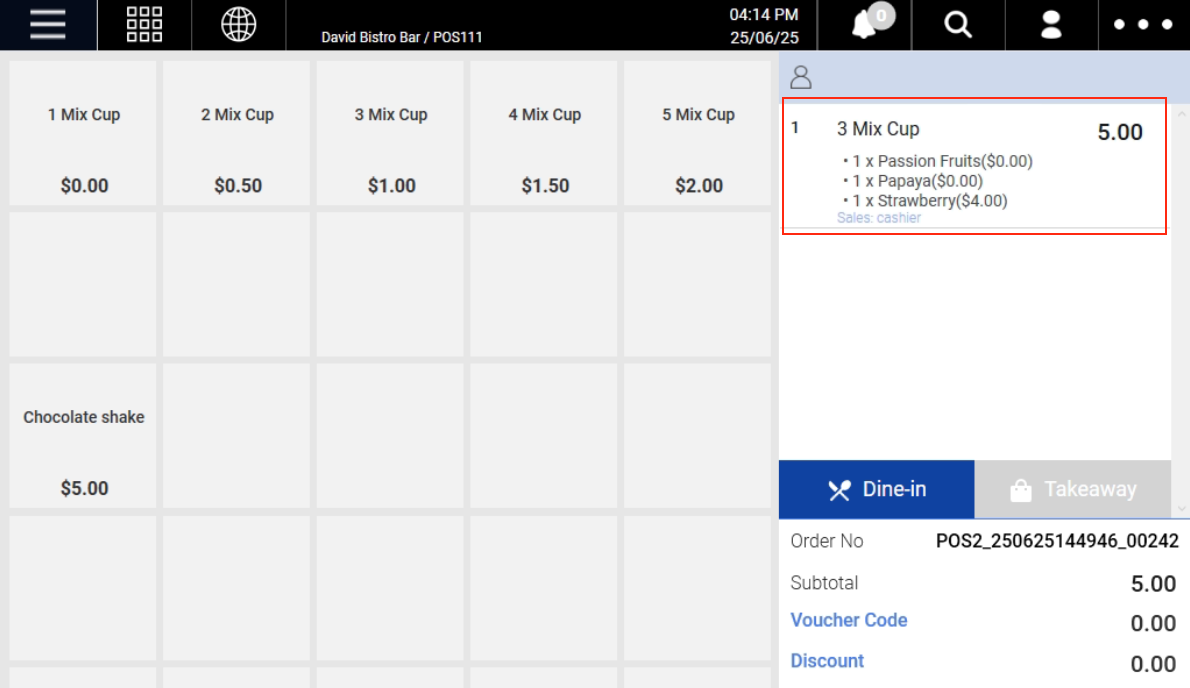
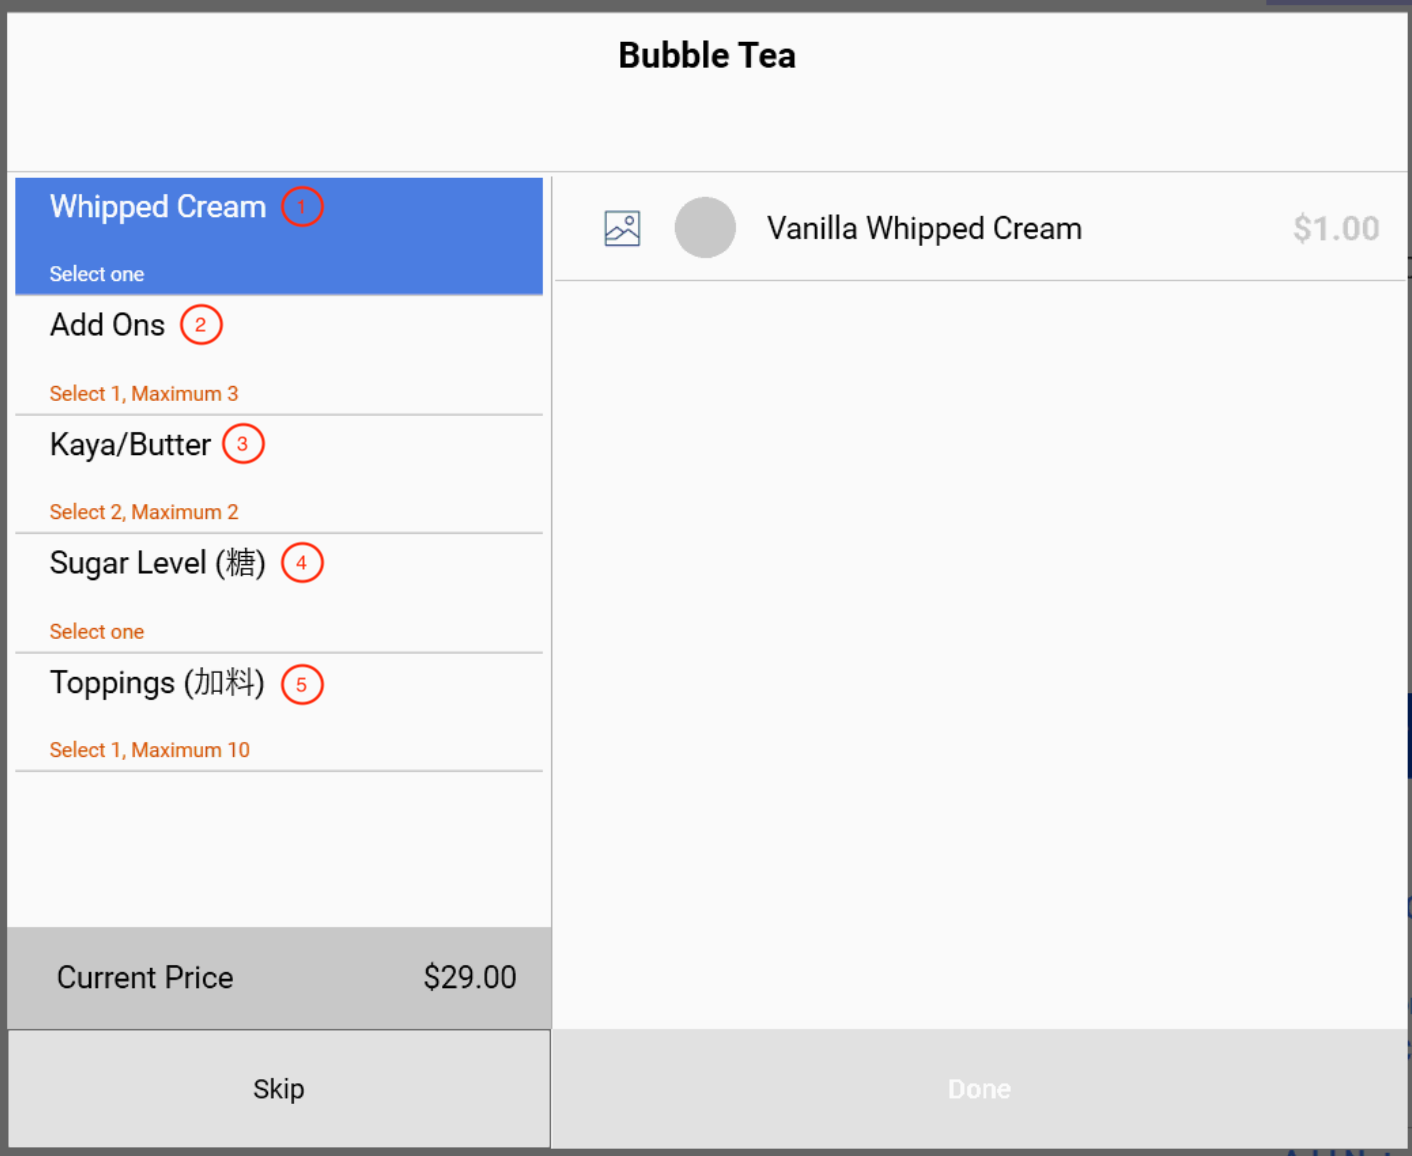
When user enable the ‘Advanced Pricing’ toggle in the Modifier setup in the BE, the POS, Kiosk, WebApp and Android POS will display the correct calculation for the pricing logic.
POS:
1. A note will be displayed. The cashier selects the items that the customer wants and the POS automatically calculates price.
2. Cashier clicks ‘Done’ to add item into shopping cart with correct price and completes payment.
Kiosk:
1. Customer selects item with the modifier that has the “advanced pricing” toggle enabled.
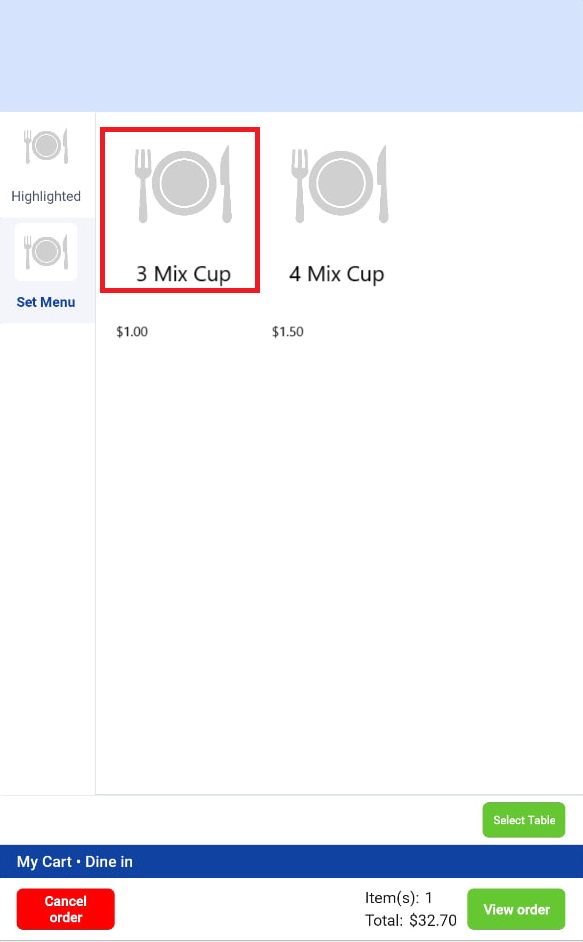
2. A Note will be displayed and Kiosk automatically calculates the price.
3. If the modifier price is not applied, it will be displayed as $0.
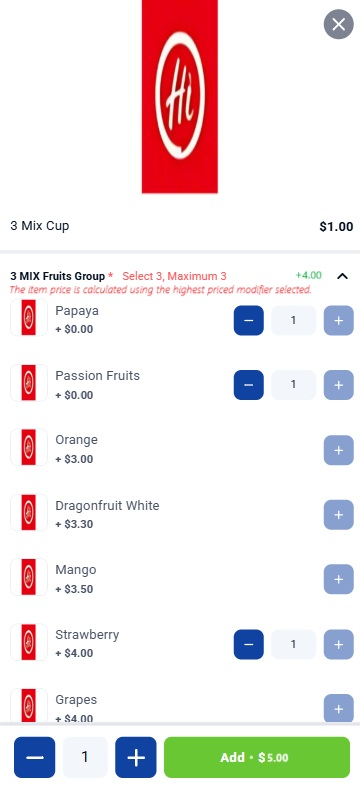
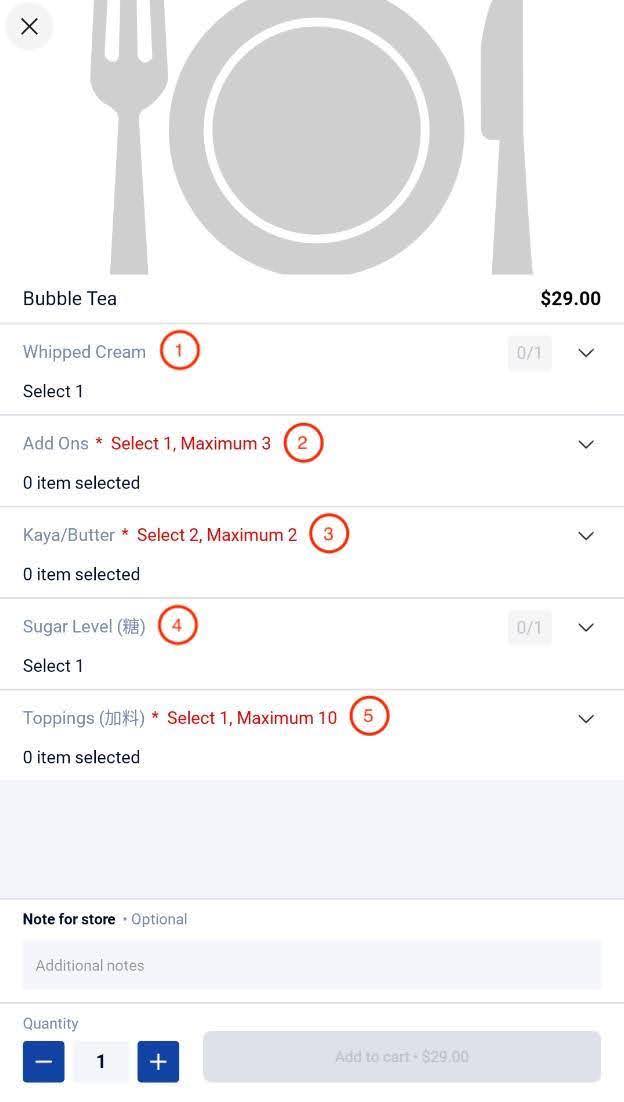
WebApp:
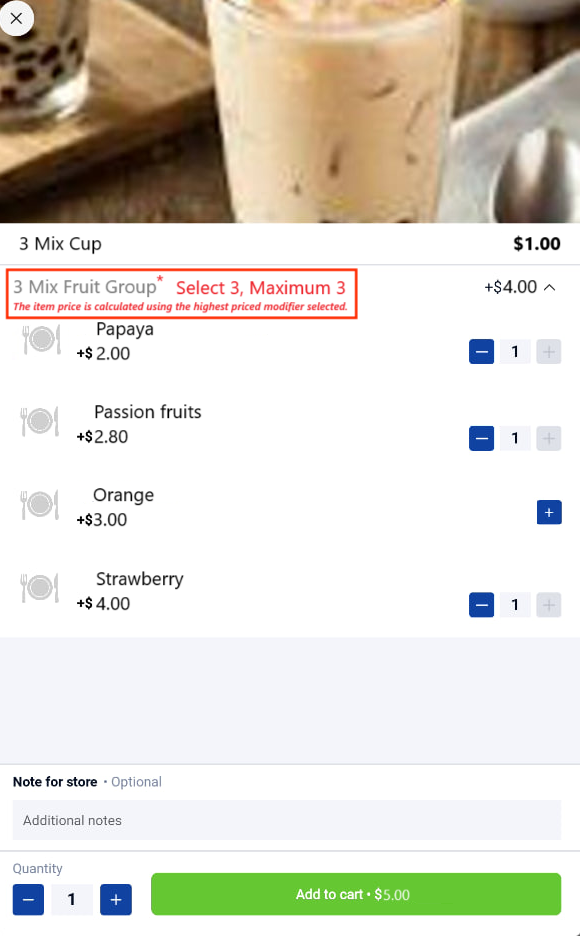
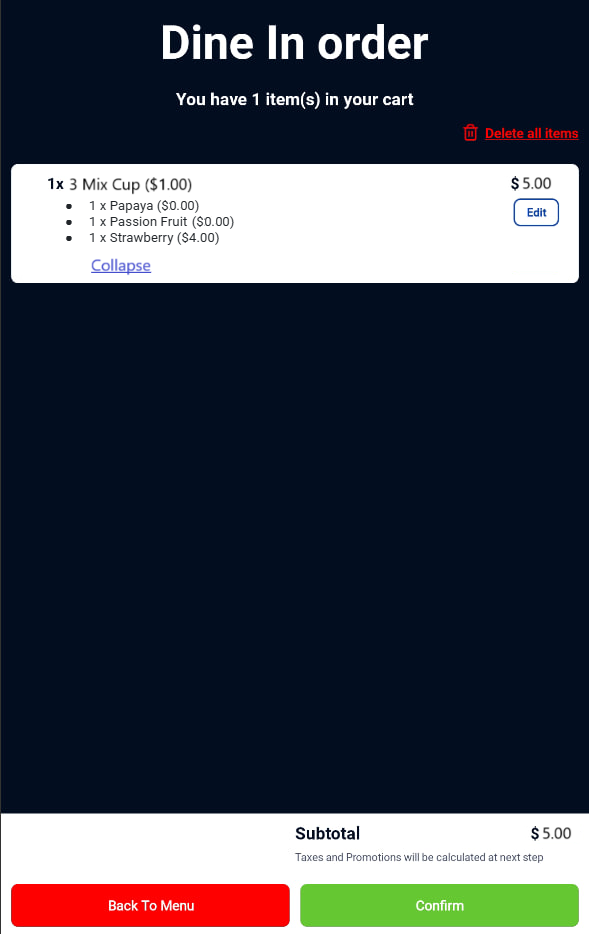
1. The customer selects an item (e.g. 3 Mix Cup) with the modifier that has the “advanced pricing” toggle enabled.

2. A note will be displayed. The customer selects the 3 fruits they want and the WebApp automatically calculates the price.
Android POS:
1. The customer selects an item (e.g. 3 Mix Cup) with the modifier that has the “advanced pricing” toggle enabled.
2. A note will be displayed. The customer selects the 3 fruits they want and the Android POS automatically calculates the correct price.
Frontend cashiers can now directly update item availability for Kiosk and Web Ordering (including separators and modifiers) in POS, without using the EPOS Backend.
How it works:
1. Cashier go to POS > 3 bars > Setting > Kiosk & Web Ordering Settings
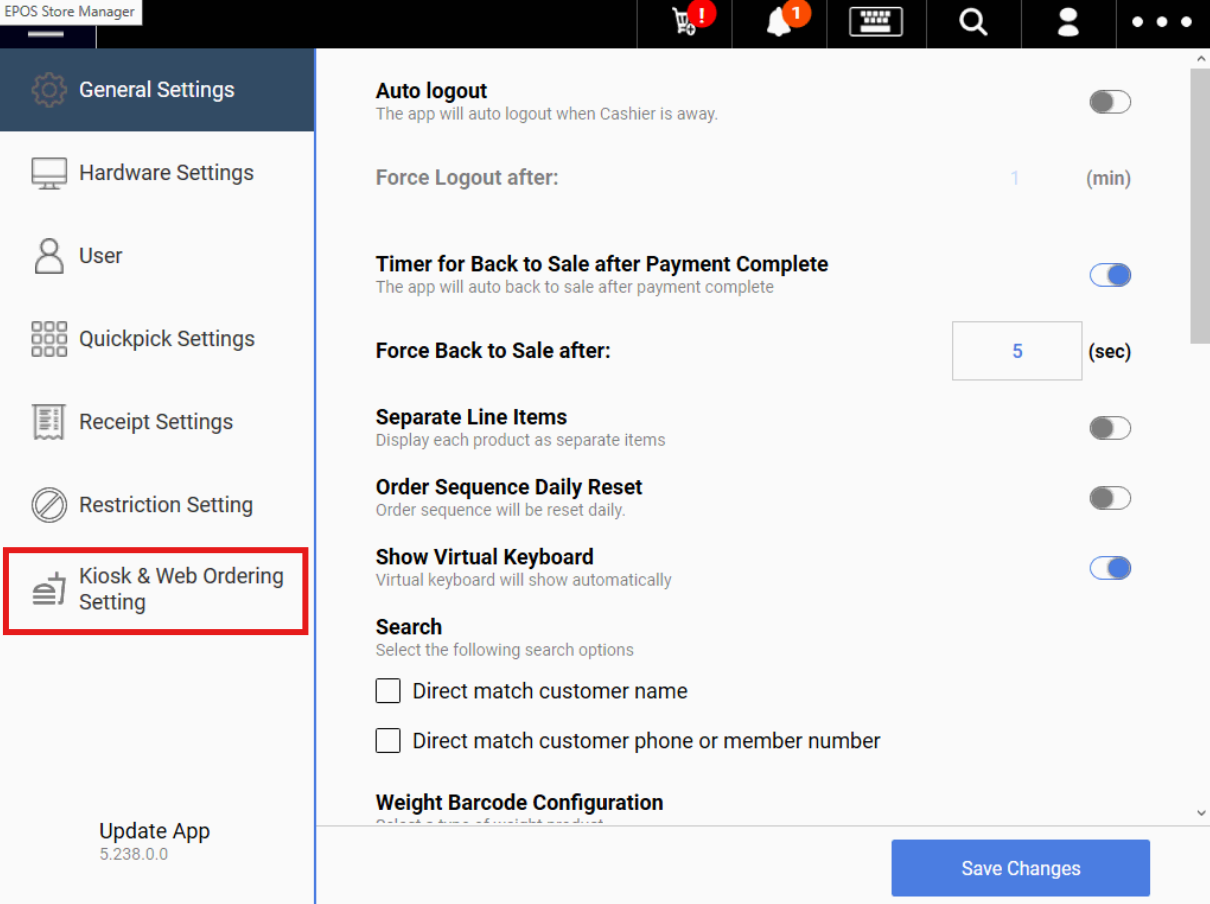
2. The cashier edits availability of products using the toggles.

3. For the Modifiers tab, there will also be a search bar where user can search for the separator/modifier name and edit the availability by toggling on or off.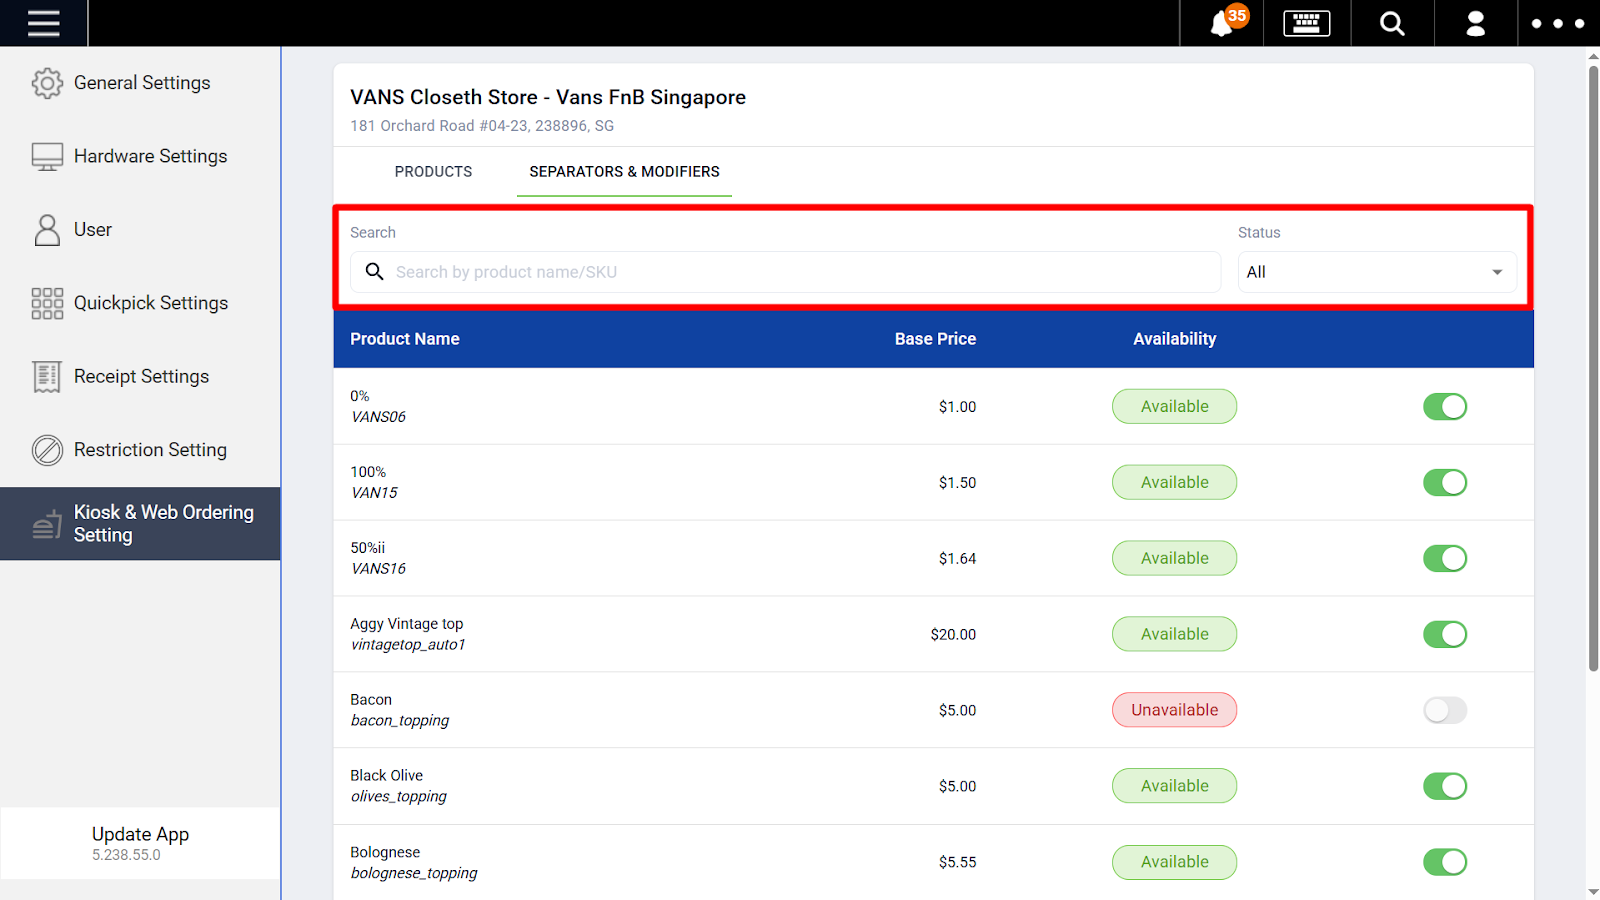
4. Once the item’s availability is updated in POS, the availability changes will be live updated across Kiosk and Web Ordering platforms.
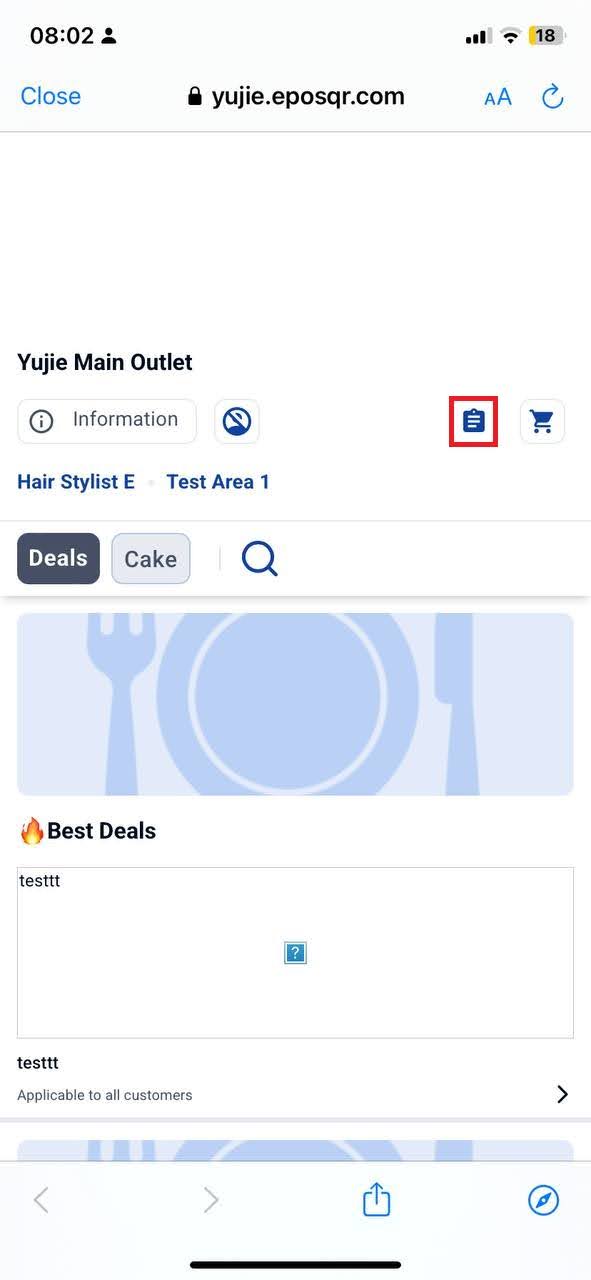
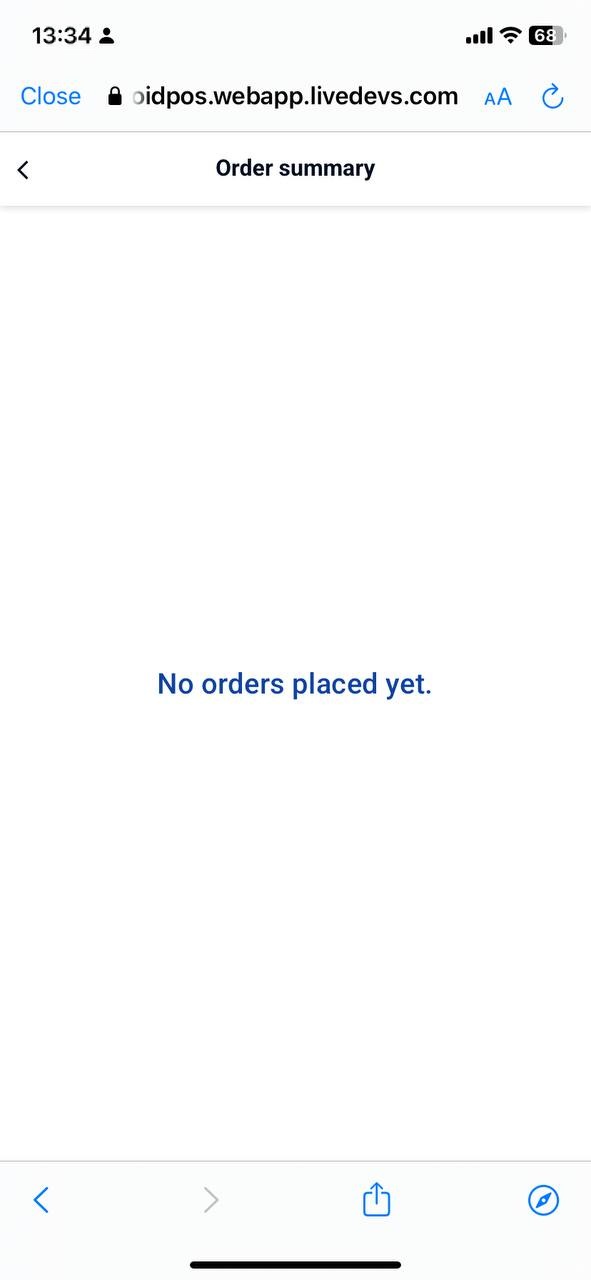
Customers can now view their order summary on the Web Ordering App when config is enabled in the BE. This is only visible when ‘pay at cashier’ is selected.
How it works:
1. Toggle on ‘Enable view order summary’ in the BE 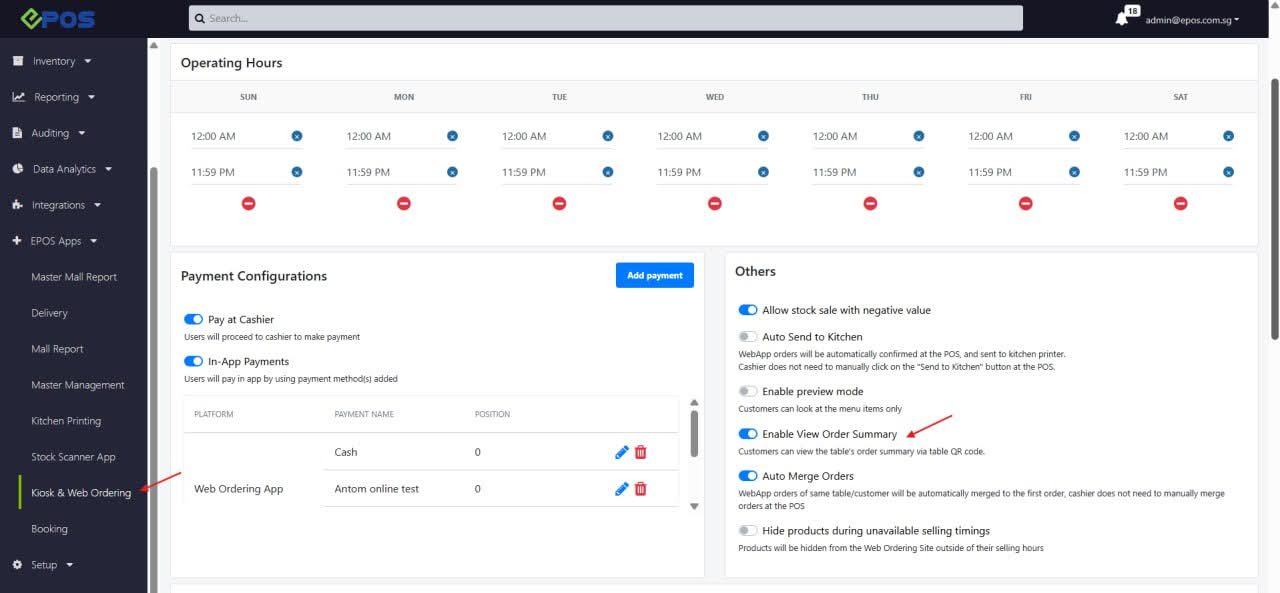
2. Order Summary icon appears on the WebApp main page. Click icon to view order summary when order is placed.

3. The order summary will be removed from the WebApp once the table is considered cleared under the following conditions:
- When the payment of the entire table is completed.
- When the order in the table is voided from the 3rd party in POS.
- When the cashier merges table (merge bill) from Table B into Table A (Table B is considered cleared)
- When cashier removes tagged table
- When cashier reassigns the table
- When cashier removes all the items in the order
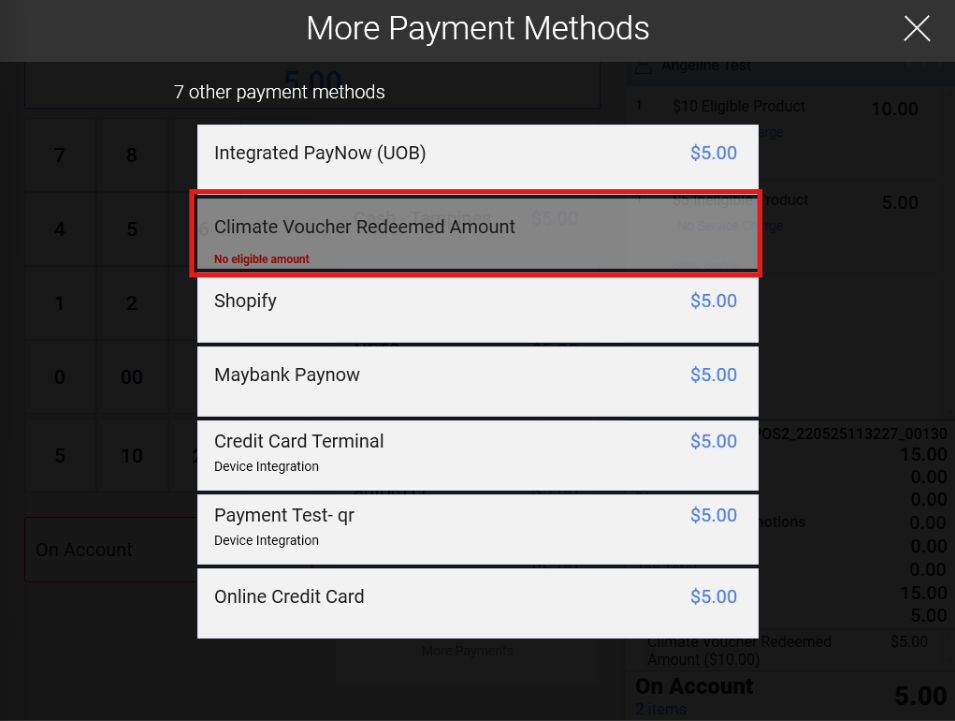
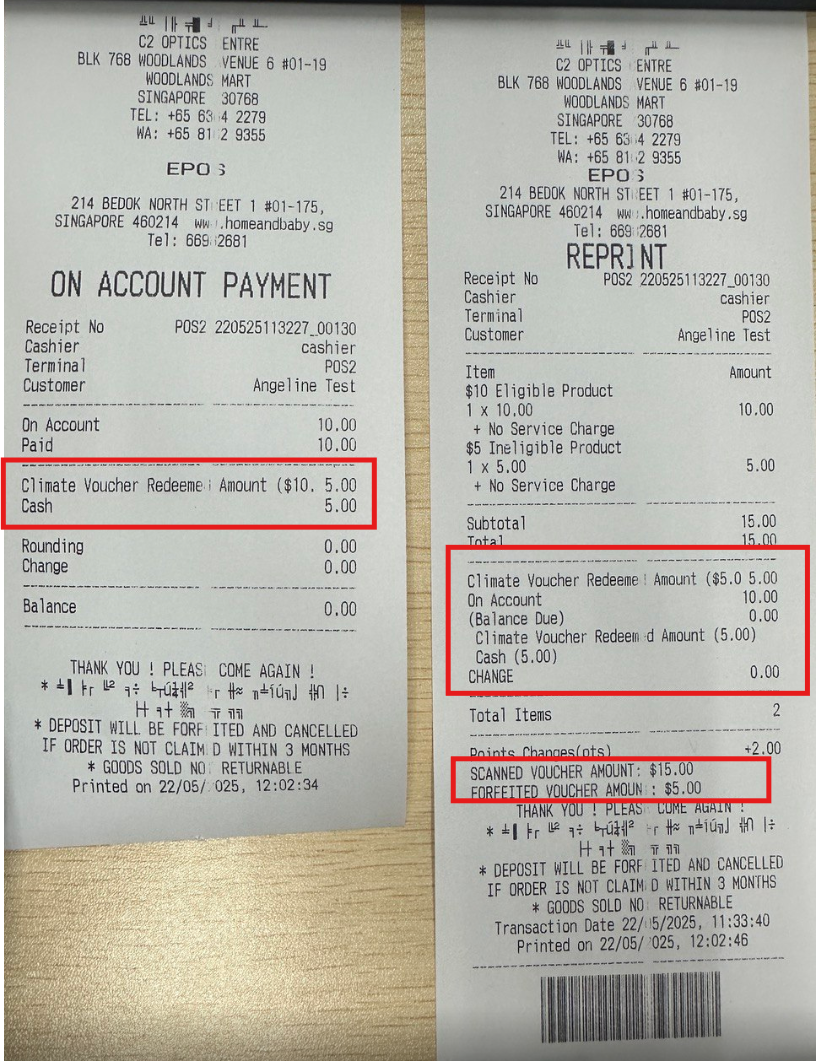
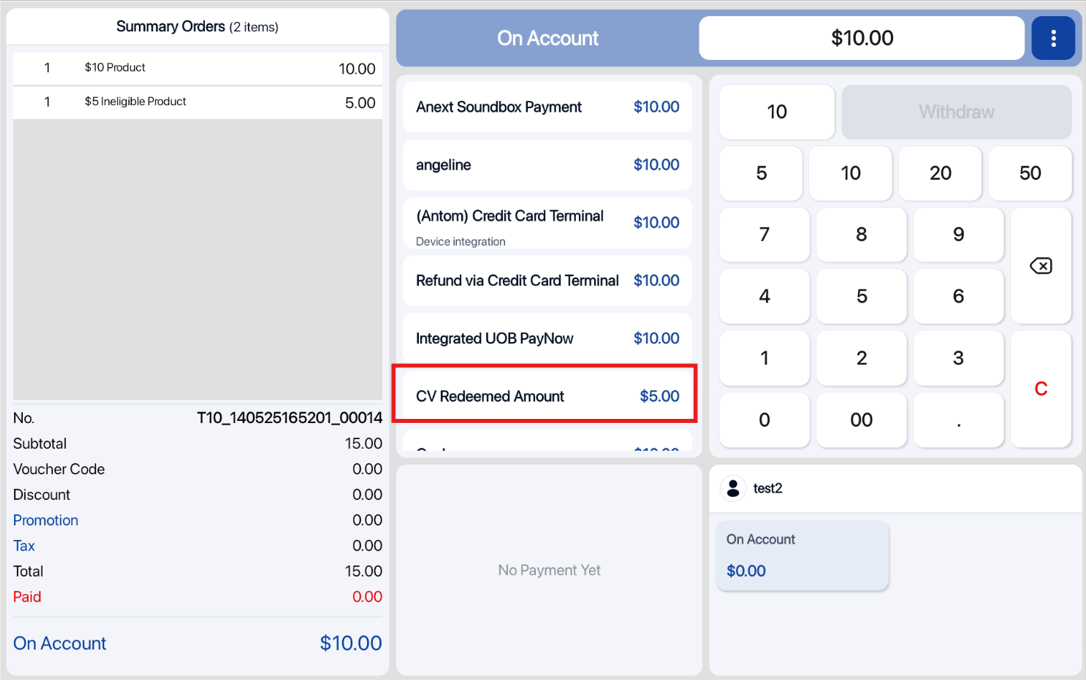
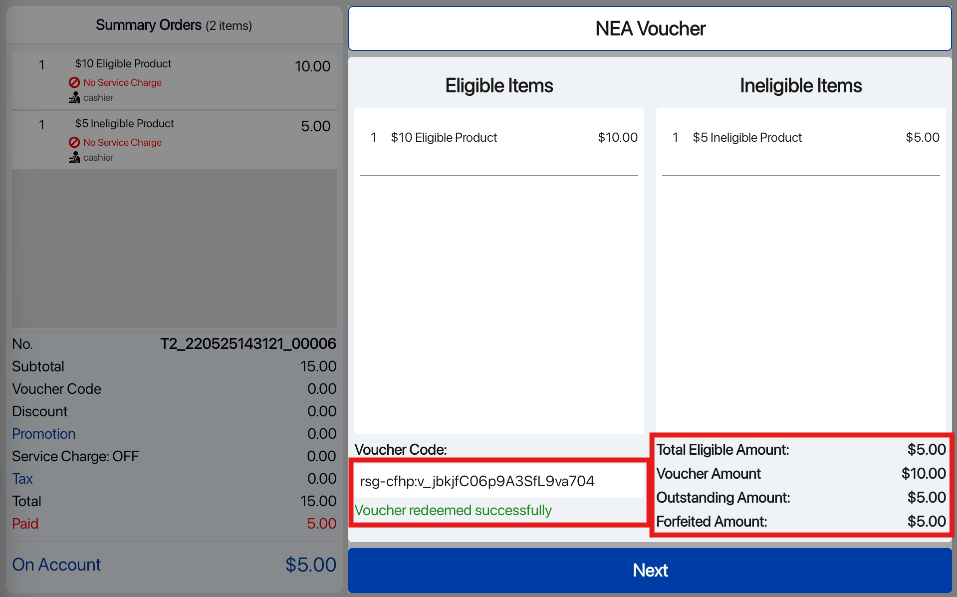
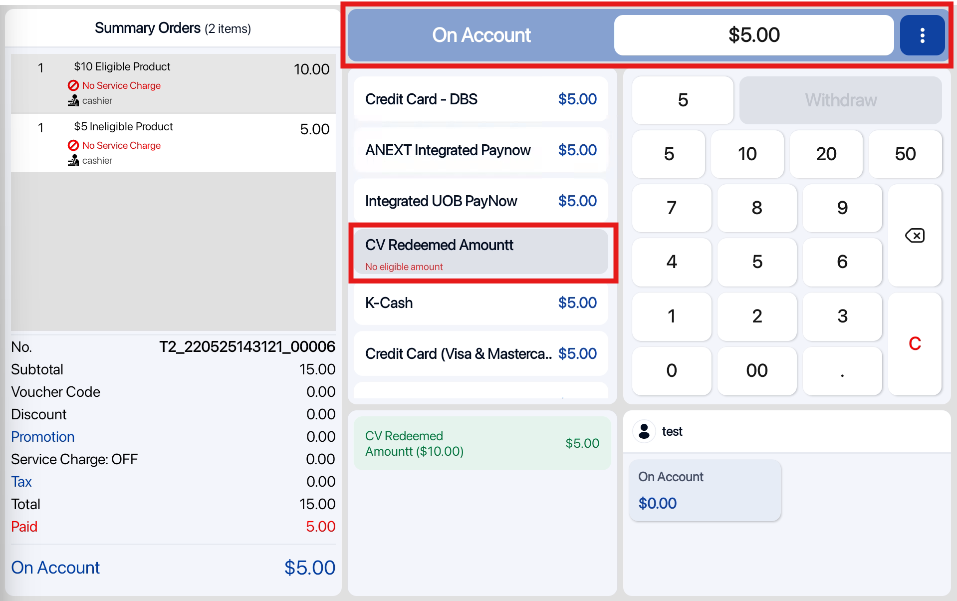
You are now able to use NEA Climate Vouchers for On Account Balance Payments if there is an eligible amount to satisfy.
POS:
1. First, retrieve the order from Order History. If there is an eligible amount that can be paid for with NEA Climate Vouchers, the corresponding payment method will show how much can be paid.

2. Simply scan the NEA Climate Voucher QR code and in the bottom right, the respective voucher amounts will be shown.

3. However, if there is no eligible amount in the On Account balance that can be paid for with NEA Climate Voucher, it will not be shown as an eligible payment method. Users can then choose to pay by other payment methods or continue with on account.
4. After payment, an On Account Payment receipt will be printed showing the ‘Scanned Voucher Amount’ and ‘Forfeited Voucher Amount’. A reprint of the sales receipt will also show the cumulative aforementioned amounts.
Android POS:
1. First, retrieve the order from Order History. If there is an eligible amount that can be paid for with NEA Climate Vouchers, the corresponding payment method will show how much can be paid.
2. Simply scan the NEA Climate Voucher QR code and in the bottom right, the respective voucher amounts will be shown.
3. However, if there is no eligible amount in the On Account balance that can be paid for with NEA Climate Voucher, it will not be shown as an eligible payment method. Customers can thus choose to pay via other payment methods instead, or continue with On Account.
4. After payment, an On Account Payment receipt will be printed showing the ‘Scanned Voucher Amount’ and ‘Forfeited Voucher Amount’. A reprint of the sales receipt will also show the cumulative aforementioned amounts.

After using Climate Vouchers for On Account Balance Payments, users can now extract the Sales Receipt and Order Note of the transaction in the Backend.
Sales Receipt:

Exported Sales Receipt:

Order Note:
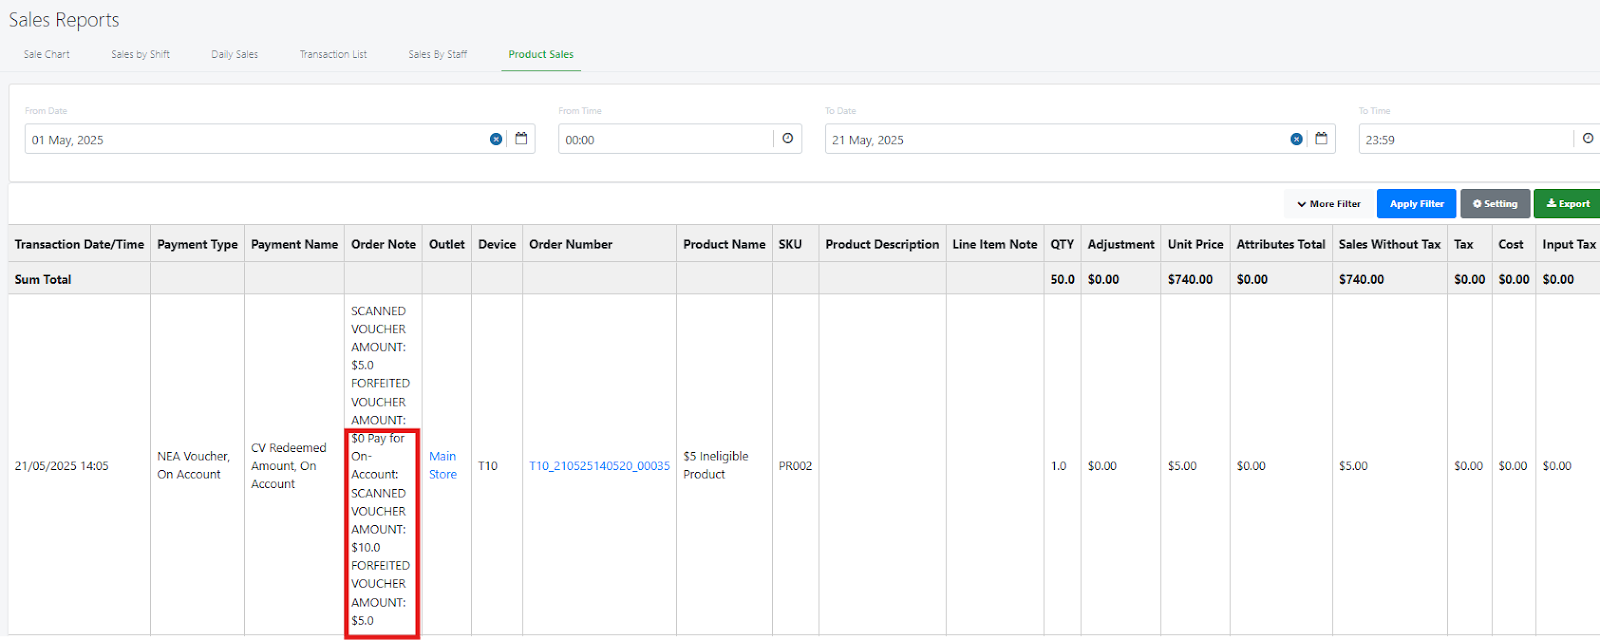
Exported Order Note:

In each receipt, the ‘Scanned Voucher Amount’ and Forfeited Voucher Amounts’ are clearly displayed.
Now, the modifier displayed on POS, Kiosk, WebApp and Android POS will follow the modifier sequence set in the BE. .
Configure modifier sequence set in the BE:

Modifier sequence displayed on POS:
Modifier sequence displayed on Kiosk:
Modifier sequence displayed on WebApp:
Modifier sequence displayed on Android POS:
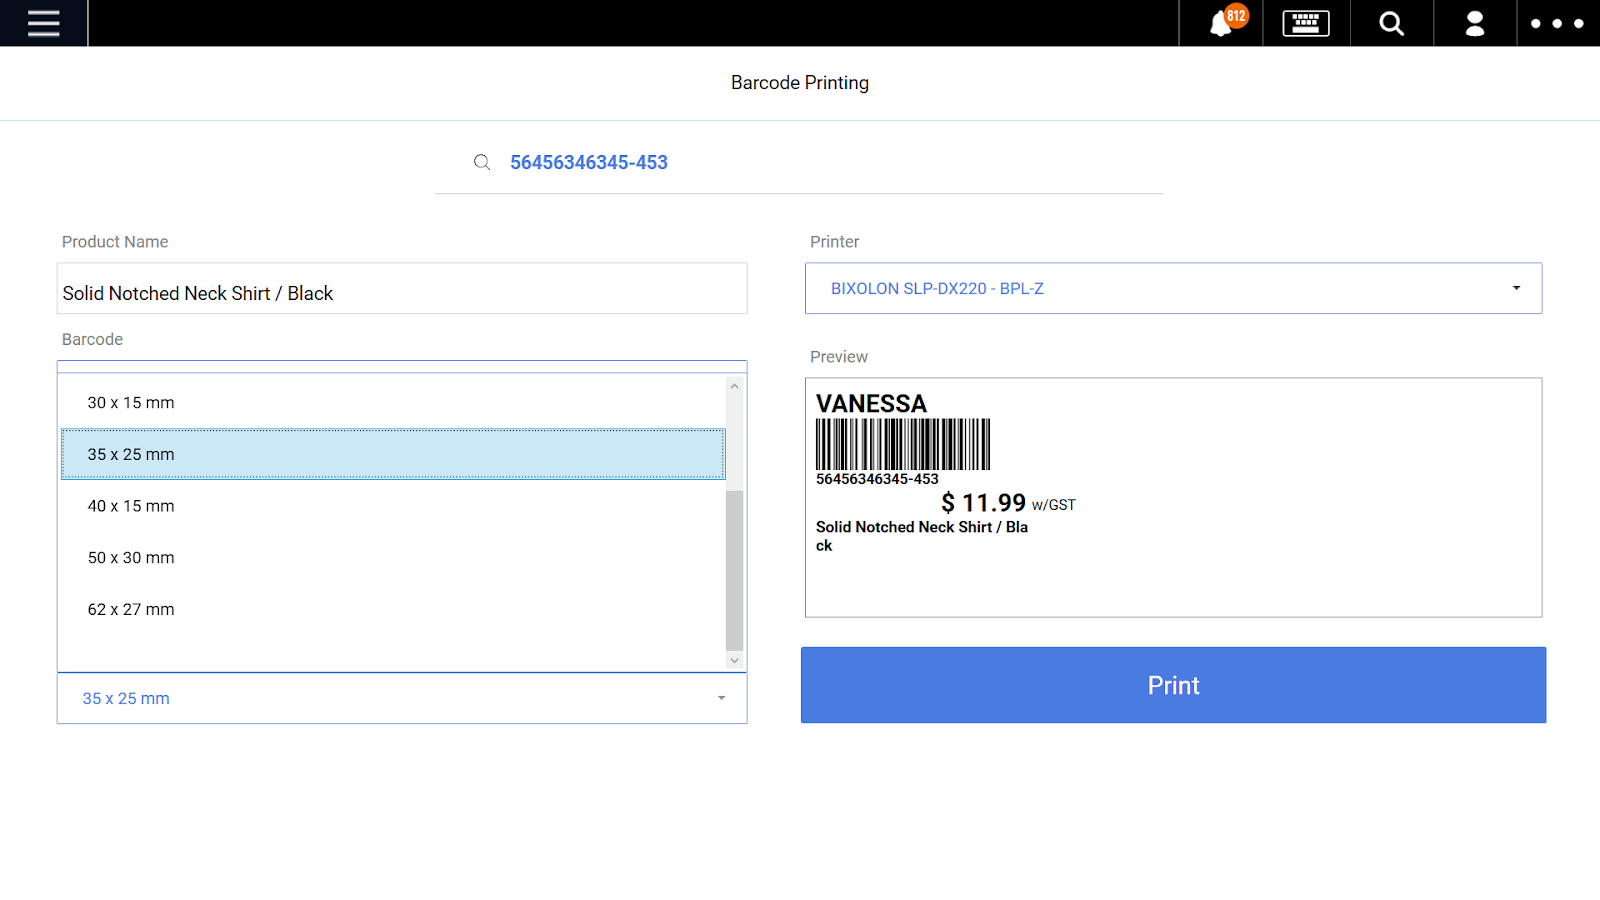
There is now a new barcode label size: 35x25mm for printer Model: TSC 244 Pro.

How to setup Printer to our POS:
- Download TSC Driver: https://fs.tscprinters.com/en/dl/4/8139
- Install driver with printer connected via USB, with USB driver
- Control Panel > Hardware and Sound > Devices and Printers > Right Click Printer > Printer properties > Tools > Driver Options > Printer Specifications
- Set Model Specifications as according to the image

Restriction:
- Maximum allowable no. of characters in barcode is 18 characters. If it is more than 18 characters, the barcode cannot be scanned.
- Product Name can take on 2 lines (roughly 58 characters), if it is more than 2 lines, it will be cut off and appended with “…”
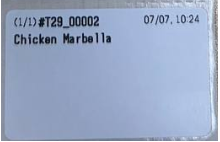
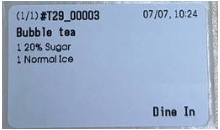
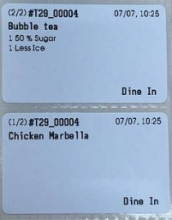
Users can now print QR Codes on Printing labels subject to the following requirements.
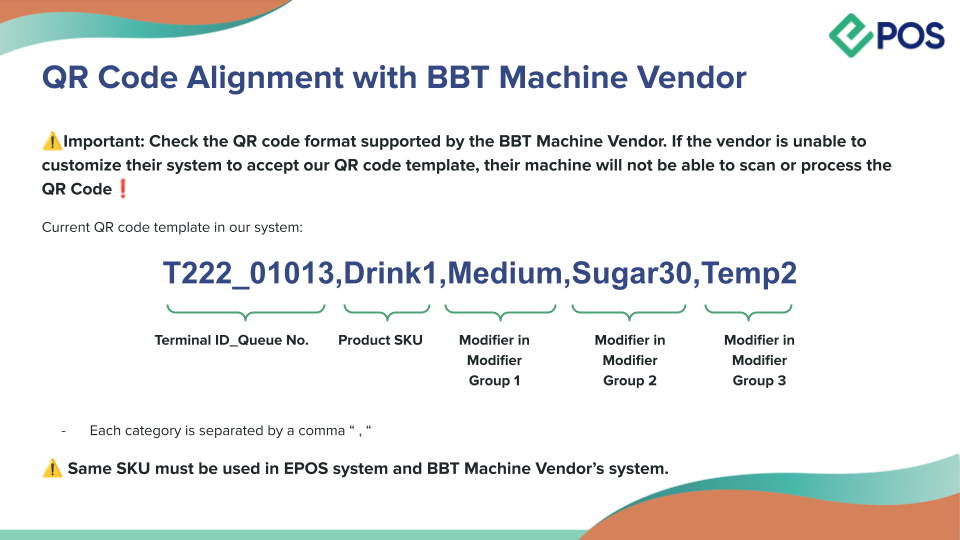
1. To configure this, go to the POS Frontend > Navigation Menu > Settings > Receipt Settings
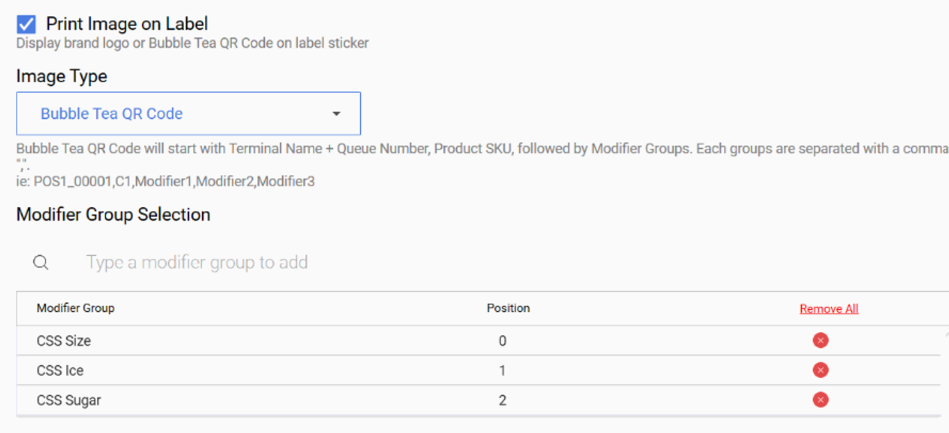
2. Set ‘Image type’ to ‘Bubble Tea QR Code’ and add the corresponding modifier groups in ‘Modifier Group Selection’. Sequence of Modifiers in the QR Code is based on the Position configured in POS.
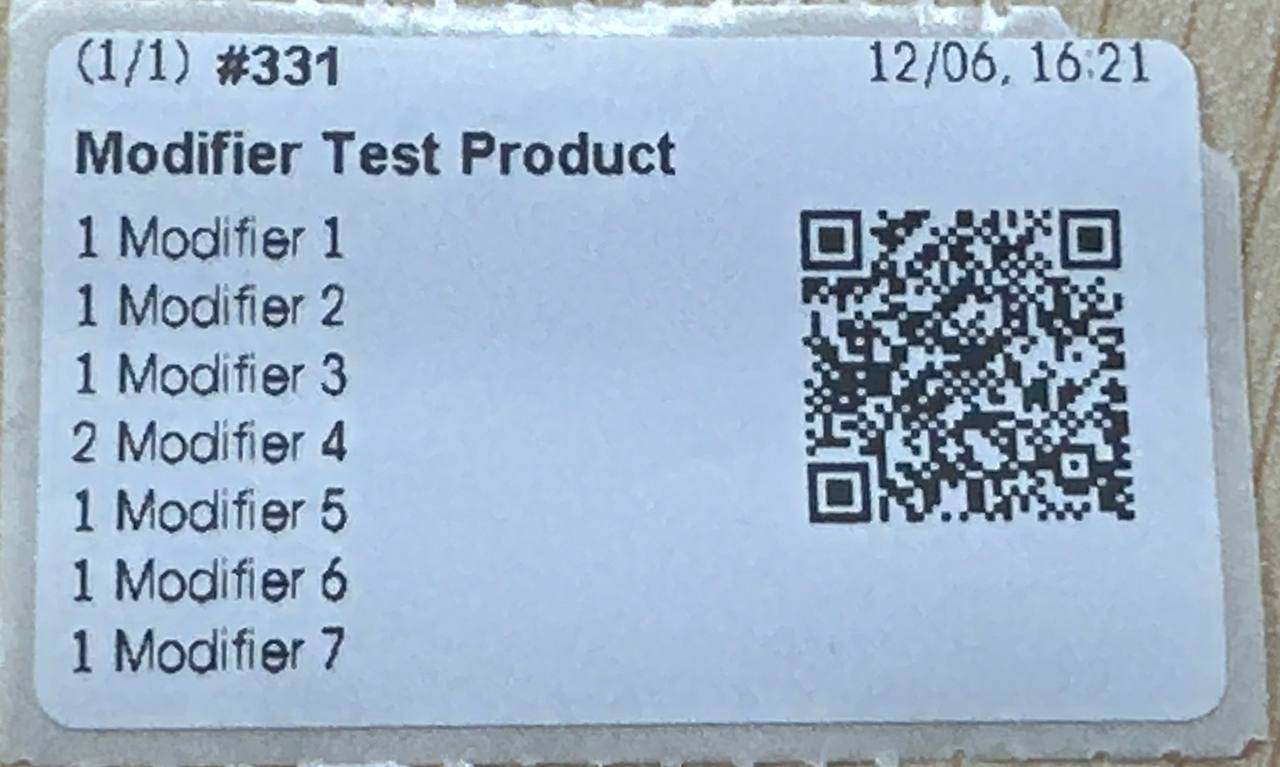
3. The result printing label will contain a QR code with the product and modifier sequence. Do note that only modifiers in modifier groups included in ‘Modifier Group Selection’ will be printed in the QR code.
QR Code Rules:
- If Modifier Group is not added into the Bubble Tea QR Code configuration in the POS, the modifier will NOT BE printed in the QR code. However, it will still be listed in the label sticker to inform user that there’s this modifier.
- If the Product has no Modifiers / No relevant Modifier Groups added in the POS, no QR Code will be printed on the label sticker.
You may now integrate the Soundbox with POS.
Soundbox Set Up
Connect the Soundbox to the POS via a USB cable that supports data transfer.
Then in POS, go to Setting > Hardware Settings > Integrate Soundbox.
Select the Correct Port and Save Changes.

Anext PayNow
The soundbox will act like a second screen when Anext PayNow payment option is selected in the POS.
Soundbox Screen when Anext PayNow payment method is selected:

After a payment is made, payment succeeds on POS and Soundbox with audio and visual notification. No sound will come from Windows POS.
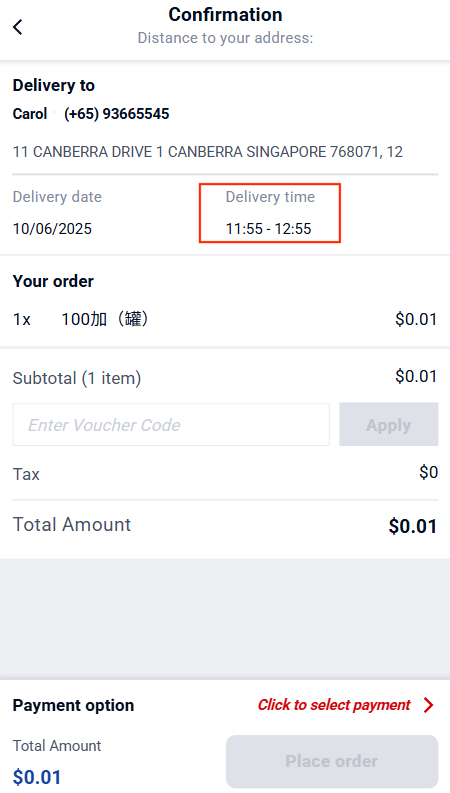
Delivery time now shows as a range (e.g., 10:30 AM – 11:30 AM) instead of a fixed time.
How it works:
1. User add items to cart and select delivery on the WebApp. Delivery time shown as a range.
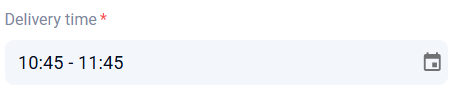
2. A note ‘Delivery starts from this time’ will be shown when user clicks the calender icon.
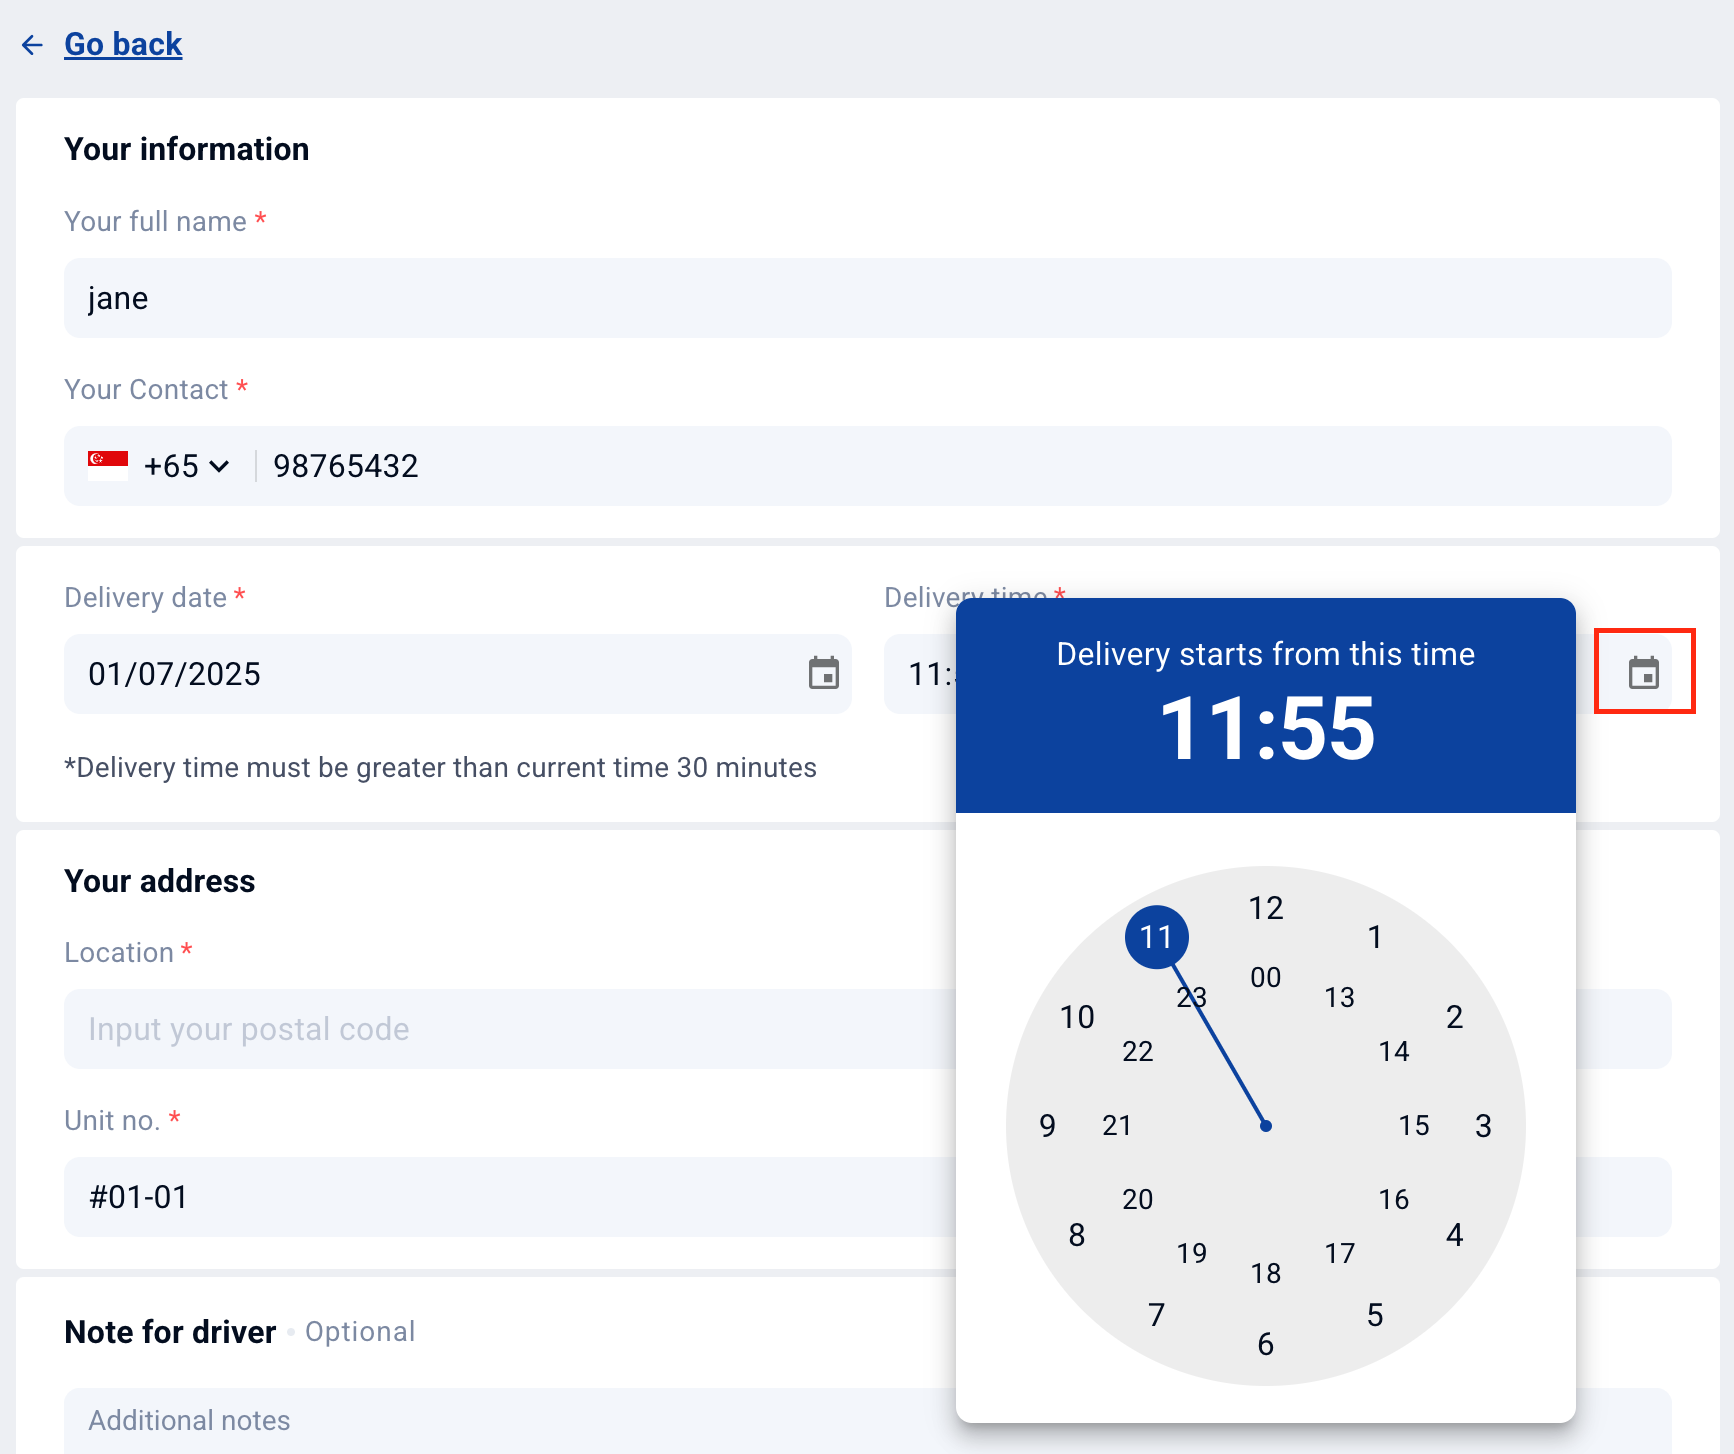
3. The review confirmation page will also show the delivery time range.
Multi-terminal receipt printing is now enabled, allowing all Android tablets connected via LAN to independently send print commands to a shared receipt printer.
Note: Android Slave POS only needs receipt printer setup. Kitchen printer is setup in the Master POS.
How it works:
1. The waitress takes an order using any of the slave Android tablets.
2. Upon confirming the order, the POS app sends a print command to the LAN-connected receipt printer.
3. A pre-settlement receipt is printed from the shared printer for customer review, order is fired to kitchen and kitchen slip is printed
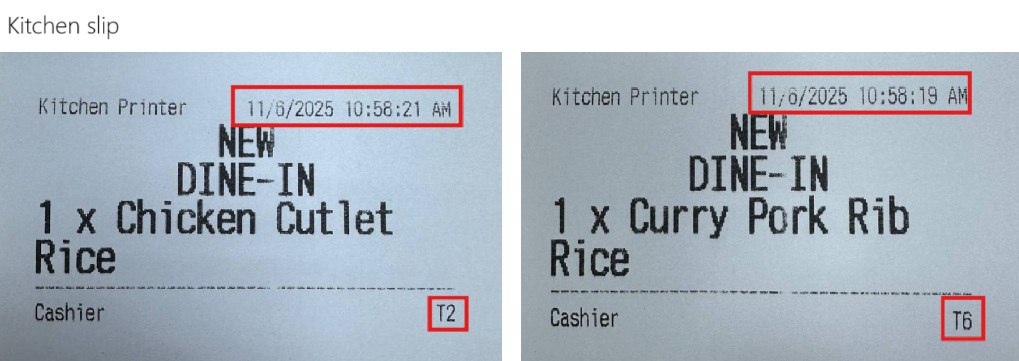
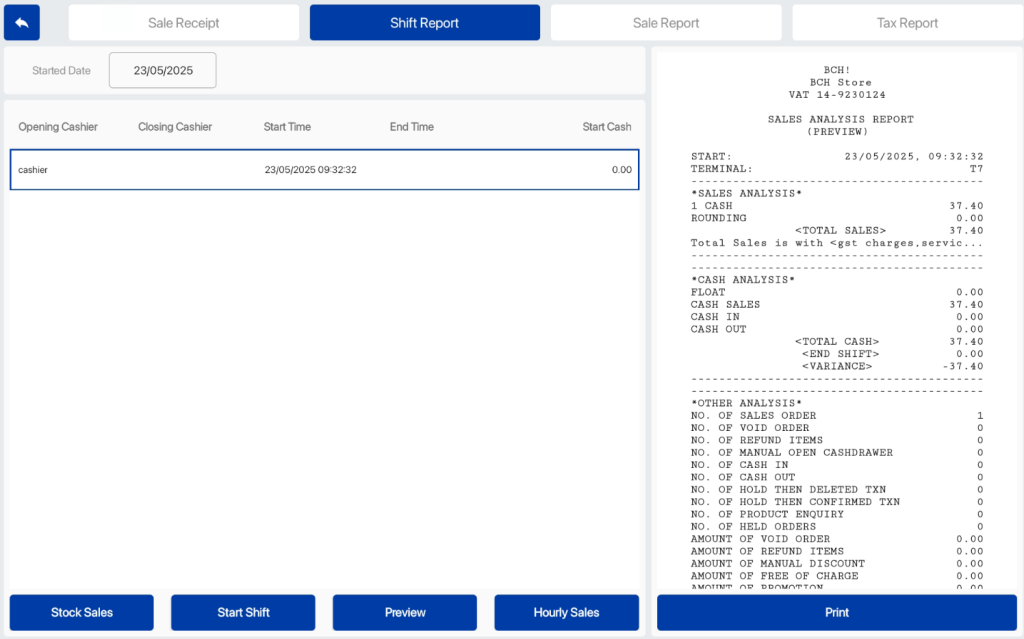
4. After the customer finishes dining, the cashier prints out the sales receipt.
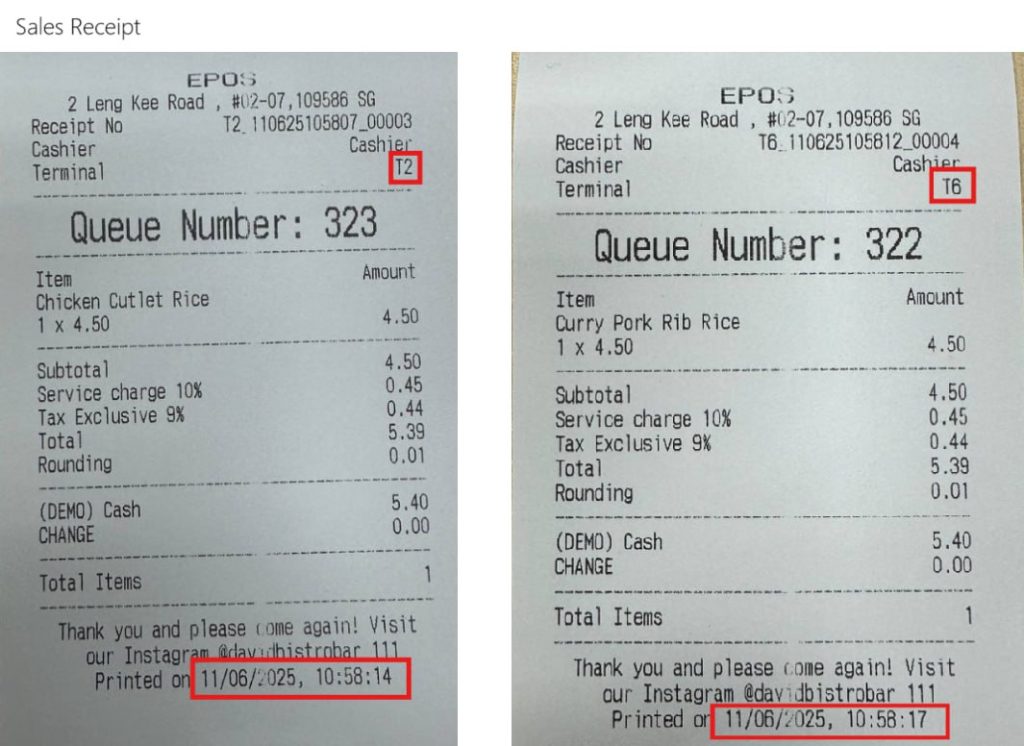
5. At closing time, the cashier prints the shift report and sales report for the day.
Our Soundbox now supports Chinese language audio notification.
How it works:
1. On Soundbox, User press F1 > Language > Chinese
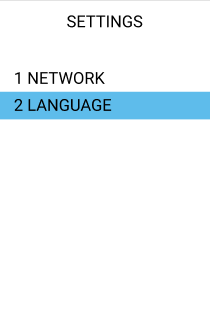
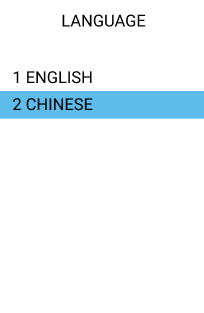
2. Pop-up displays “Set up Successful”. Audio notifications played from Soundbox will be in Chinese language.

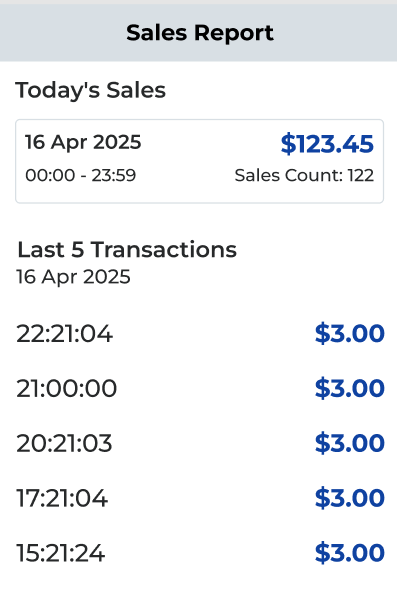
Our Soundbox now allows users to view the daily sales report and latest payment transactions.
How it works:
- User clicks on the F2 Button on Soundbox.
- Sales report will be displayed on the screen
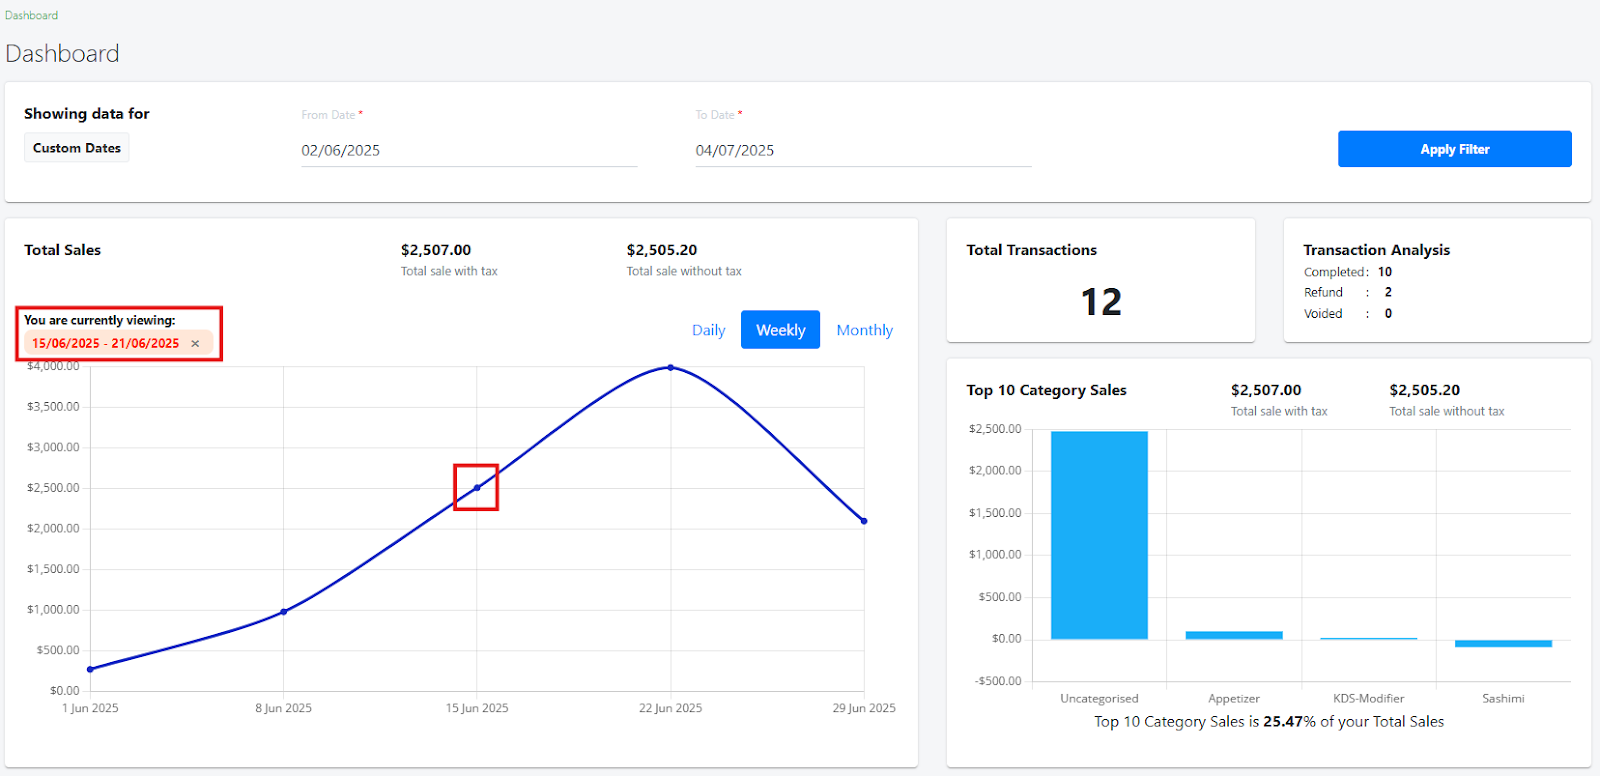
Users can now get better information on the sales and transaction data on the backend dashboard.
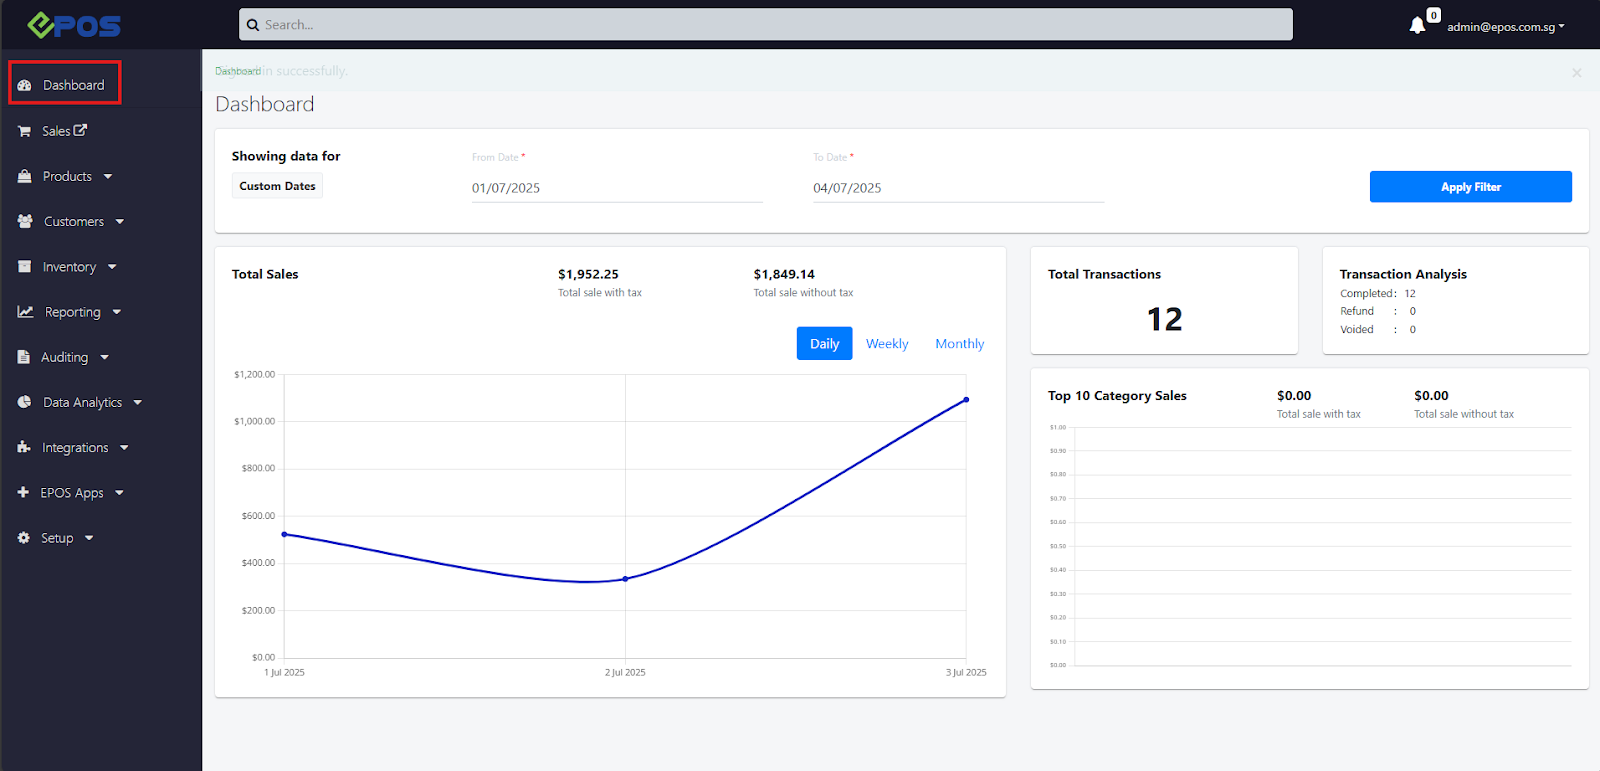
New functionalities:
- Global Date Filter: Custom Start and End Date
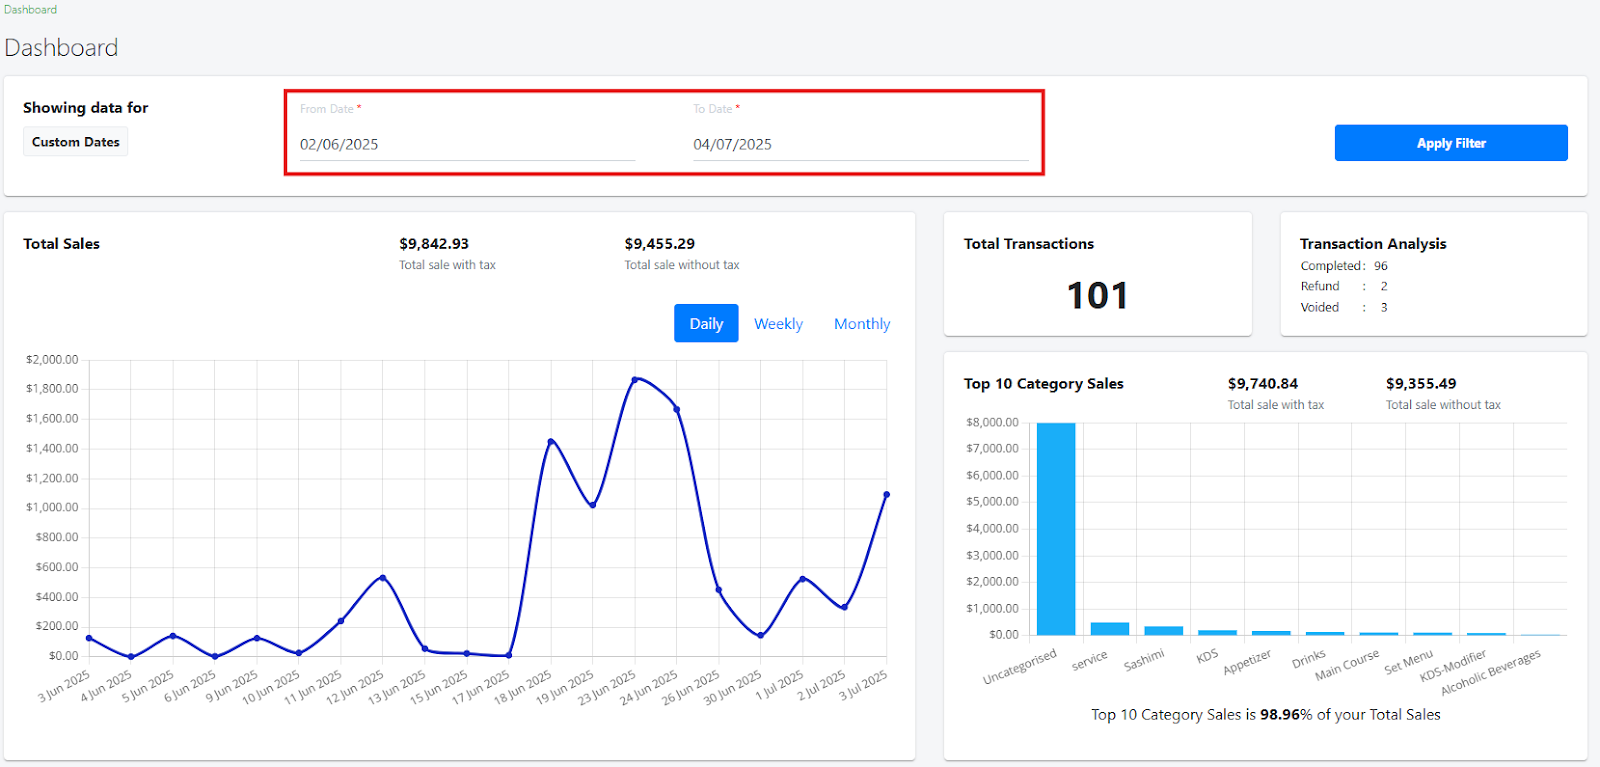
- Aggregate data by Daily, Weekly or Monthly Sales
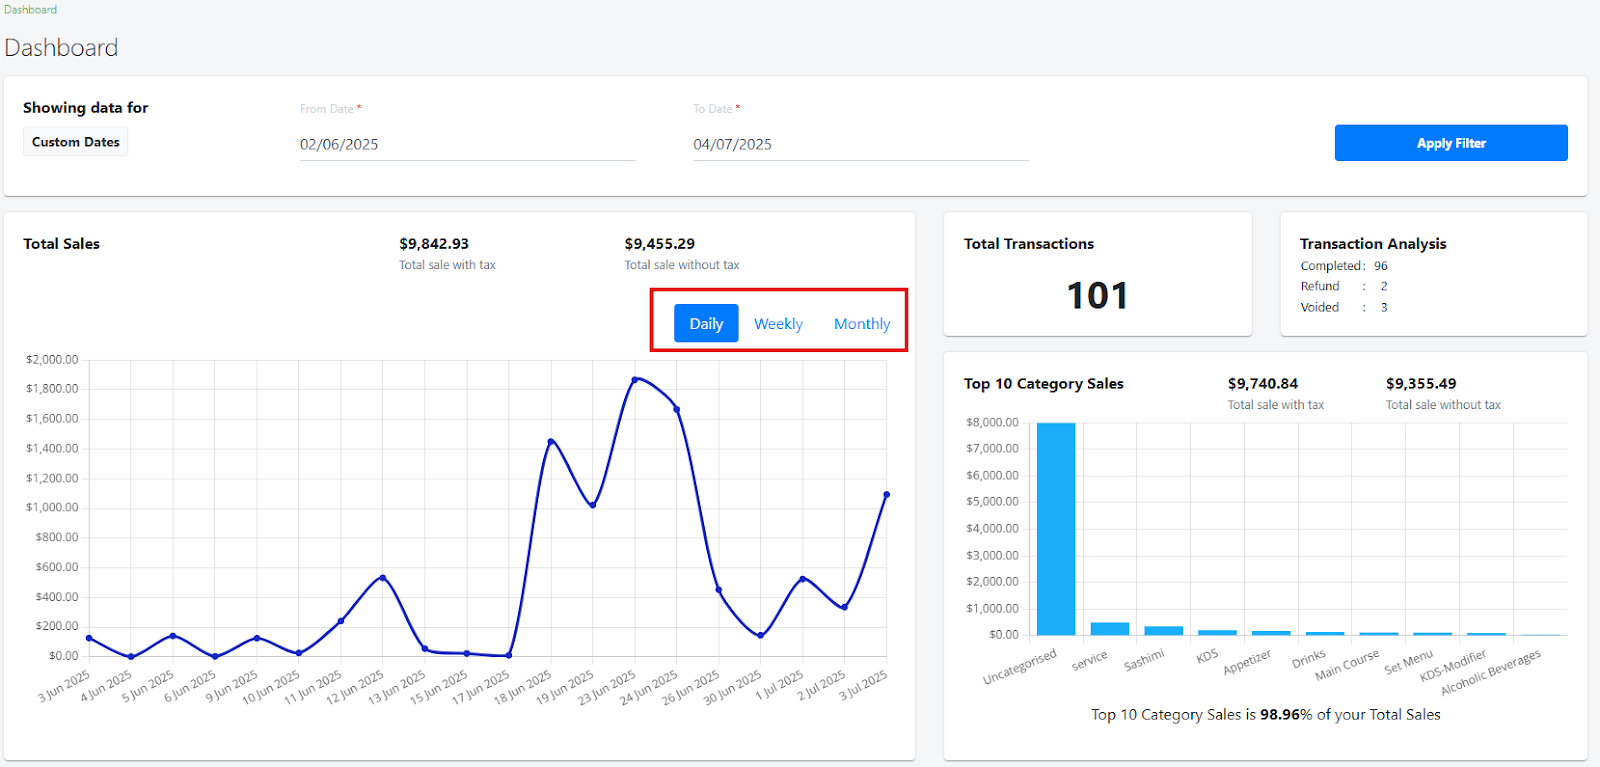
- Perform cross-filtering with a specific Category: Click on the category in “Top 10 Category Sales”

- Perform cross-filtering within a specific time-period: Click on the data point in “Total Sales”
Users can now choose to print labels for modifier products only on the Android POS.
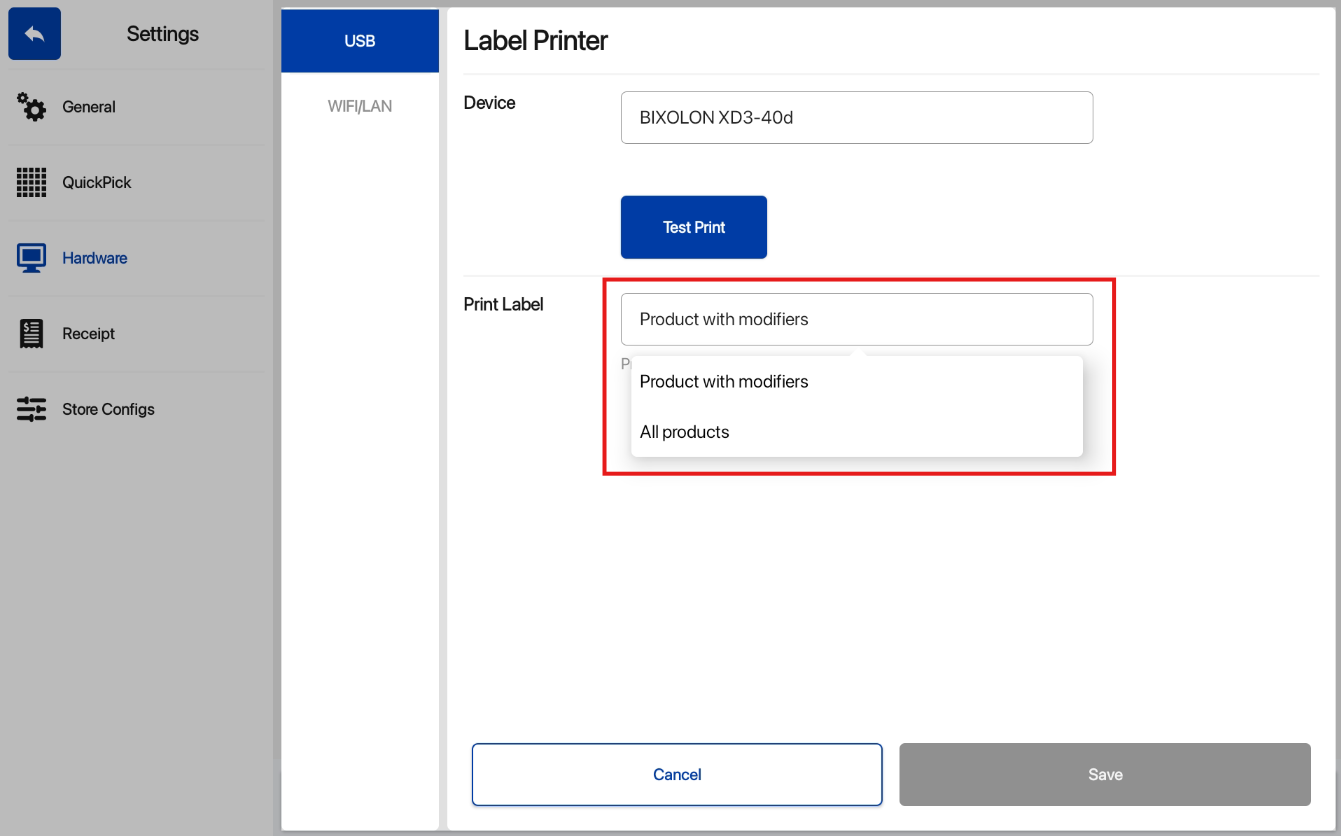
Config Setup
Navigate to Settings > Hardware > Label Printer
Select the Device and select the Print Label option:
- Product with modifiers: Only modifier products can be printed on kitchen label
- All products: All products can be printed on kitchen label
Below is a table showing the result of Label Printing based on the Print Label option:
|
Print Label Option |
Order Details |
Result of Label Printing |
|
All Products |
Normal products only |
Normal products label printed
|
|
All Products |
Modifier products only |
Modifier products label printed
|
|
All Products |
Normal products and modifier products |
Normal products and modifier products label printed
|
|
Products with modifiers |
Normal products only |
No label printed |
|
Products with modifiers |
Modifier products only |
Modifier products label printed
|
|
Products with modifiers |
Normal products and modifier products |
Only modifier products label printed
|
How to Update
For POS related features, user will need to update the POS to the latest version, version 5.224.0.0.
For Backend related features, user are not required to perform any actions, the new features would automatically be updated.
Feedback
We value your input! If you encounter any issues or have suggestions for further improvements, please don’t hesitate to contact us.
Stay Connected
Stay updated with the latest news and updates by following us on our social platforms.
Thank You
We appreciate your continued trust in EPOS. This update is just one of many steps we’re taking to provide you with the best POS system on the market.
If you have any questions or need assistance with the update, please contact our support team at:
Call: 6871 8833 / Email: [email protected] / Whatsapp: 8482 1888
![]()