
December 2025
This November, several features across our Portrait POS, Android POS have implemented features to enhance the experience of both the users and customers.
What’s New
Not sure which affects you?
These icons indicate which group of users is impacted by each enhancement: Point of Sale (POS) users, Backend users, or Web Ordering App users.
(🖥️ POS — ⚙️ Backend — 📱 Web Ordering App — 🤖 Android POS — 🗣CRM — 👨🍳 Kitchen Display System (KDS) — 📦 Stock Take Device — 🔊Soundbox — 🛒 Kiosk )
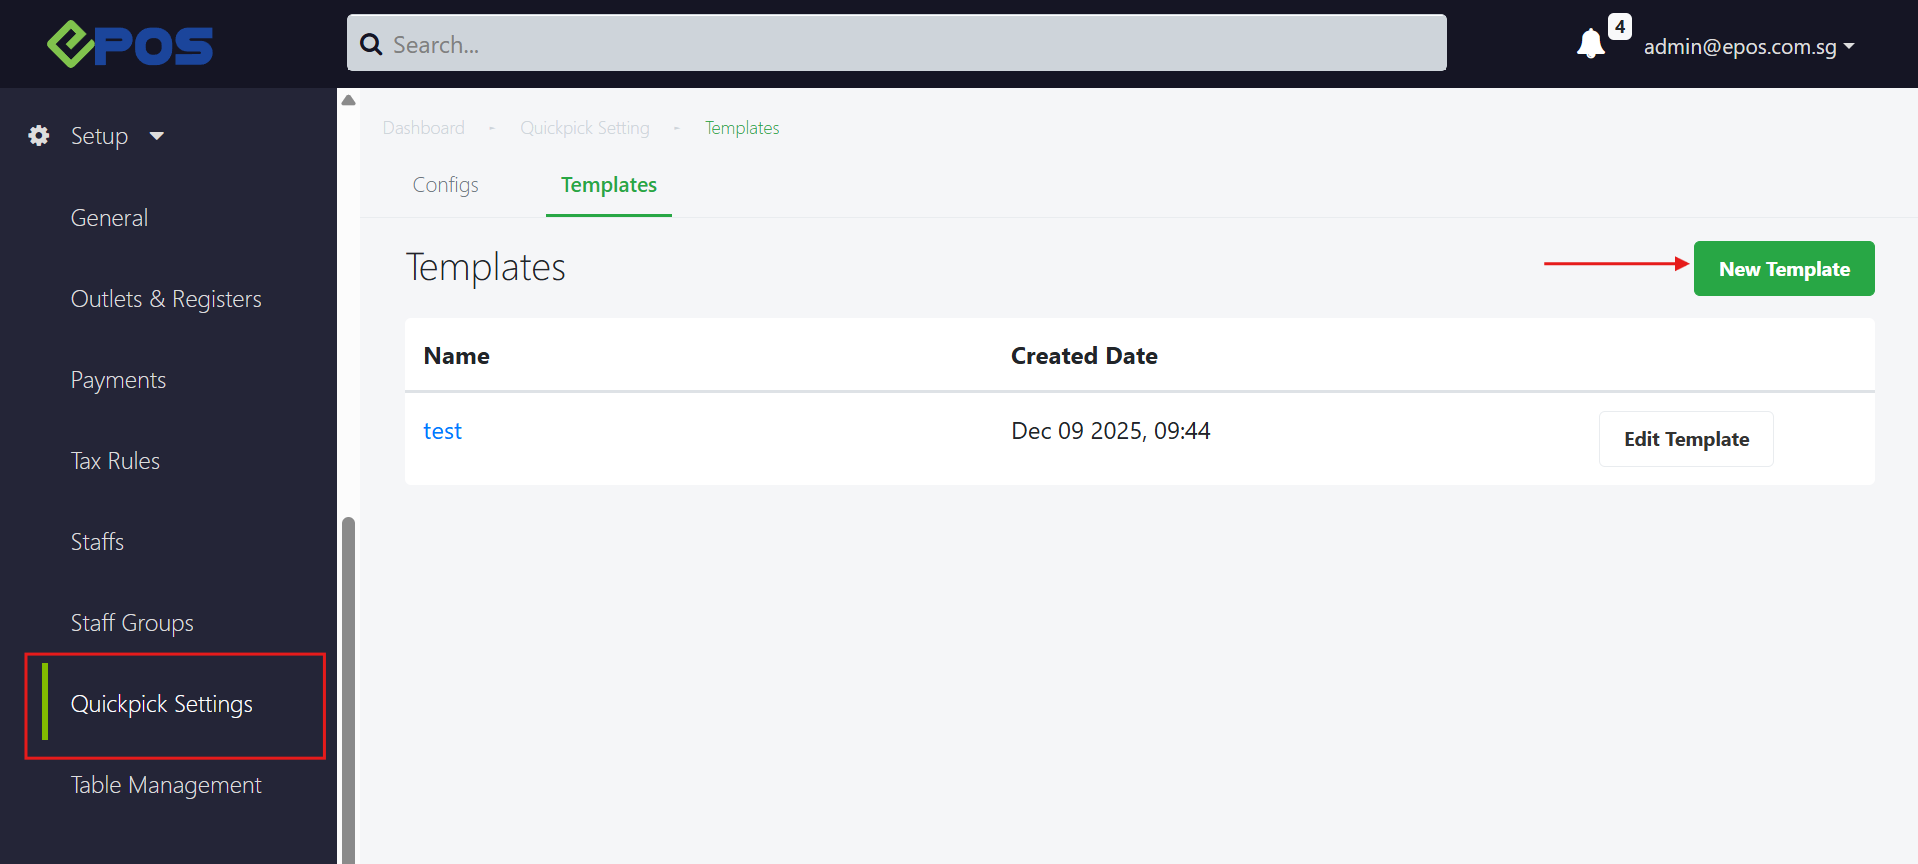
You can now manage your Quickpick layouts directly from the EPOS Backend, instead of editing them individually on the POS.
To access Quickpick Settings in the Backend Portal, navigate to Backend Portal > Setup > Quickpick Settings.
1. Users can select “New Template” to create their own Quickpick layout templates.
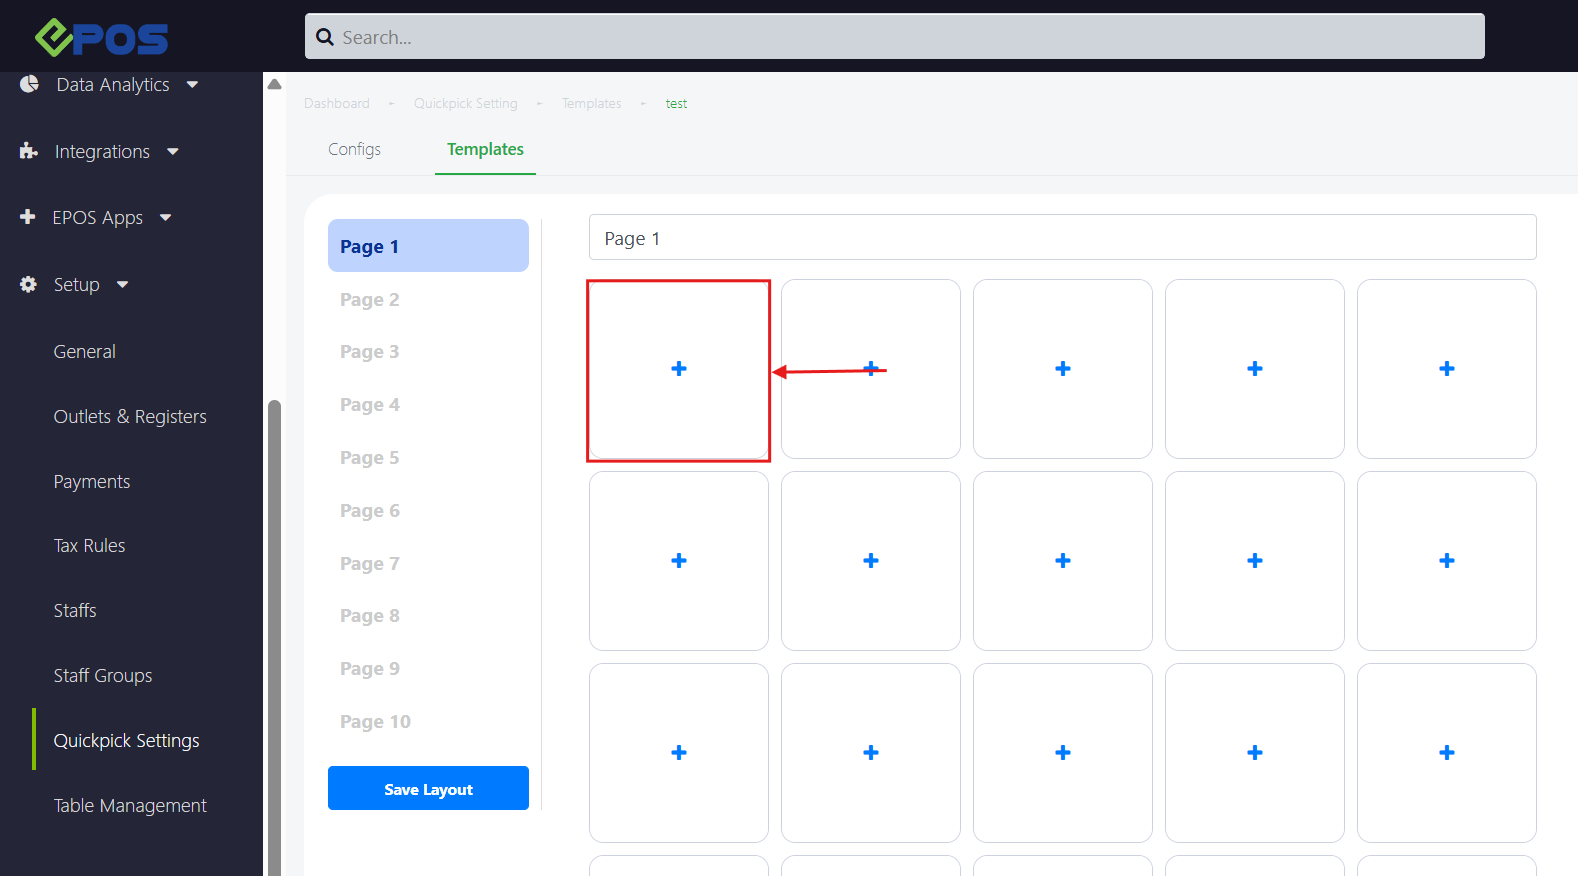
2. This is where users can customize their Quickpick layout within the backend.
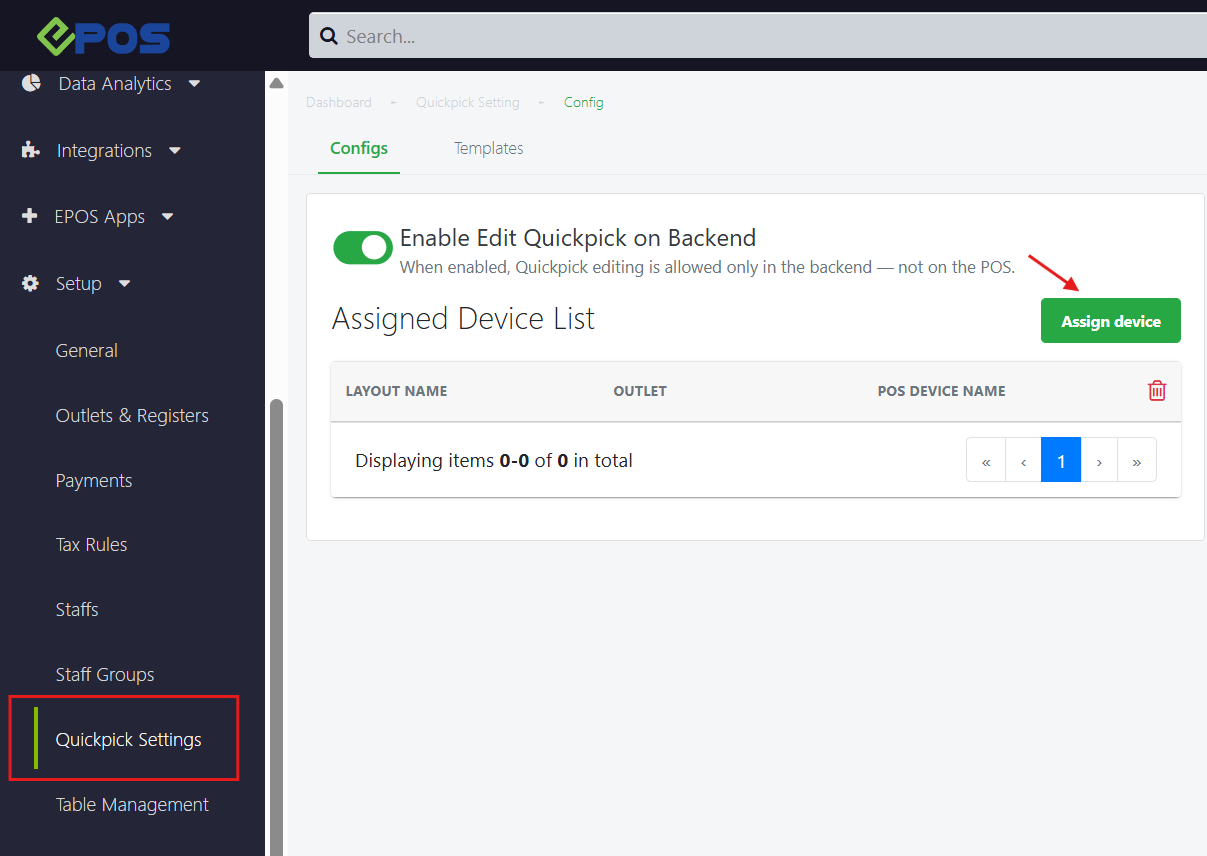
3. Users can assign existing templates to their desired devices.
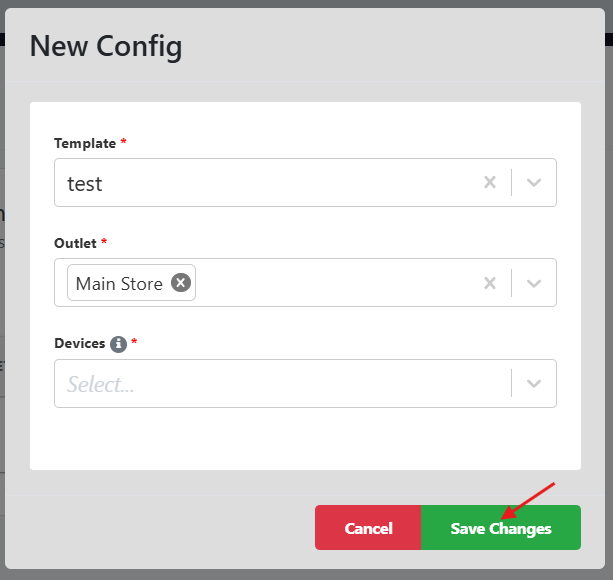
4. Users can select the template, outlet, and specific devices they would like to assign the template to.
Note: You must configure the setting to choose whether Quickpick layouts are edited via the Windows POS, Android POS OR via the Backend Portal.
For more information, please click on this link.
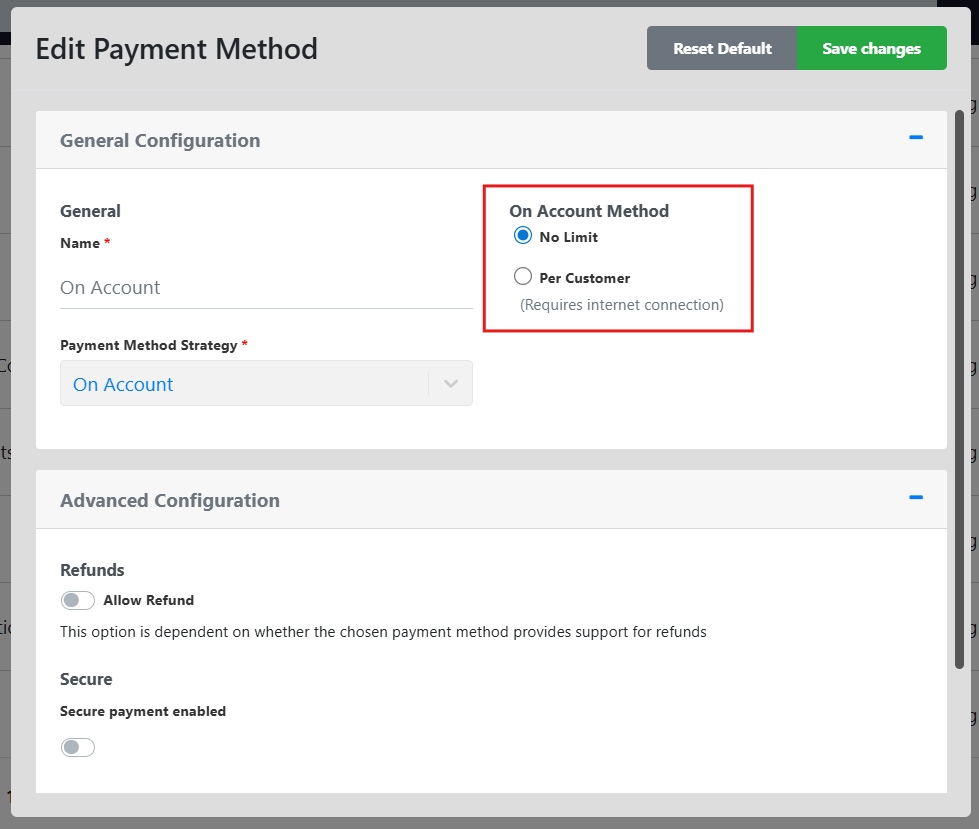
We have enhanced the “On Account” payment method with two configuration options:
- No Limit: Allow credit payments regardless of amount.
- Per Customer: Set a specific maximum credit limit for individual customers.
User can navigate to Backend Portal > Setup > Payment > On Account to configure if they would like to impose a limit on this payment method.
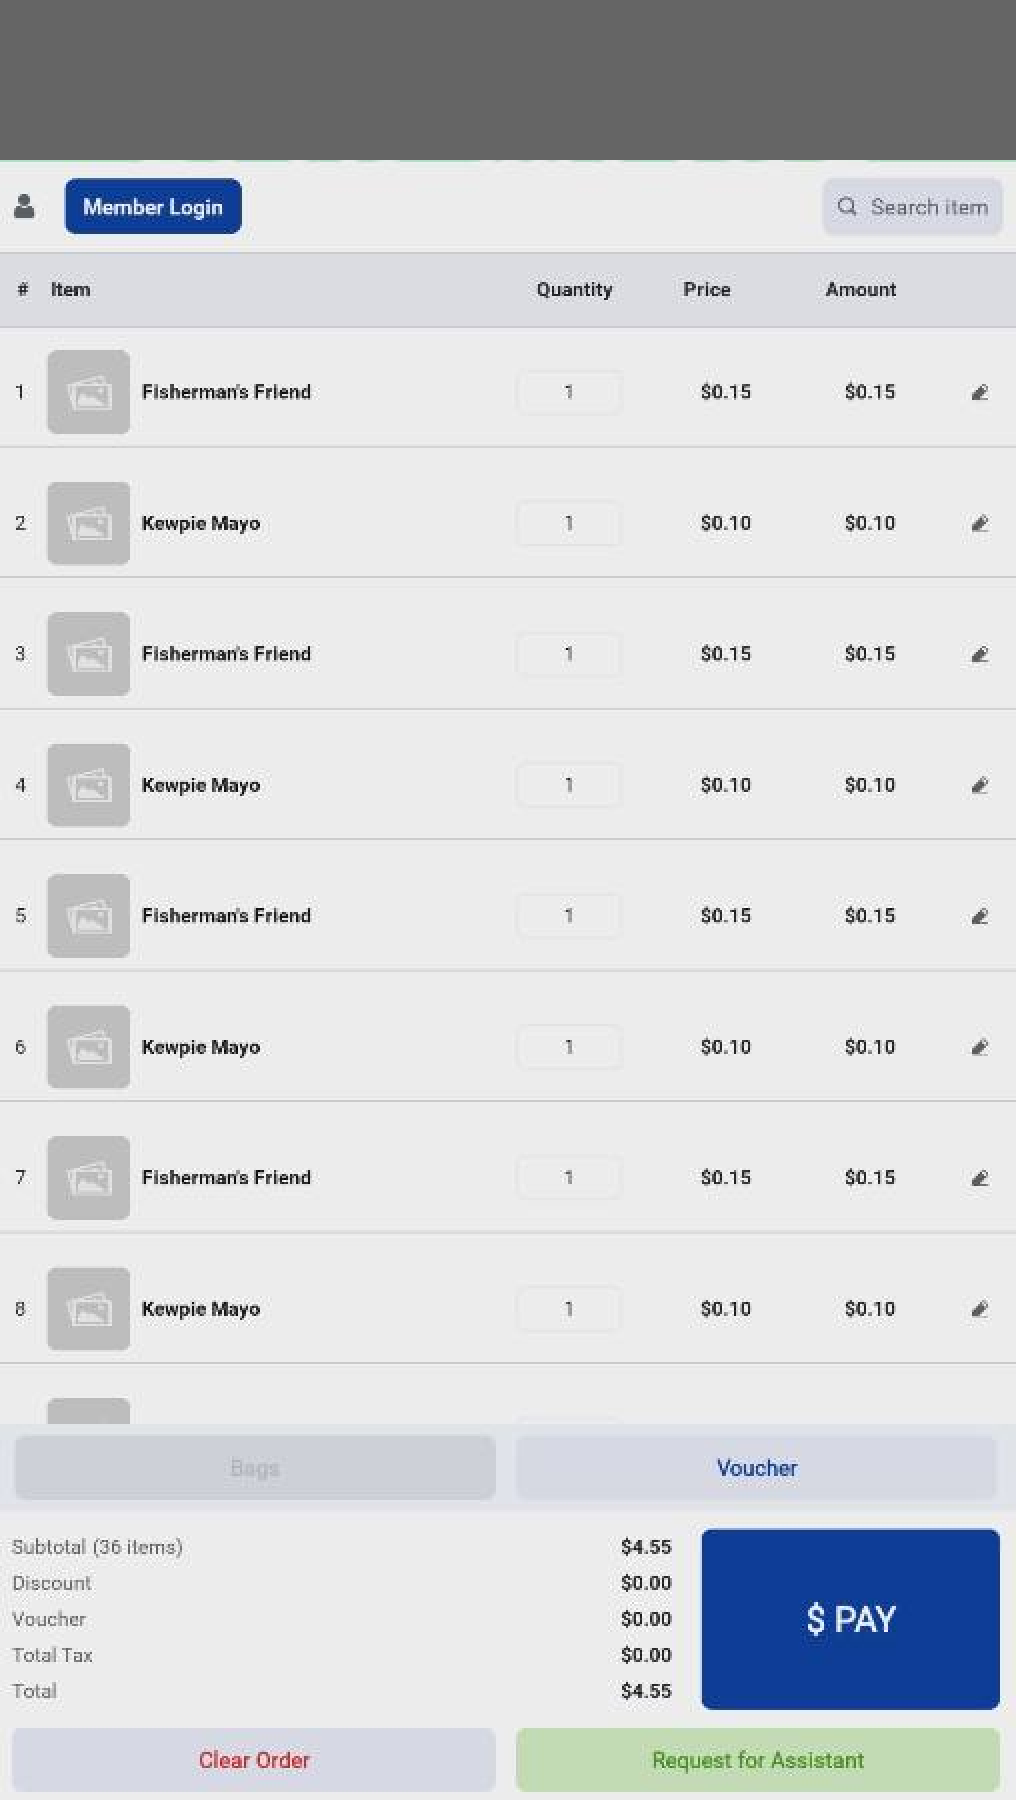
Below is an example of On Account Limit on Windows POS:
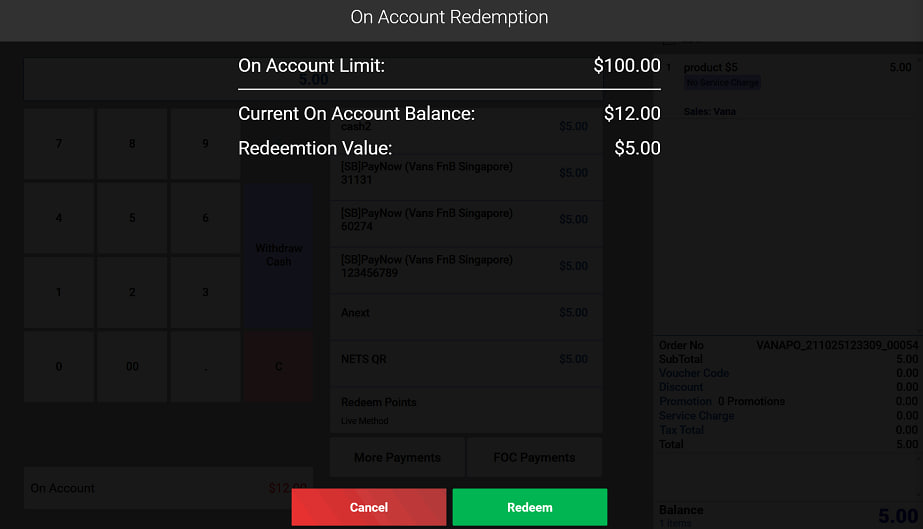
Note: The “Per Customer” limit feature requires a stable internet connection to verify balances.
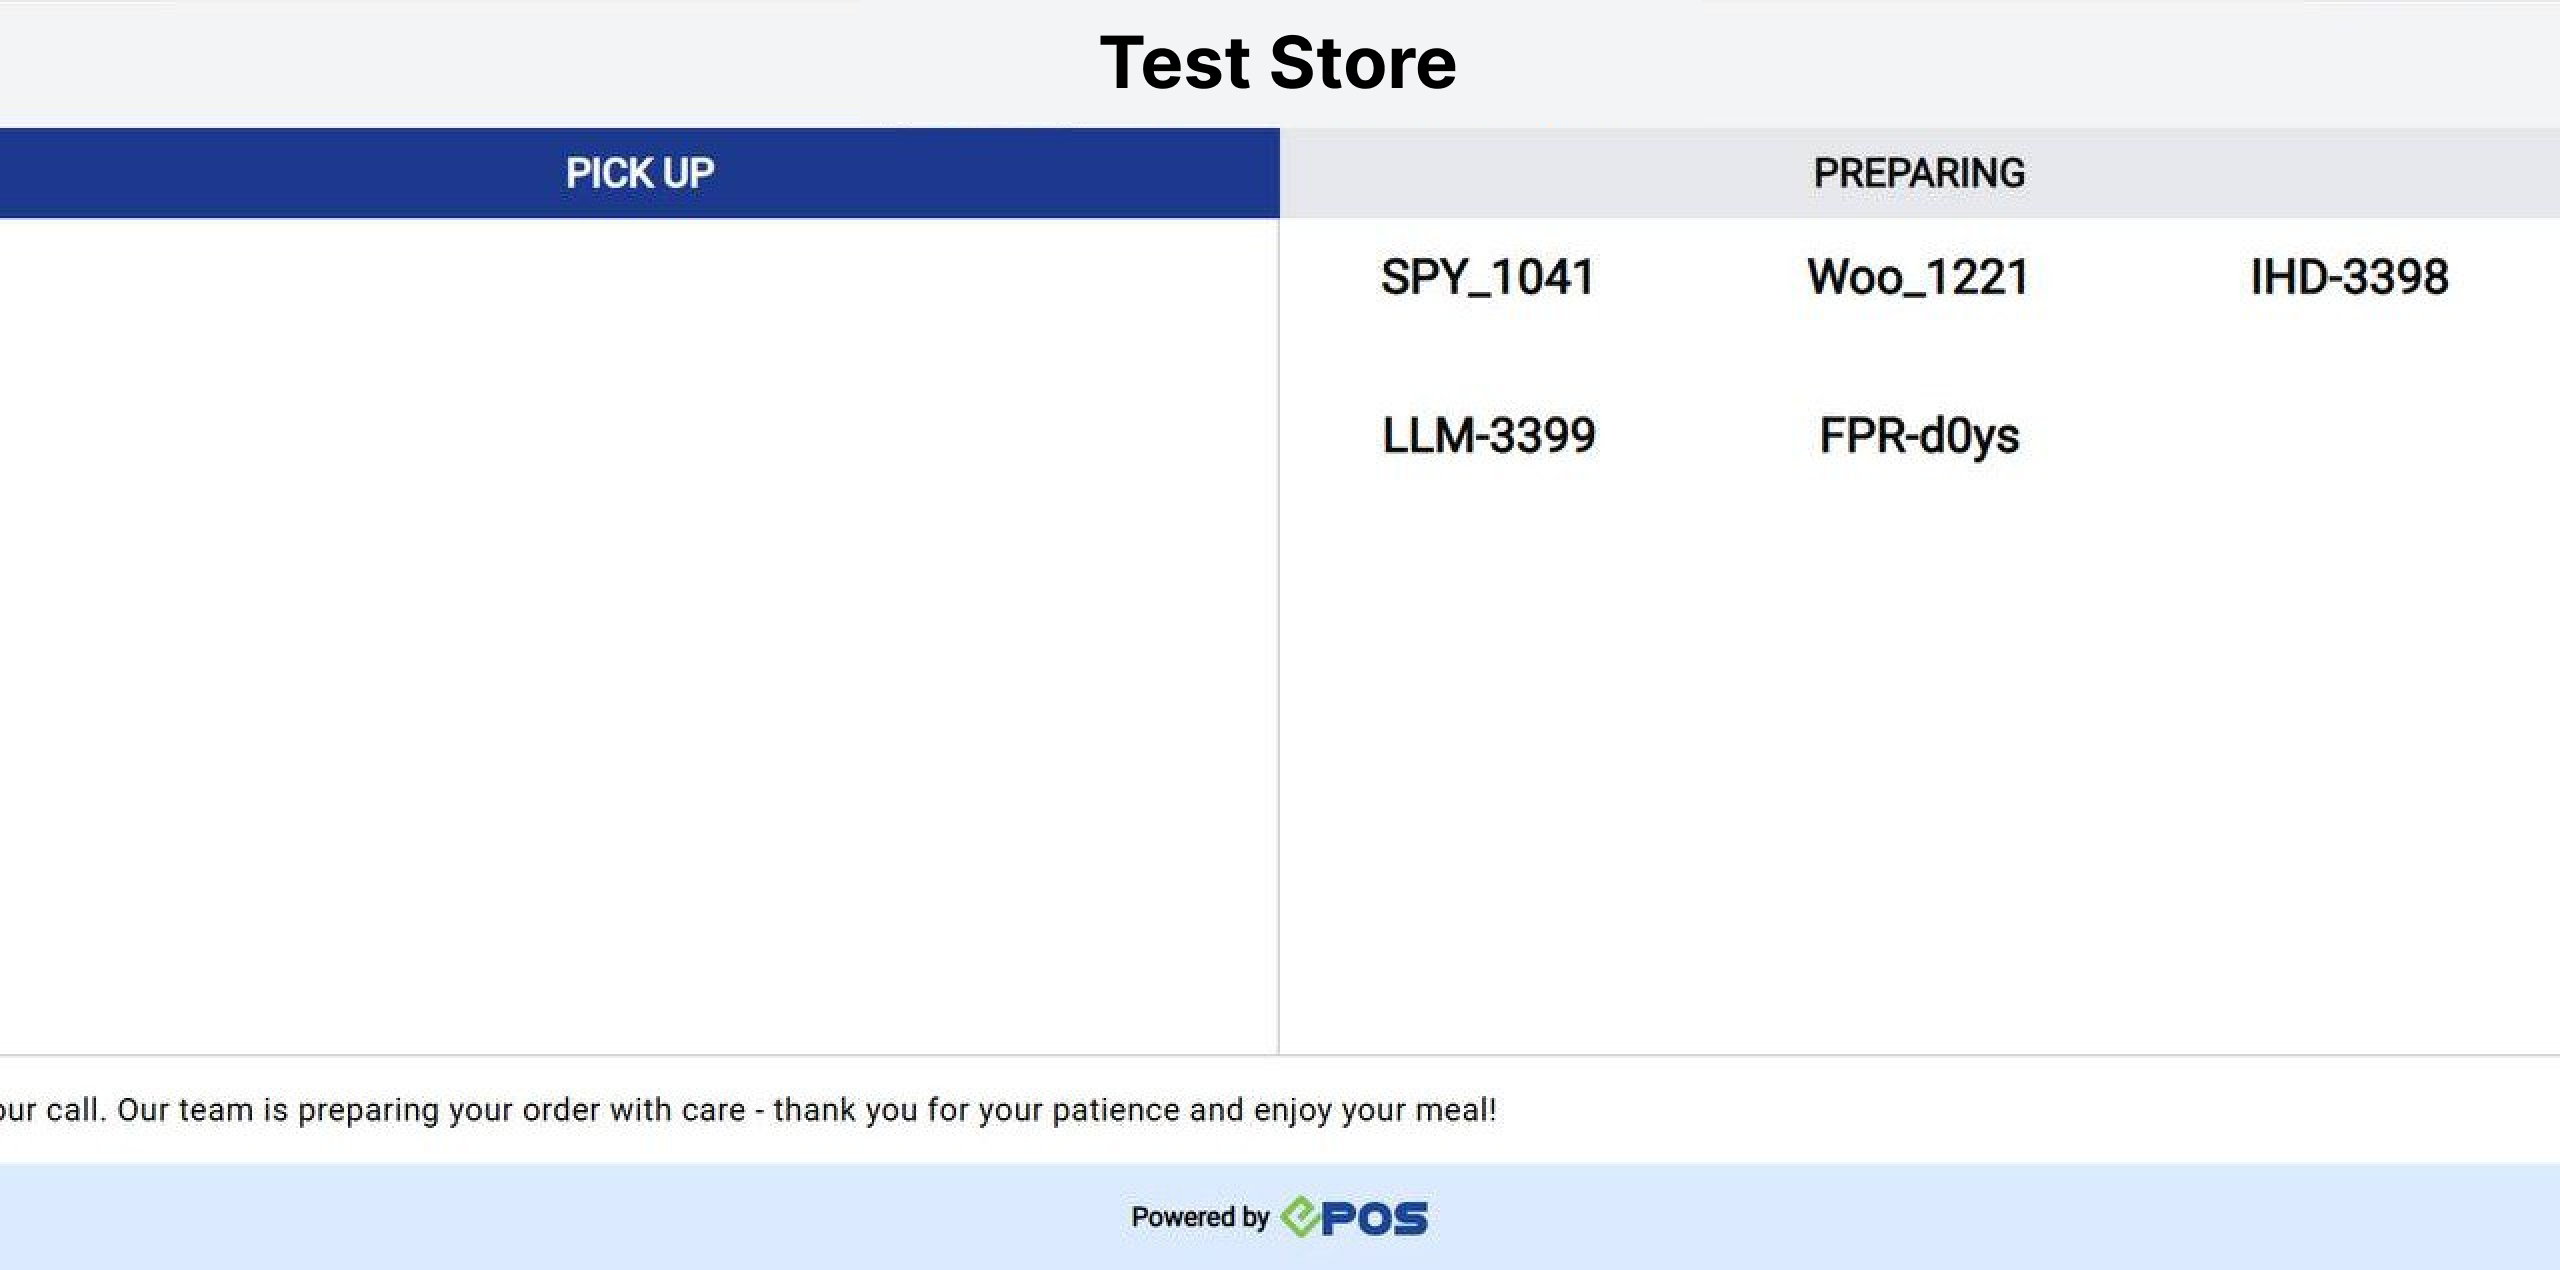
We have launched a new plugin, Queue Display, which is a Queue Display System (QDS) that fully integrates with the Kitchen Display System (KDS). In addition, the QDS supports orders from the following integrated platforms:
- WooCommerce
- Shopify
- In-House Delivery
- Lalamove
- GrabMart
- GrabFood
- Foodpanda
- Deliveroo
Features:
- Real-time Sync: Automatically updates based on the KDS order status.
- Preparing: Displays the queue number under “Preparing” when an order is sent to the kitchen.
- Ready: Moves the queue number to “Pick Up” once all items are marked as completed in the KDS.
- Compatibility: Supports orders from POS, Kiosk, QR/Web Ordering, Delivery, and E-Commerce channels.
Below are the steps users can follow to connect to their QDS:
Users must install the Queue Display plugin, then navigate to Backend Portal > EPOS Apps > Queue Display.
1. In the backend, users can find the web link and authentication code required to access their Queue Display System.
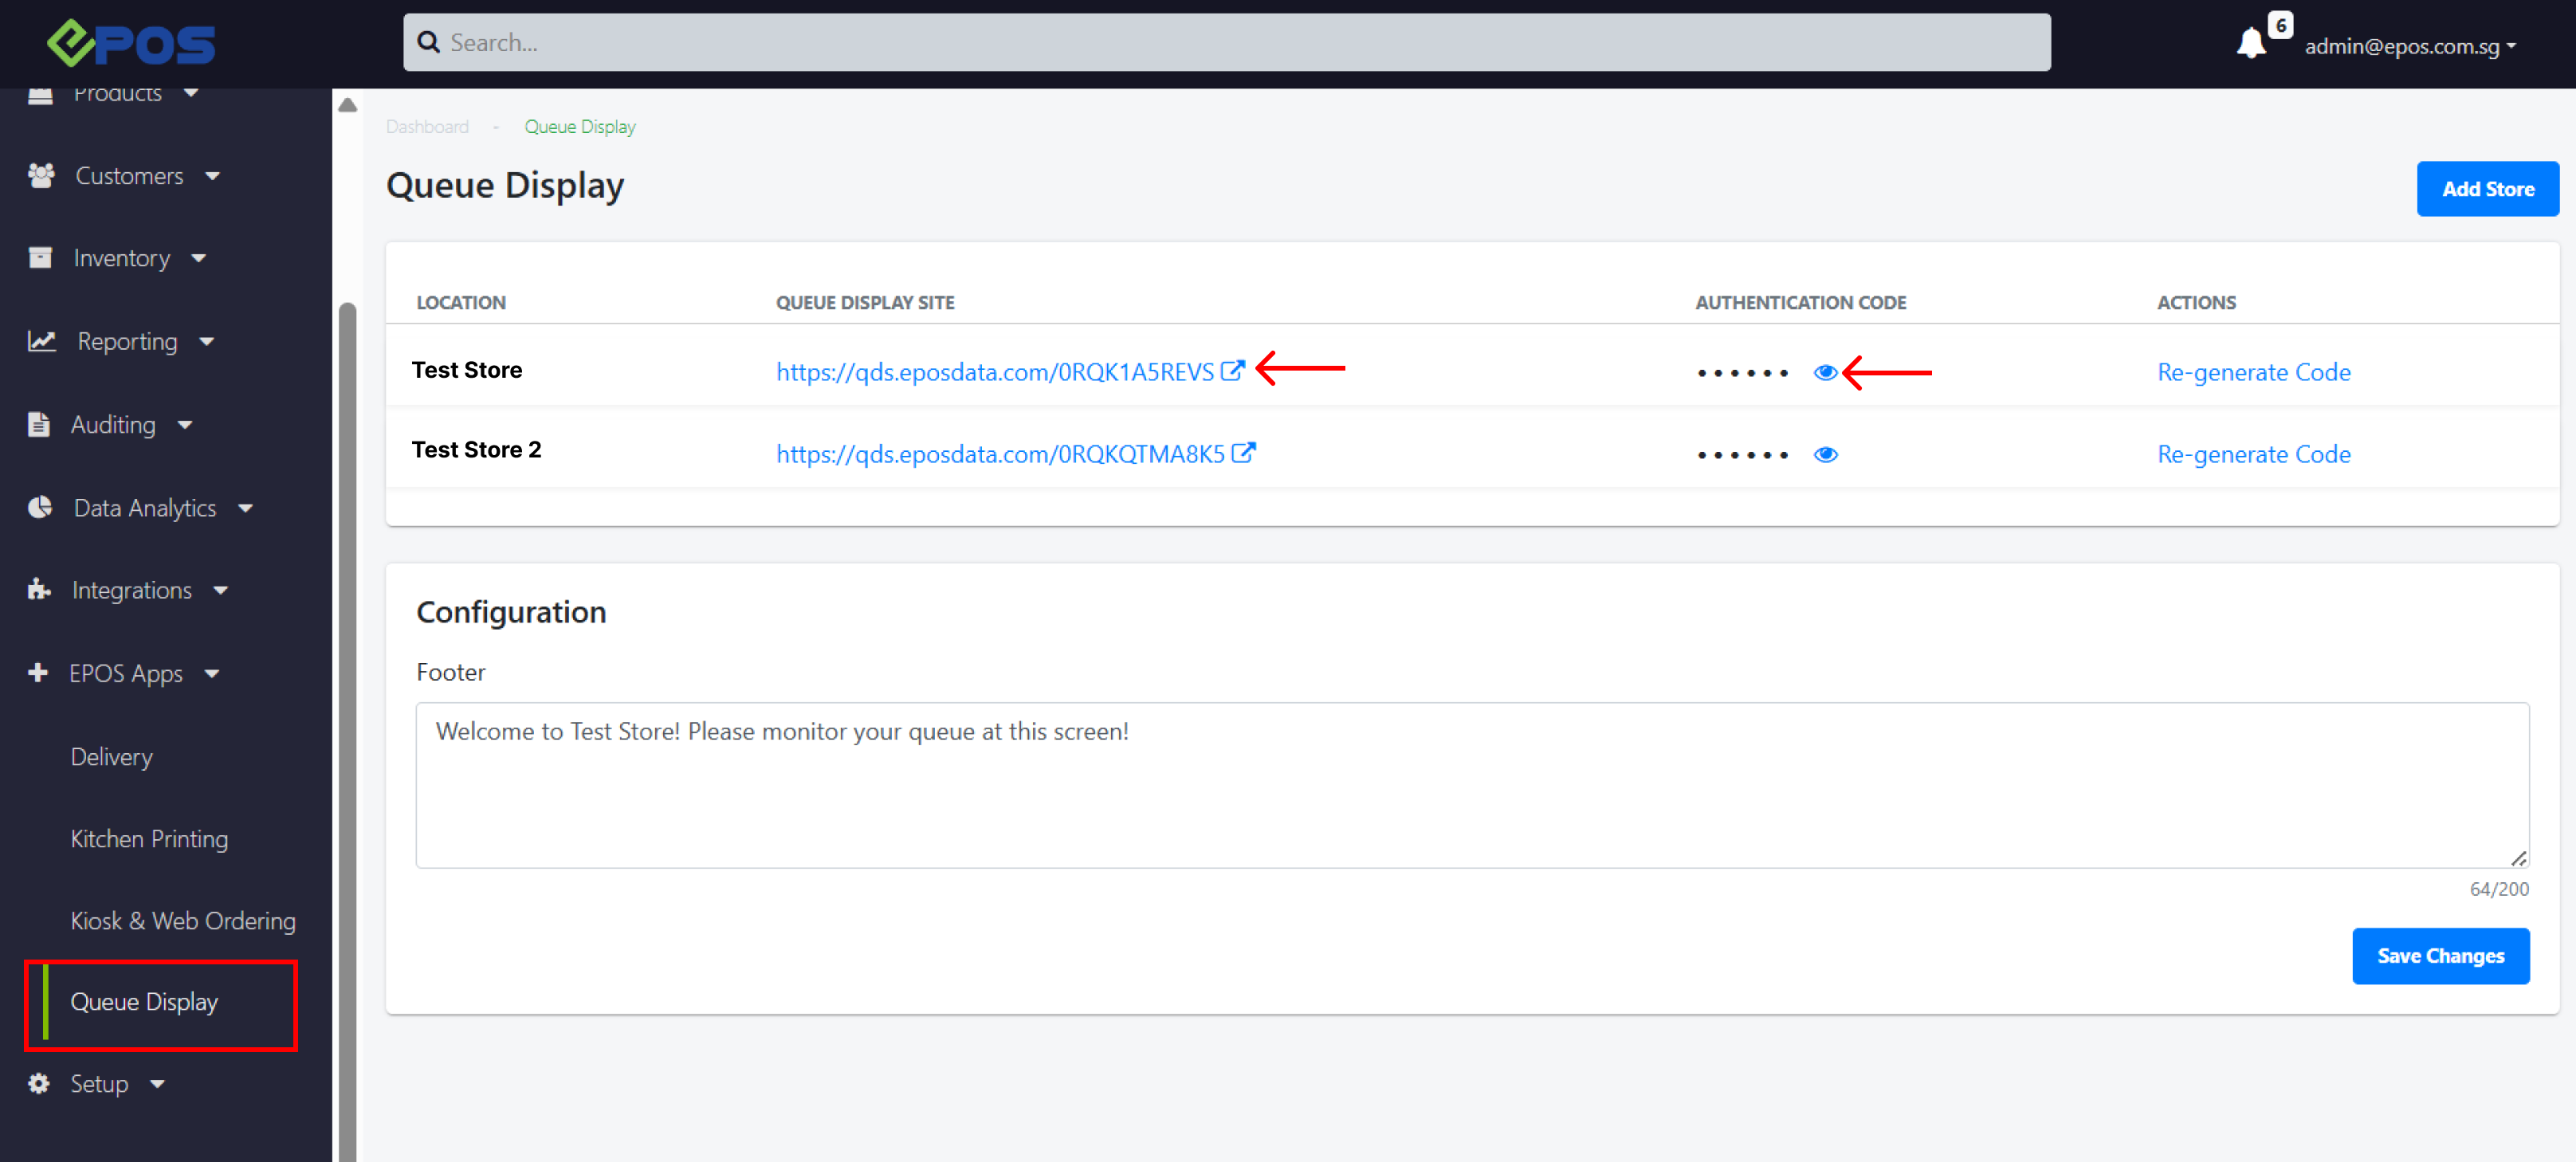
2. Once the authentication code has been verified, the Queue Display System will be displayed.
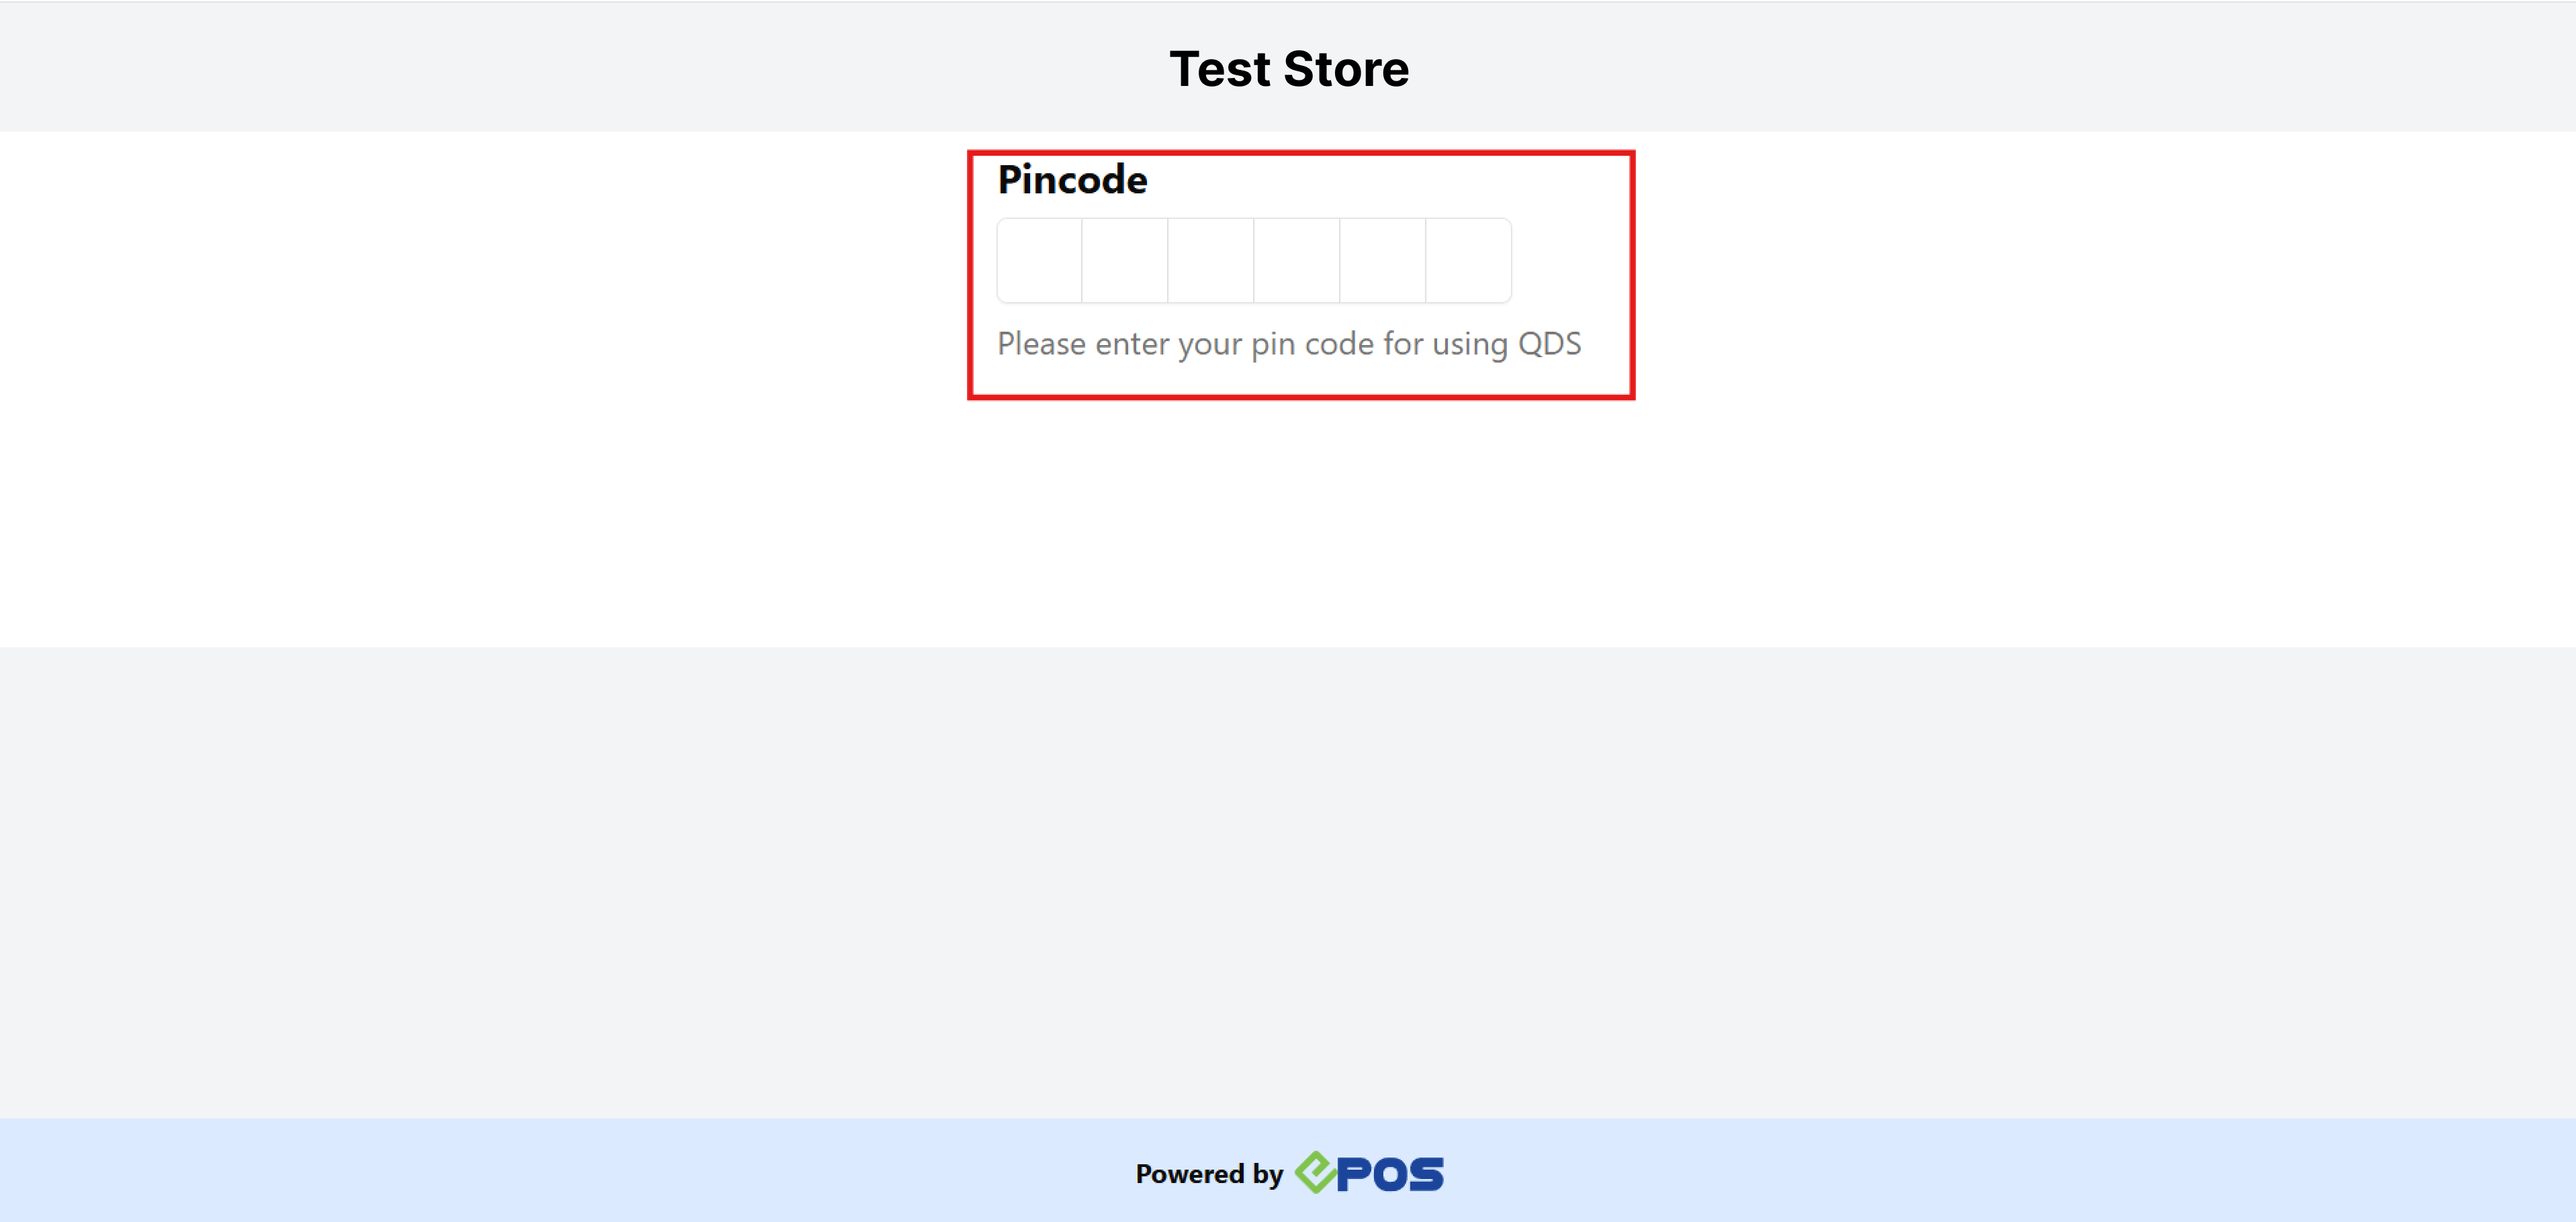
3. The user will then be directed to their QDS screen.
Below is a short video demonstrating how the Queue Display System works:
Note: Users must have the Kitchen Display System enabled and a Smart TV, or a TV with a web browser and Wi-Fi connection.
For more information, please click on this link.
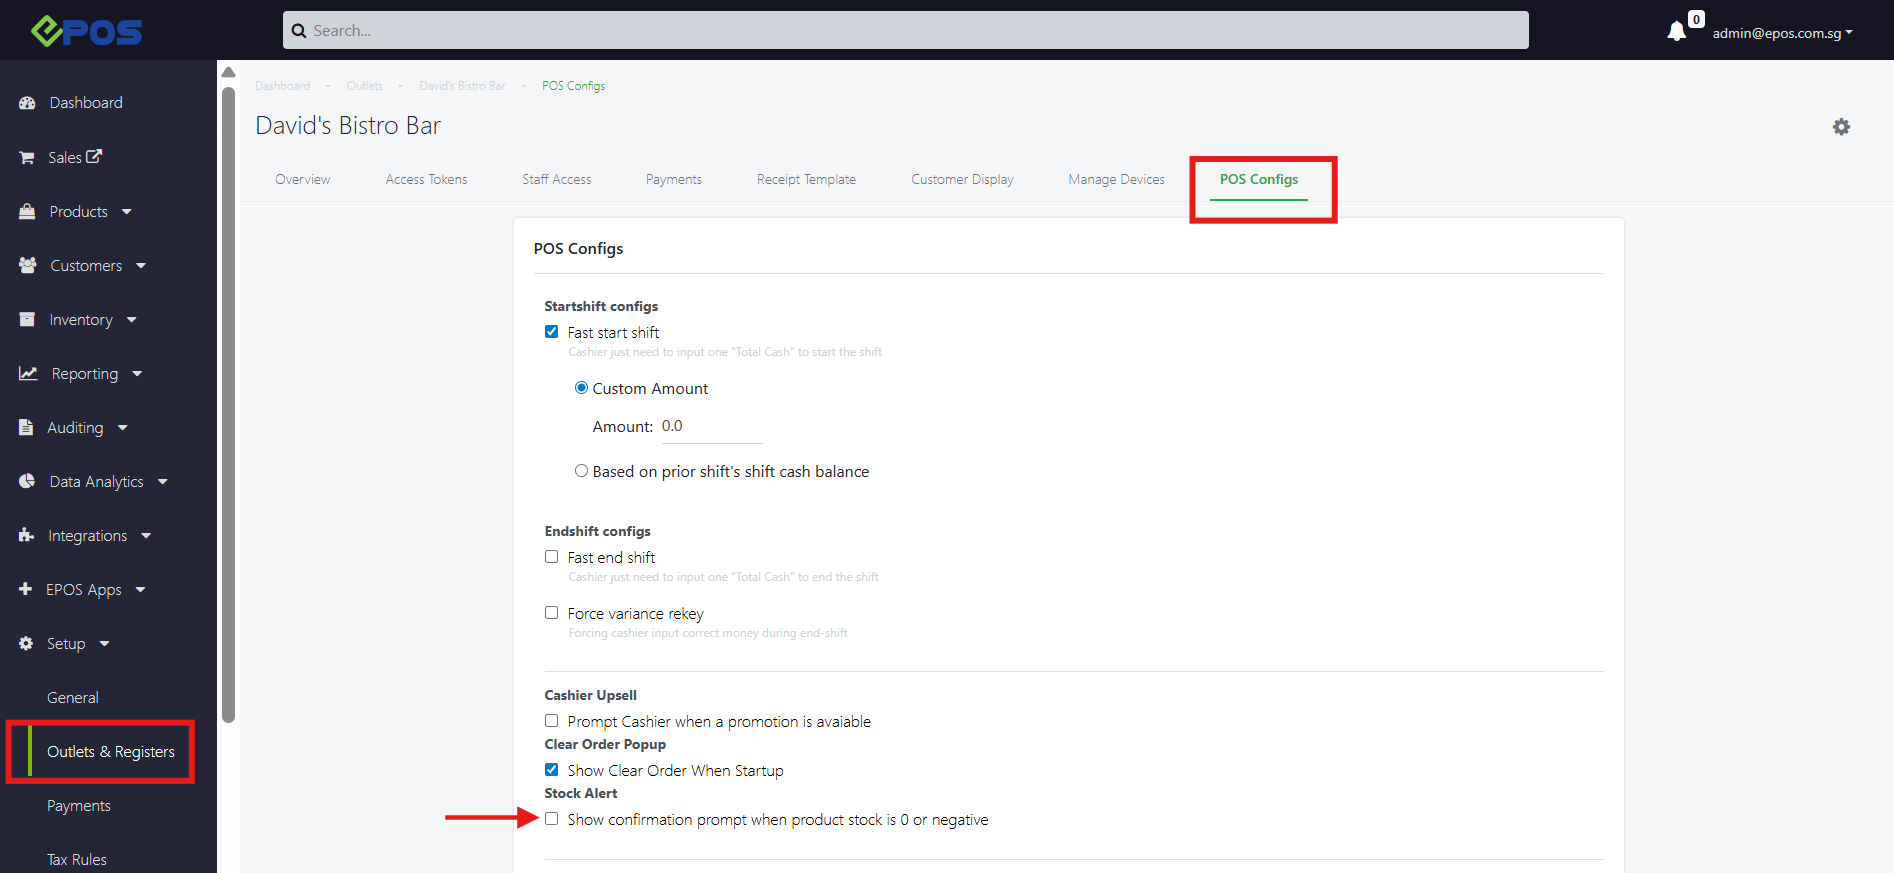
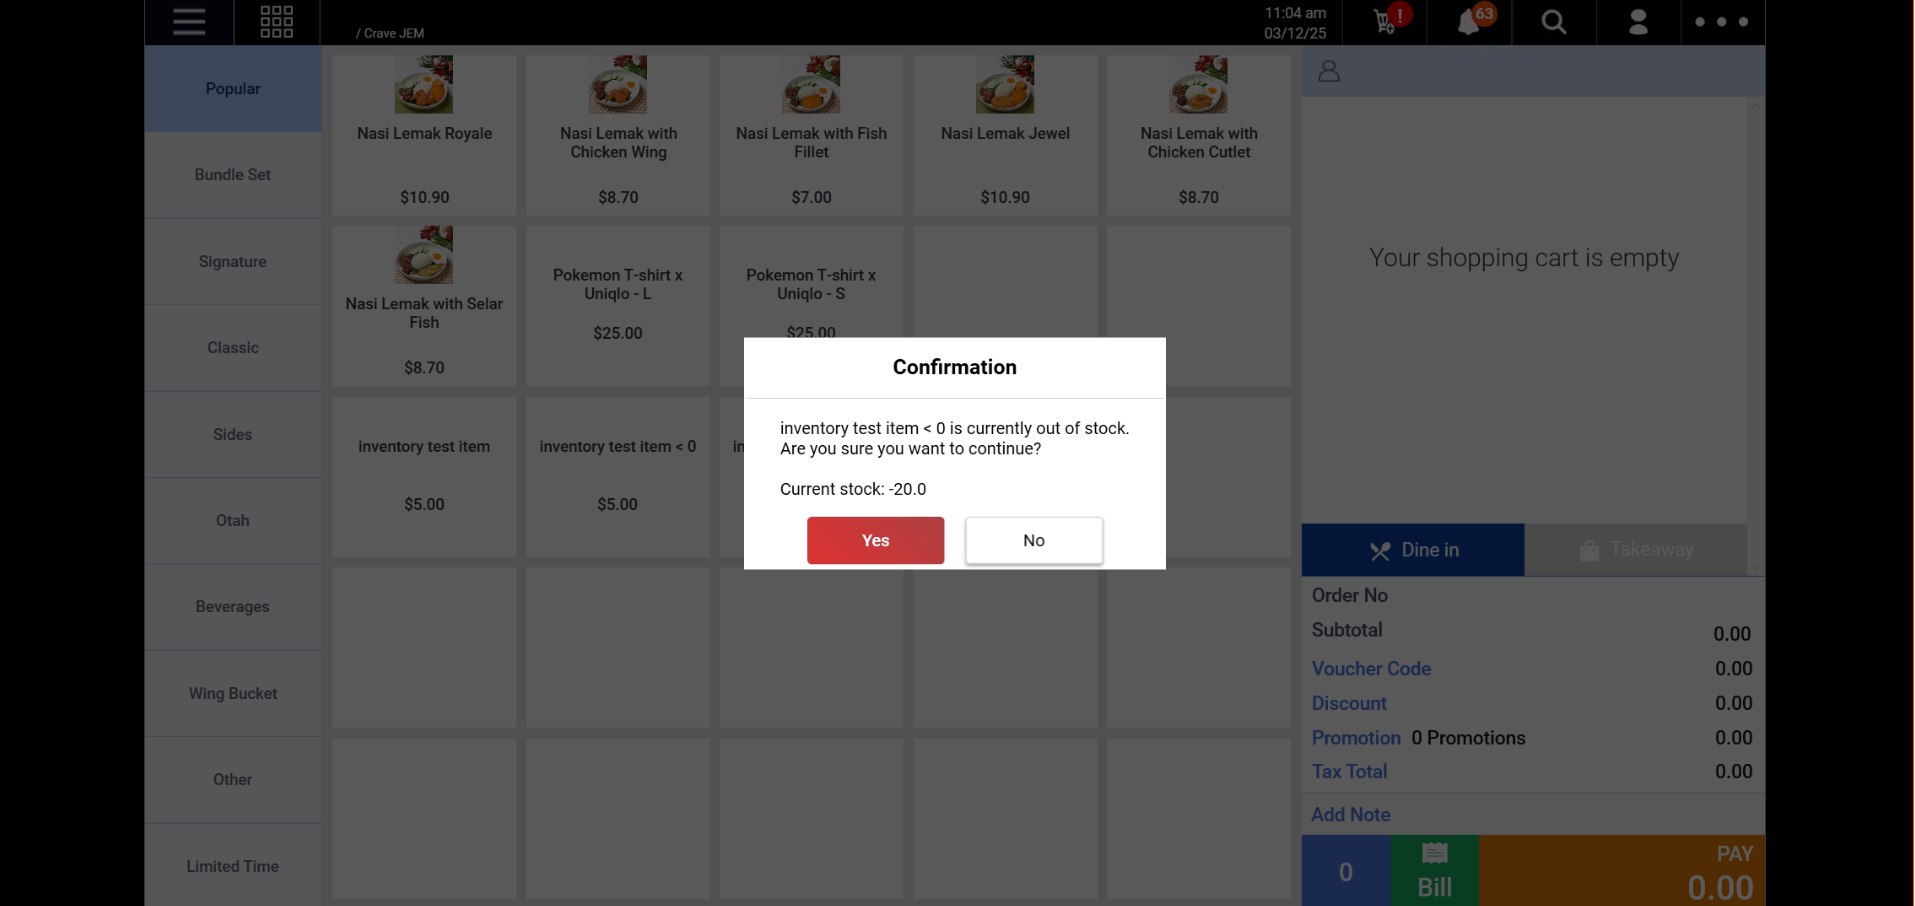
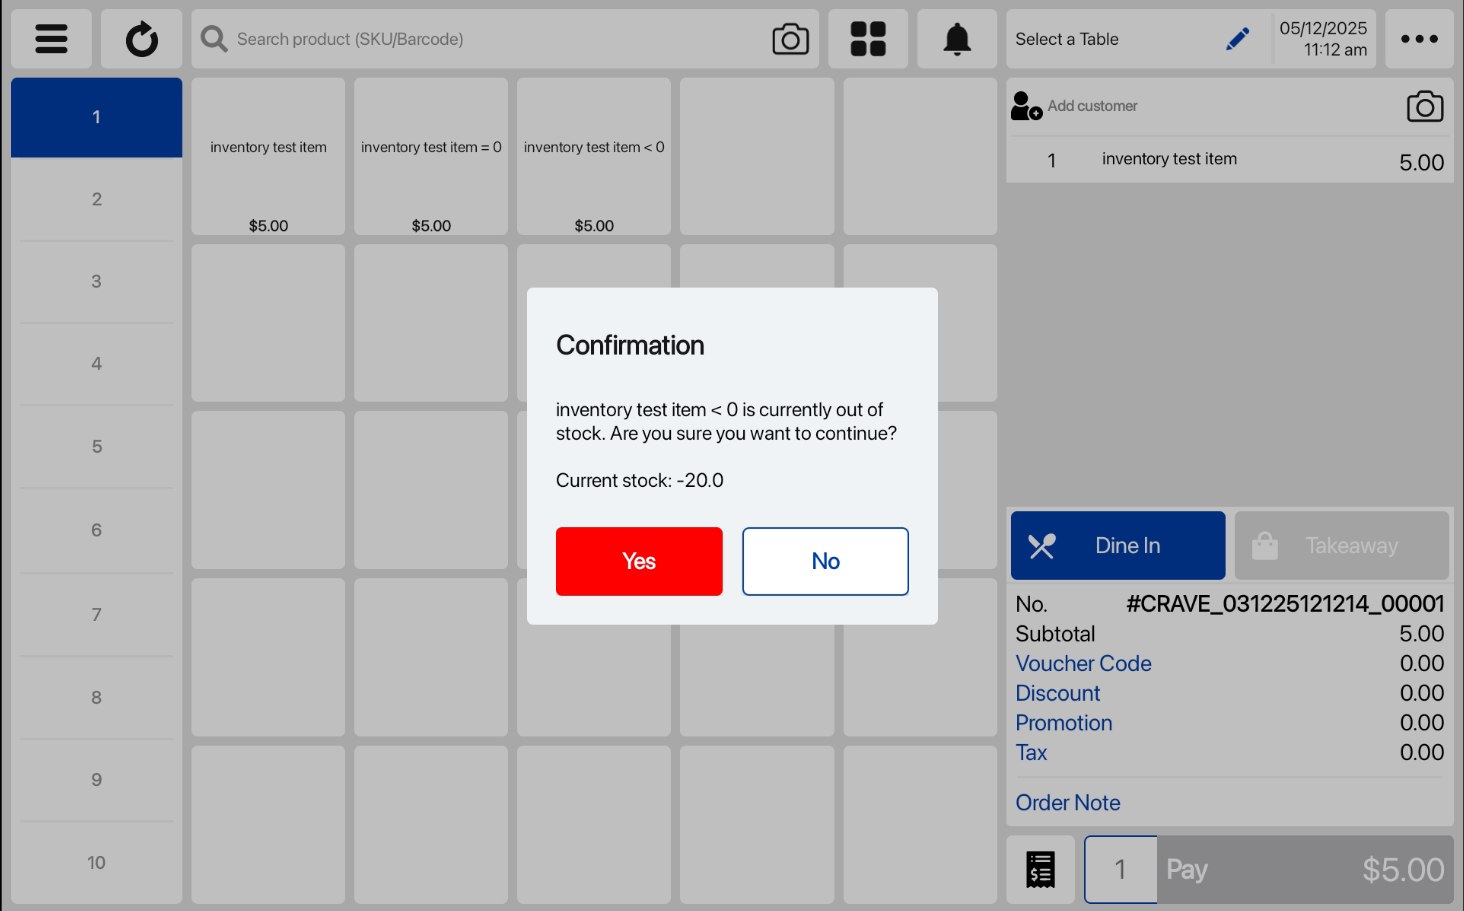
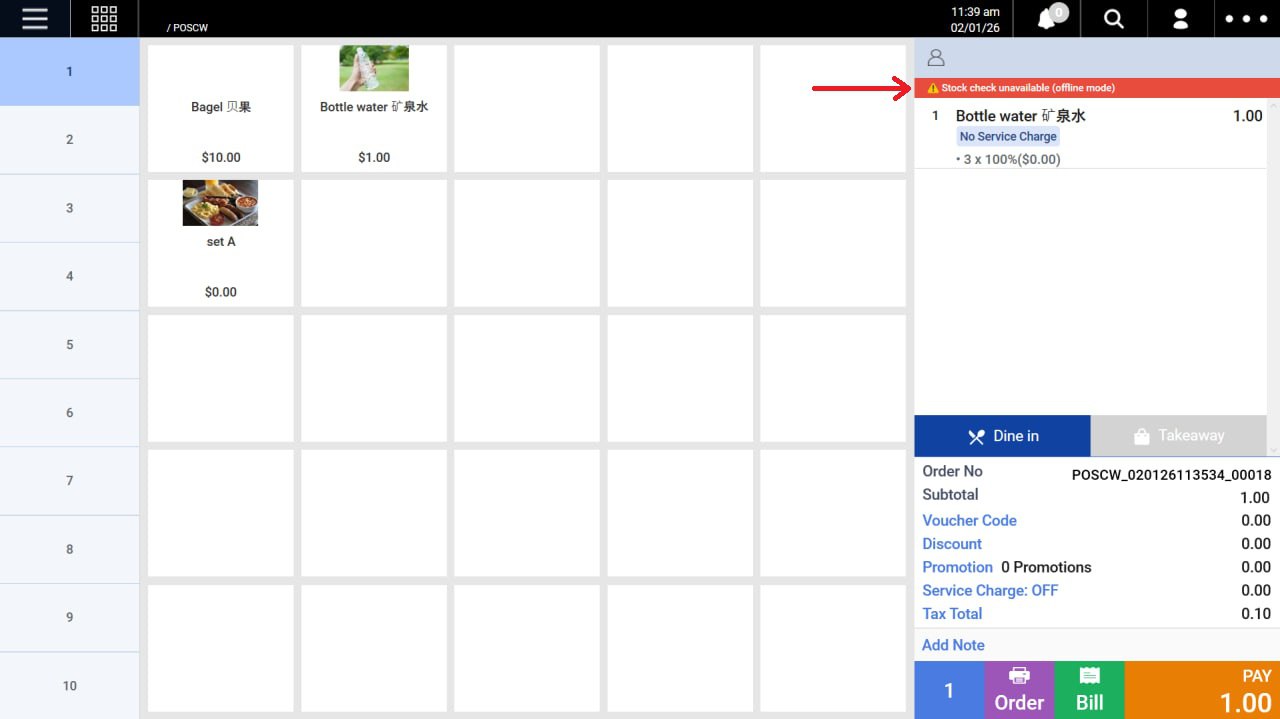
The POS system will now trigger a notification when you attempt to add an item that is out of stock.
To enable this feature, users can navigate to Backend Portal > Setup > Outlets & Registers > Select Desired Outlet > POS Configs.
Below are examples of how the Out-of-Stock Alert will appear on the respective POS systems:
Windows POS (Frontend):
Android POS (Frontend):
If the POS is operating in Offline Mode, the system will skip the stock check and allow the transaction to proceed.
- A warning message will be displayed at the top of the order summary:
⚠️ Stock check unavailable (offline mode)
For more information, please click on this link.
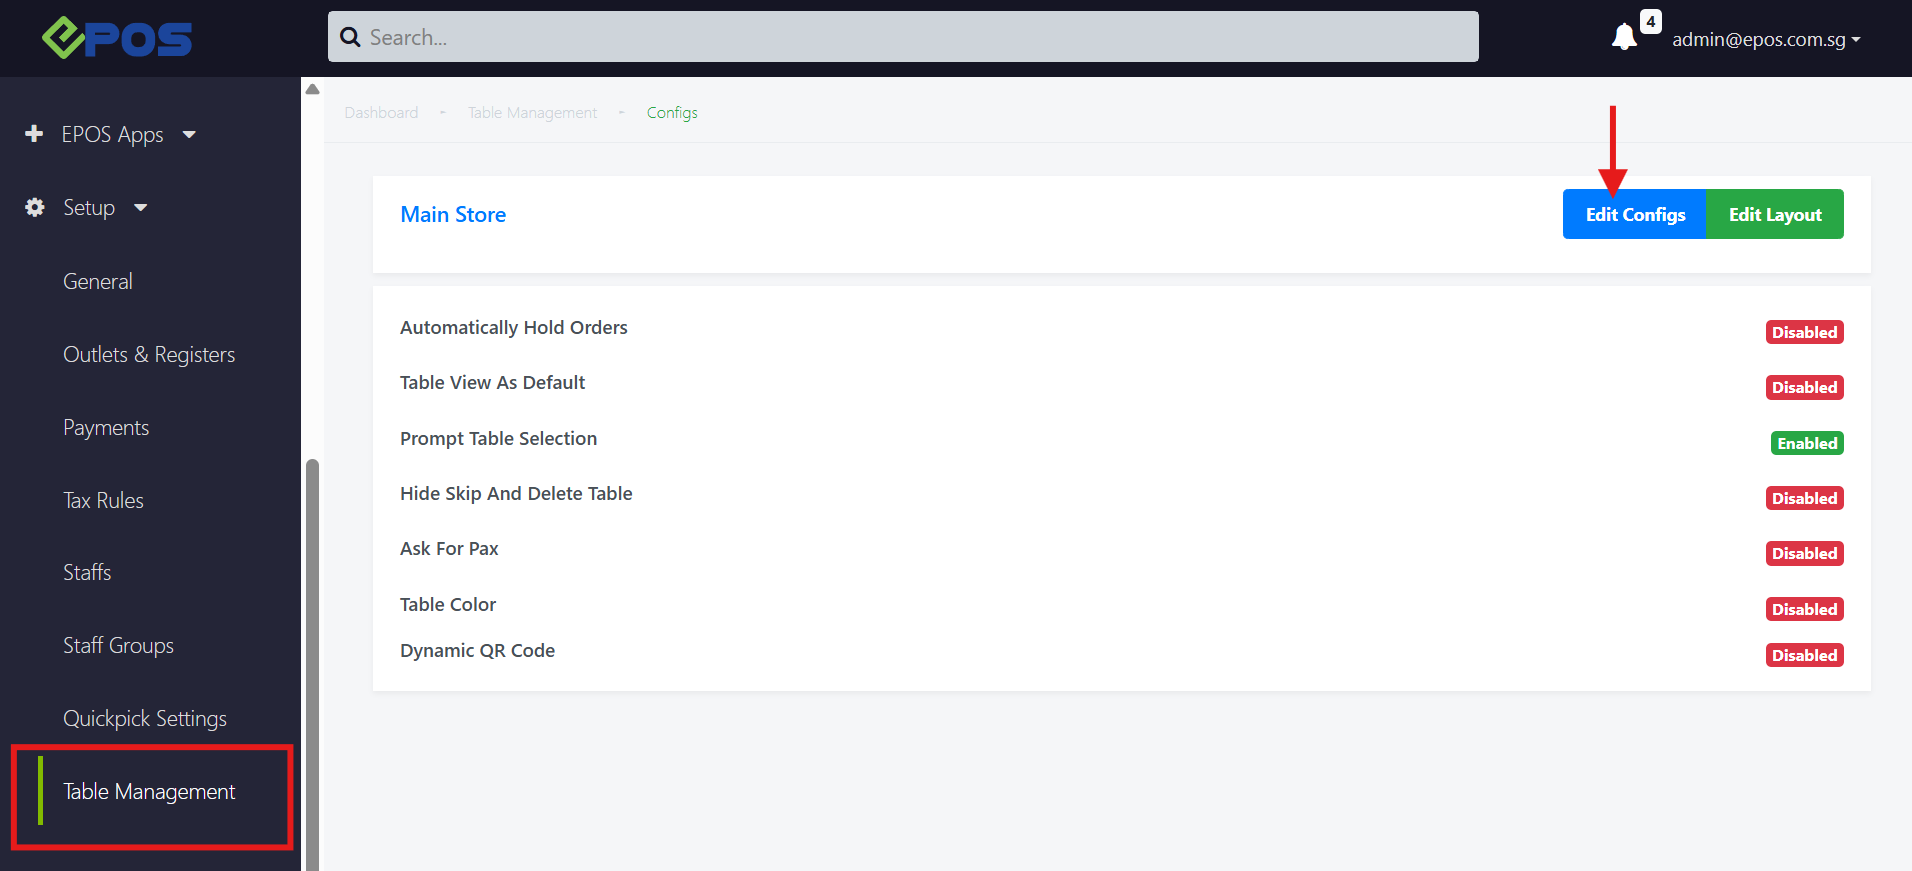
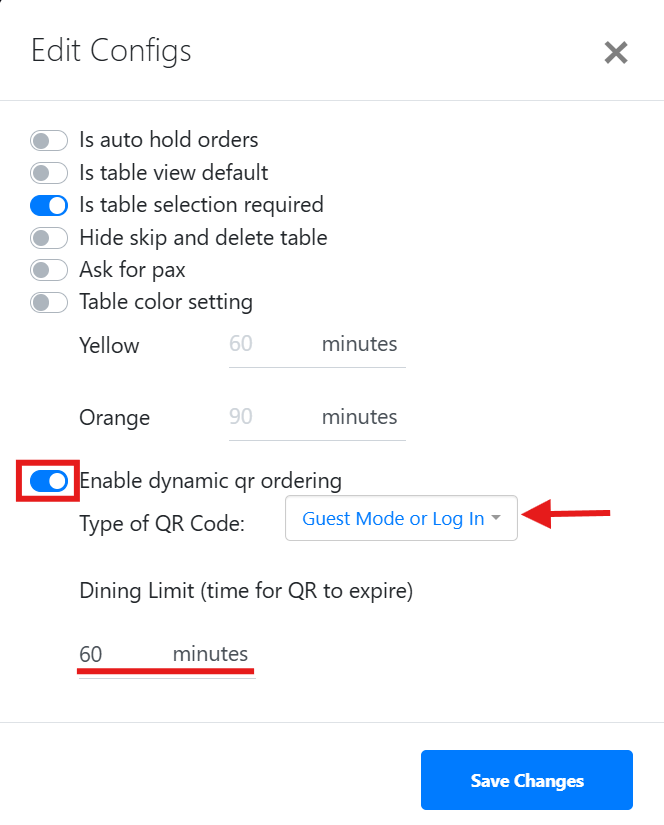
You can now generate Dynamic QR codes that expire after a set time period and enforce dining limits.
Pre-requisites: Enable Dynamic QR in the Backend (Table Management), select the QR code type to print, and define the dining limit.
- Expiration: QR codes automatically expire after a specified time period.
- Dining Limit: Apply time limits to dining sessions.
- QR Code Types: Select one (1) type of QR code
- Guest Mode or Log In
- Guest Mode, No Log In Required
- Log In Required
Below are the steps on how to activate the Dynamic QR Code feature:
1. Navigate to Backend Portal > Setup > Table Management > Edit Configs (choose your desired outlet).
2. Complete the following actions to enable the Dynamic QR Ordering feature:
- Select the QR code type by clicking on the dropdown box.
- Set the dining limit duration.
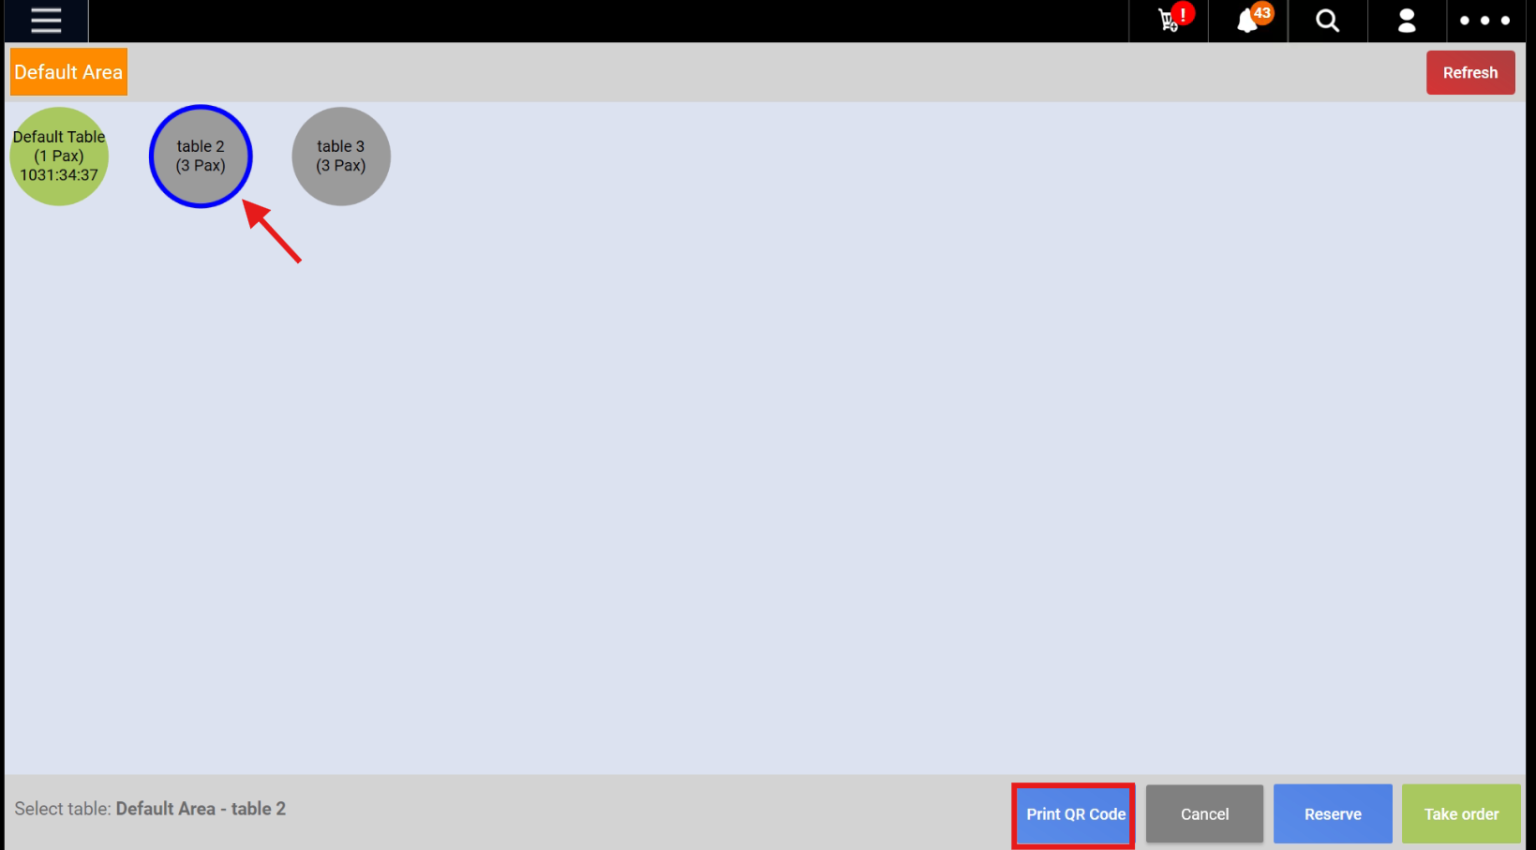
3. Once the configurations are completed, proceed to the POS Tables page and print the table’s QR code.
(a) Select the area (the selected area will be highlighted in yellow)
(b) Select the table (the selected table will be encircled in blue)
(c) Click on Print QR Code (highlighted in the red box)
Below is a sample of how the printed Dynamic QR code will look:
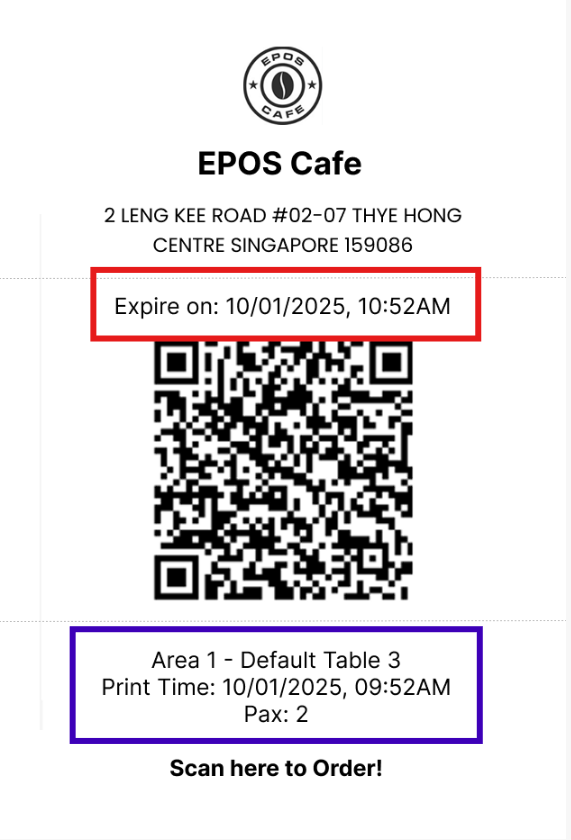
a) At the top, the outlet name and address will be displayed (Note: The logo will appear if a logo has been added to the receipt).
b) The expiry date and time will be shown (highlighted in red).
c) Below this, the area and table name will be displayed, followed by the time the QR code was printed from the receipt printer and the pre-set number of pax for that table (highlighted in blue).
Note: By default, the Static QR Code is turned ON. Once the Dynamic QR Code is turned ON, the Static QR Code will automatically be turned OFF. Users cannot use both QR code types simultaneously within the same outlet.
For more information, please click on this link!
The Malaysia (MY) backend portal now supports the Stock Snapshot Report, accessible via Reporting > Stock Reports.
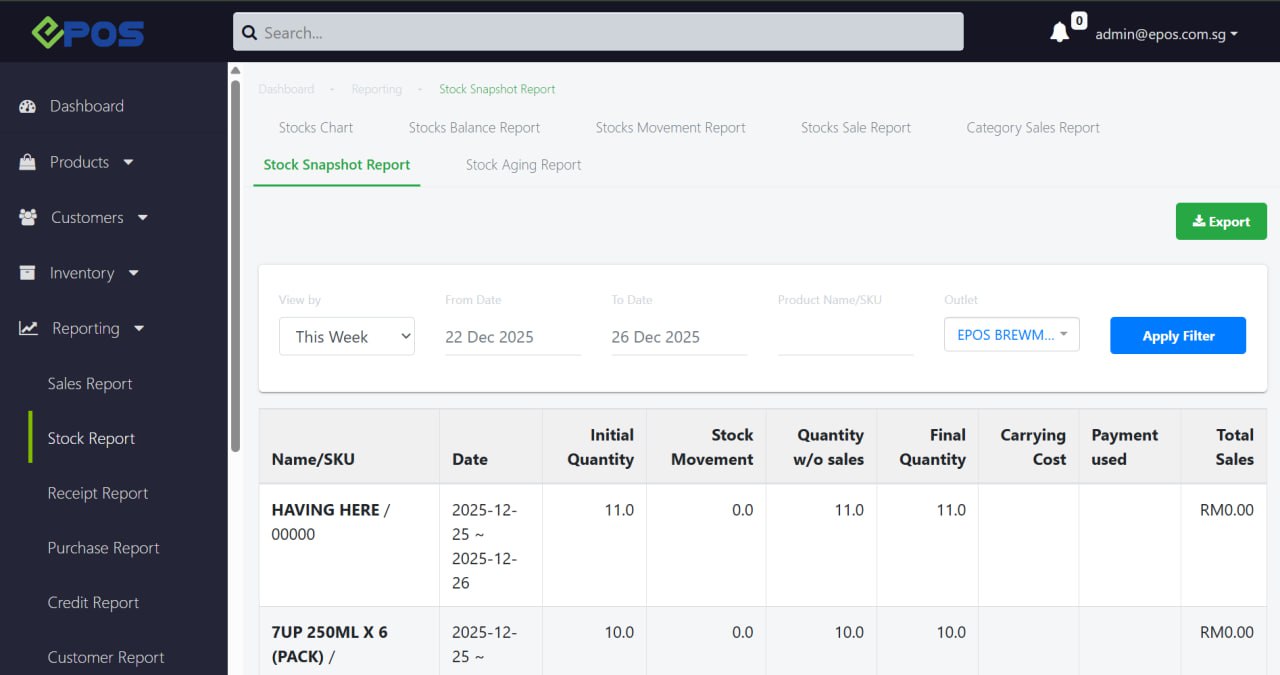
This feature allow users to monitor stock counts from start to end of day, total sales per product, and carrying costs.
Note: User must install the “Inventory Advance” plugin to use this feature.
The new “Auto Load” button in Purchase Orders streamlines stock replenishment.
Below is a short video on how it works!
1. Auto-Generate Items: Automatically lists items for the selected supplier when stock falls below the reorder point.
2. Smart Calculation: Automatically calculates order quantities based on your predefined maximum stock and reorder settings.
Note: After auto-generation, you can still manually adjust the order by duplicating/deleting products, changing quantities, or bulk importing additional items.
The WebApp now supports payments using membership points.
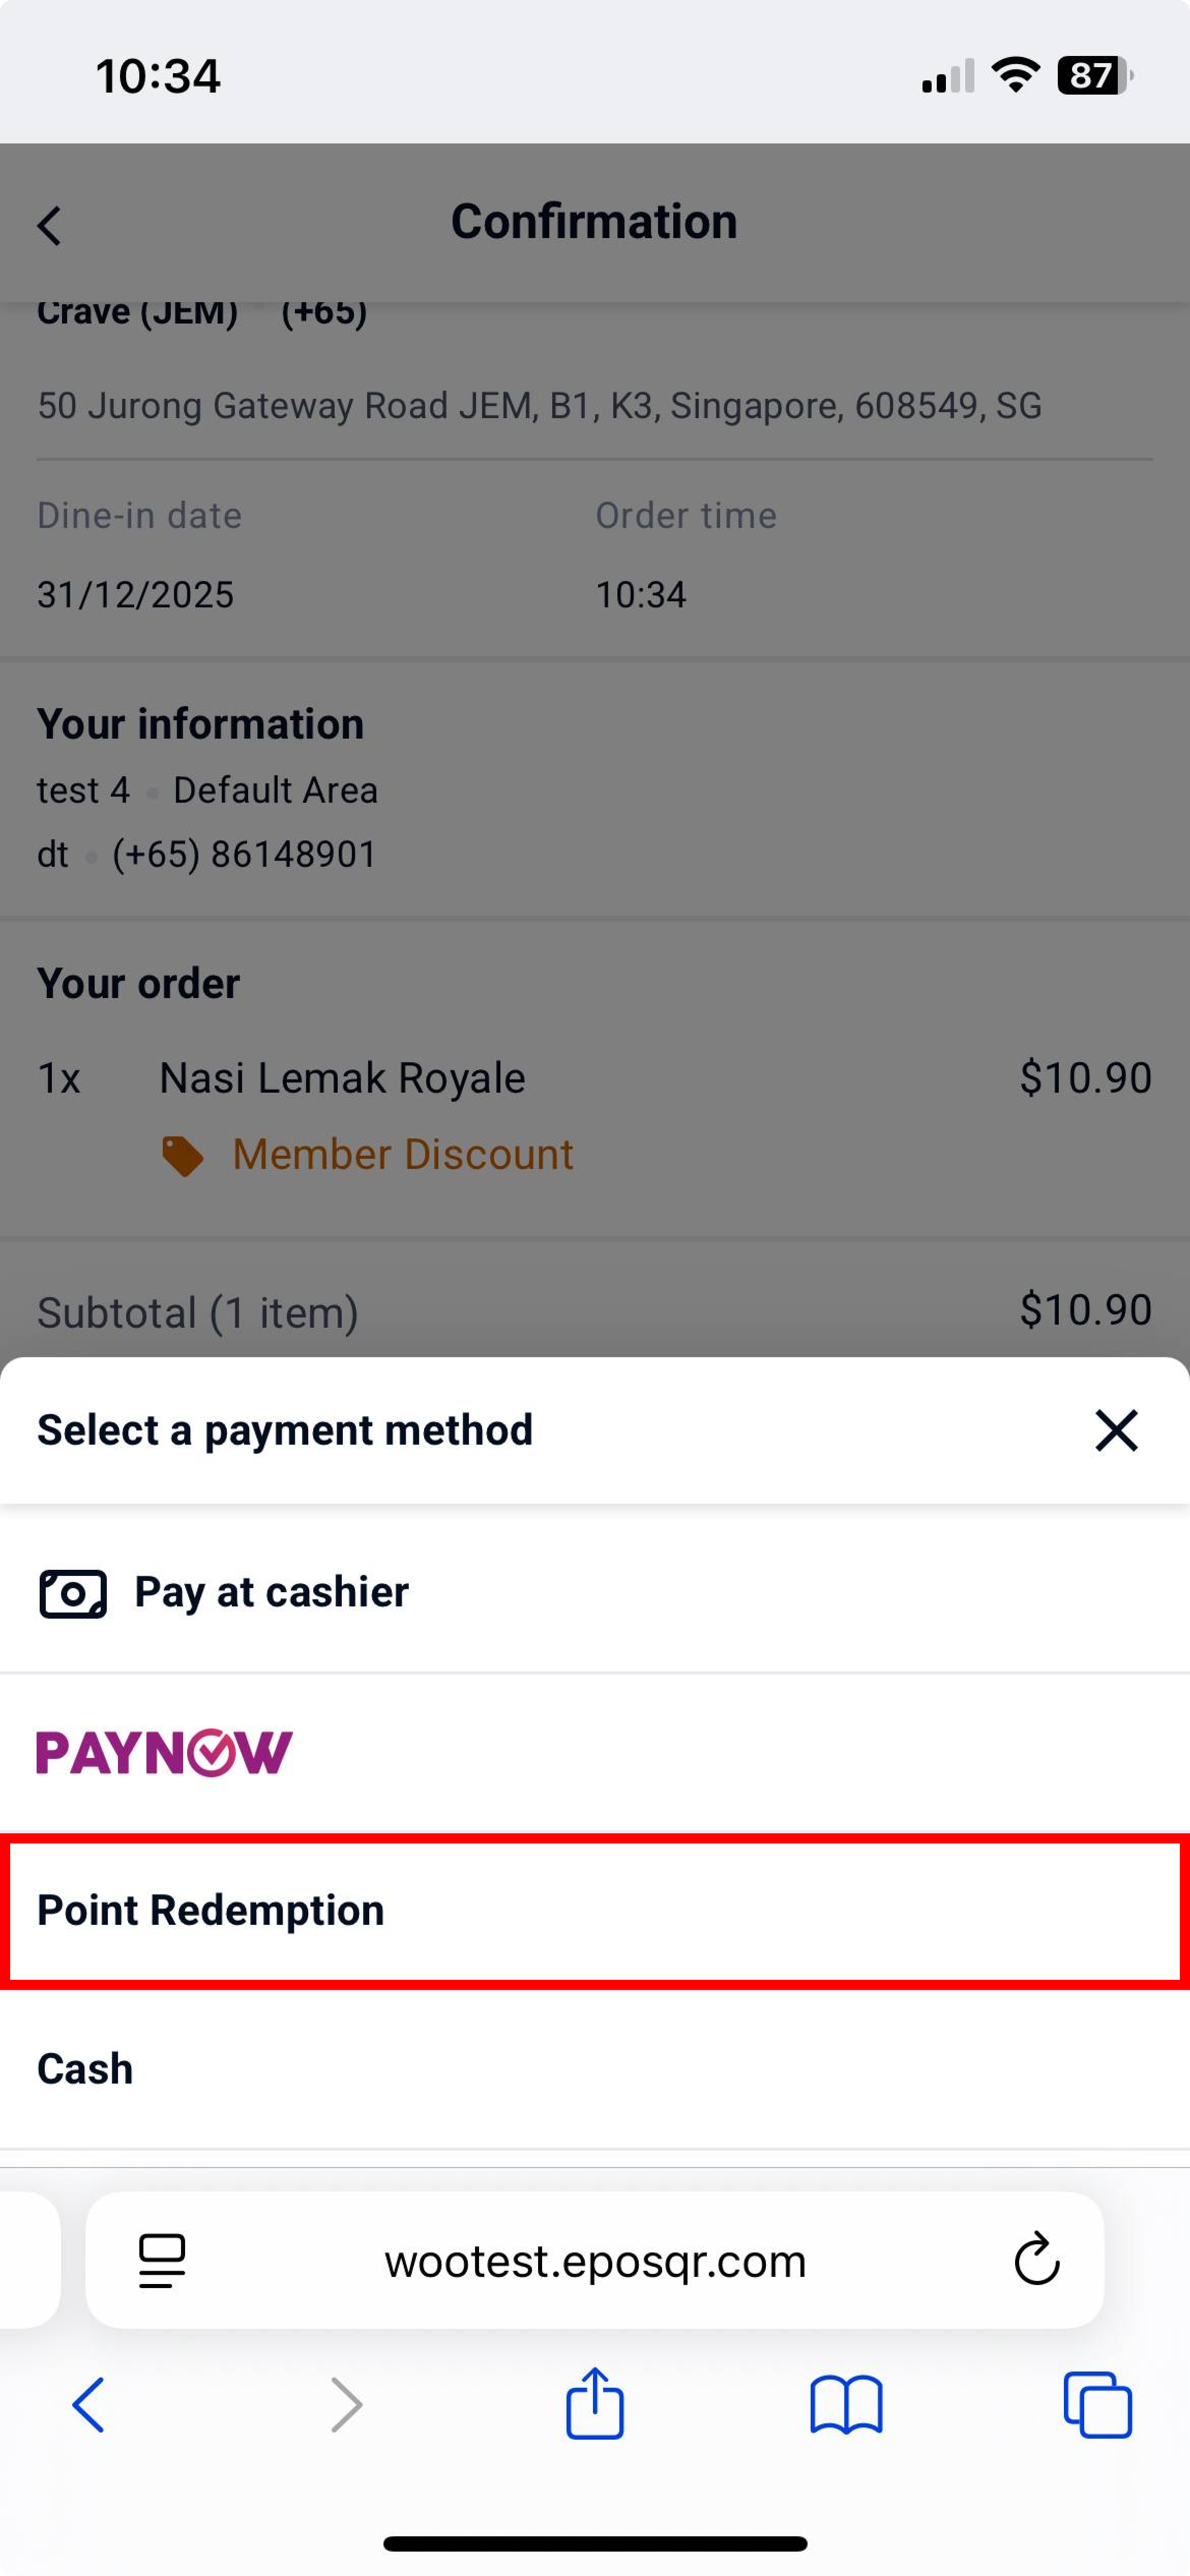
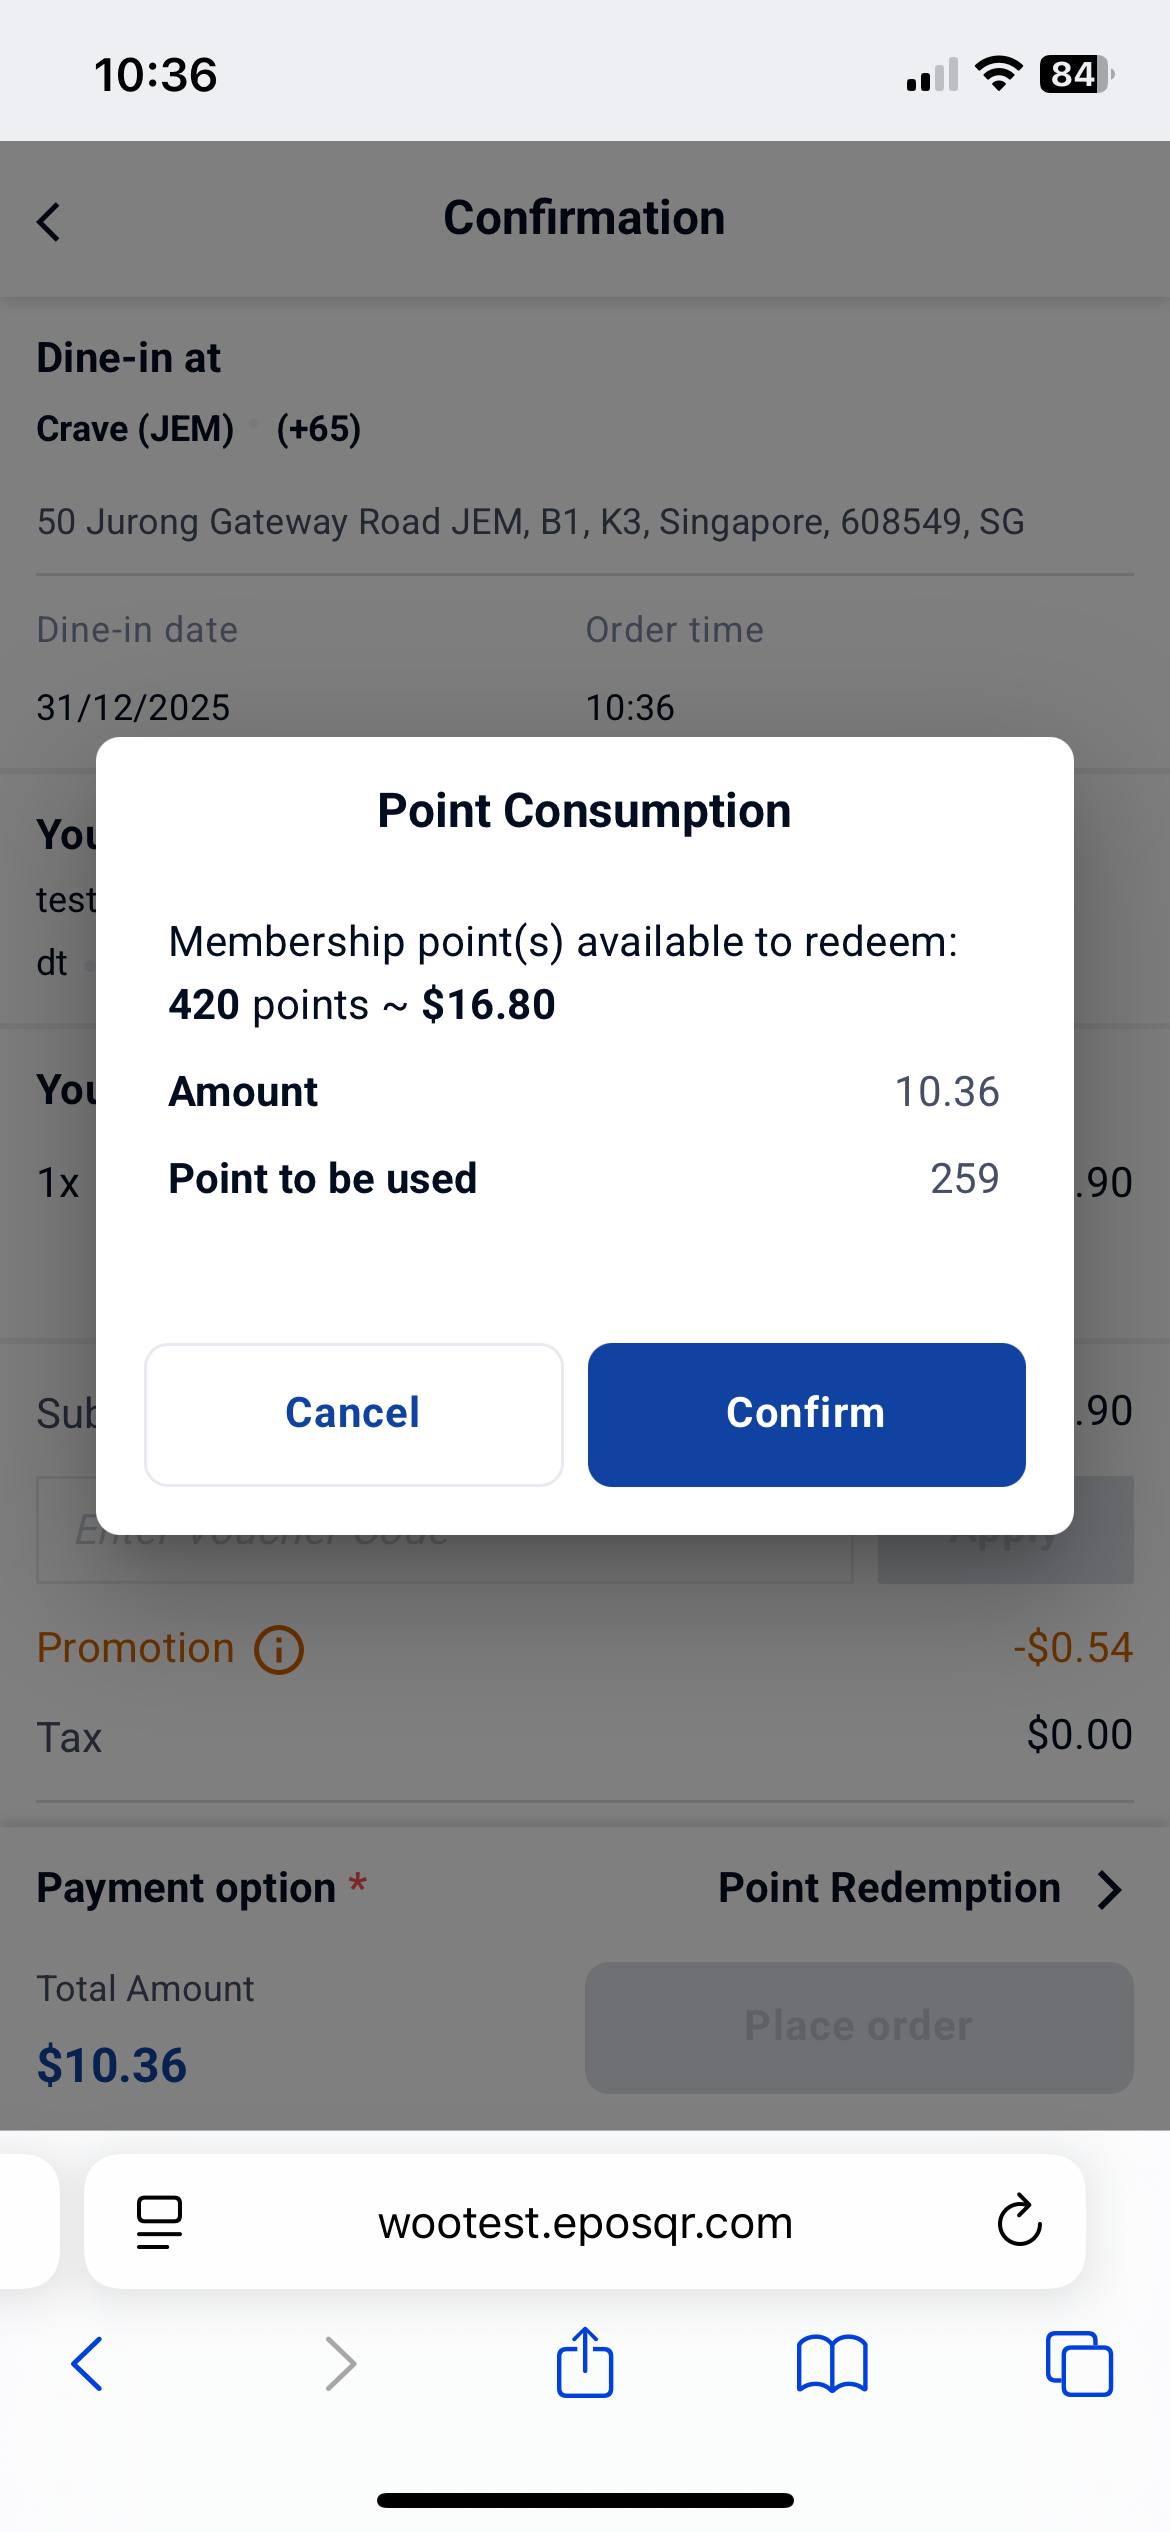
Note: Customers can only use membership points for payment if their available points balance covers the entire order total. Partial point redemption is not supported.
The Retail Self-Checkout interface has been updated with reduced line spacing.
The Order Summary can now display up to 8 products at once without requiring the customer to scroll.
Before update:

After update:
For more information on this, please click on this link!
For users with the EPOS CRM Plugin, you can now restrict specific products from being purchased with points.
User can now blacklist specific SKUs under the Membership Point Rebate Config by navigating to Backend Portal > Customers > Membership > Rebate Config

If a cart contains any blacklisted item, the membership point redemption section will be hidden.
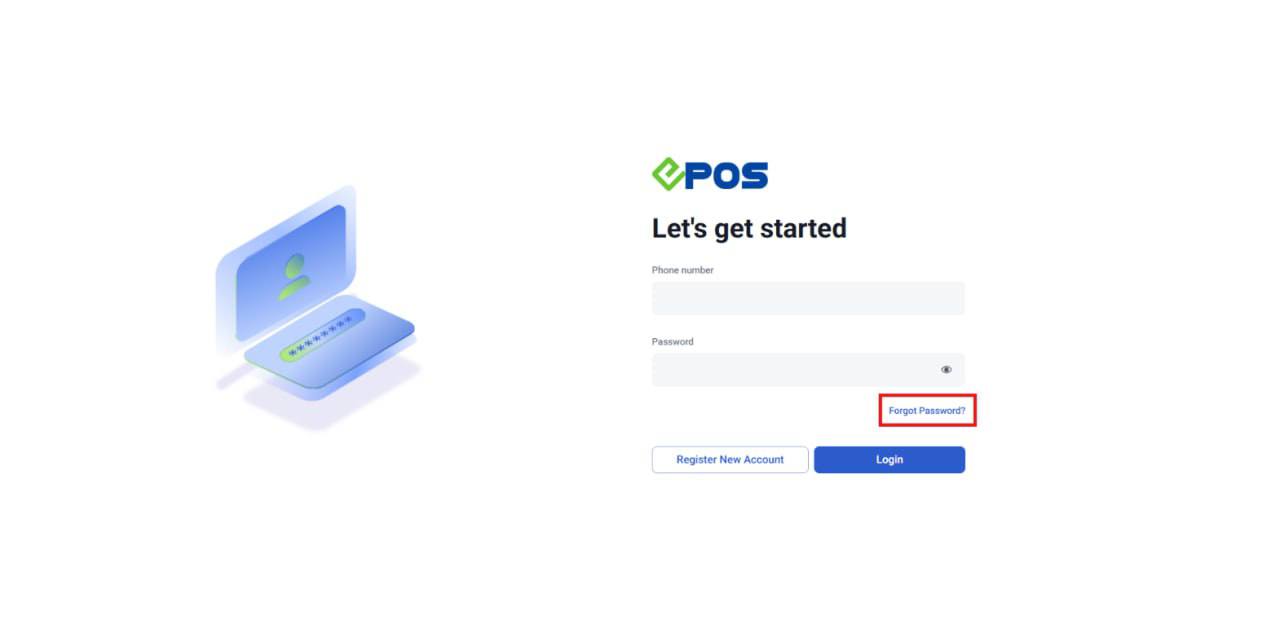
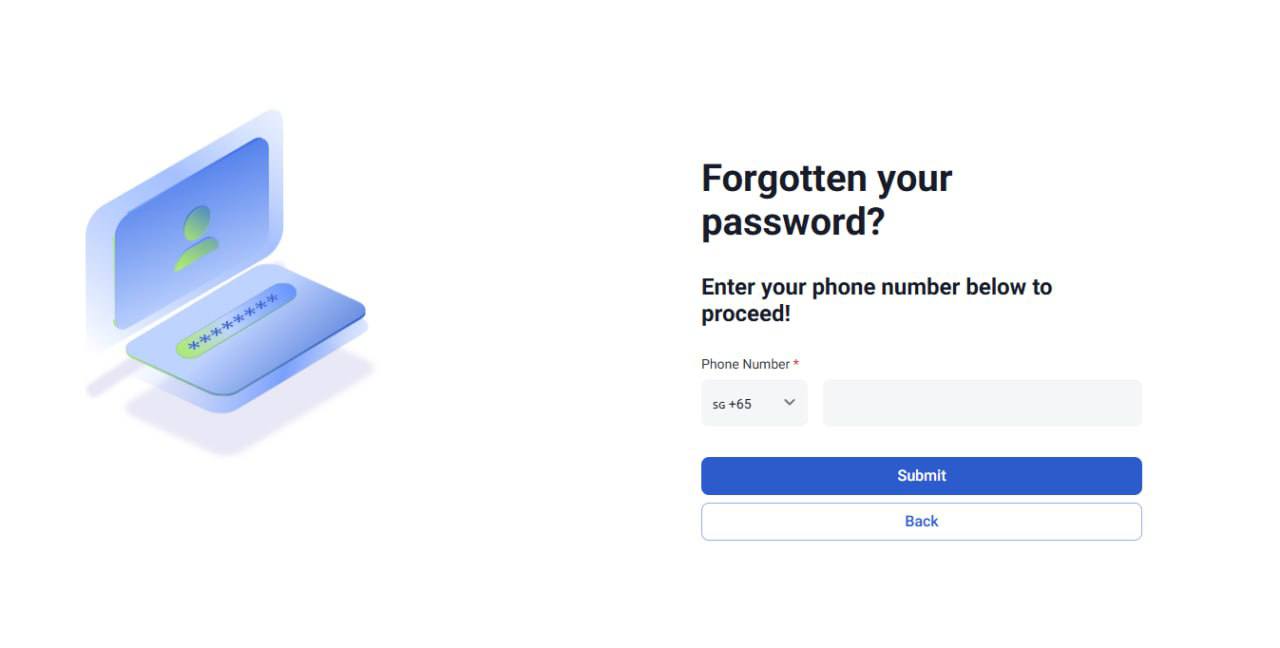
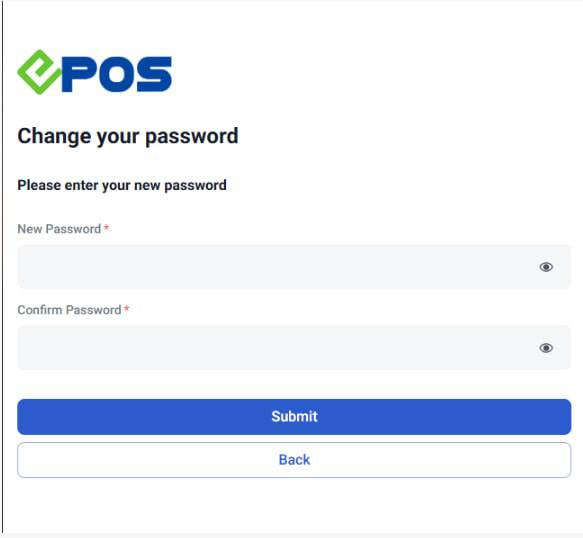
Existing customers can now securely reset their passwords via the Member’s Portal using a WhatsApp OTP.
Pre-requisites:
- Must have a valid WATI account connected to the EPOS Backend.
- OTP Sending Template must be created/approved on WATI and configured in Backend Integrations.
1. User clicks on ‘Forgot Password’
2. User key in their mobile number
3. User will receive an OTP via WhatsApp
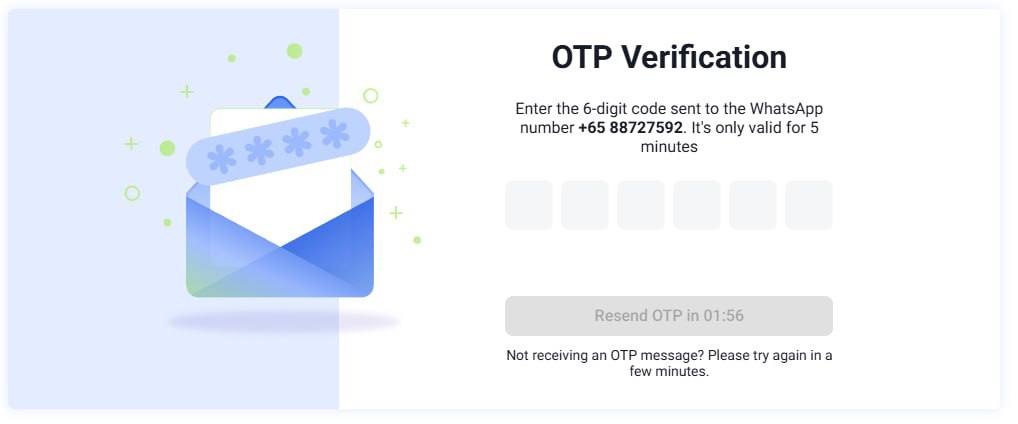
4. Once the OTP has been verified, the user will be directed to change their password
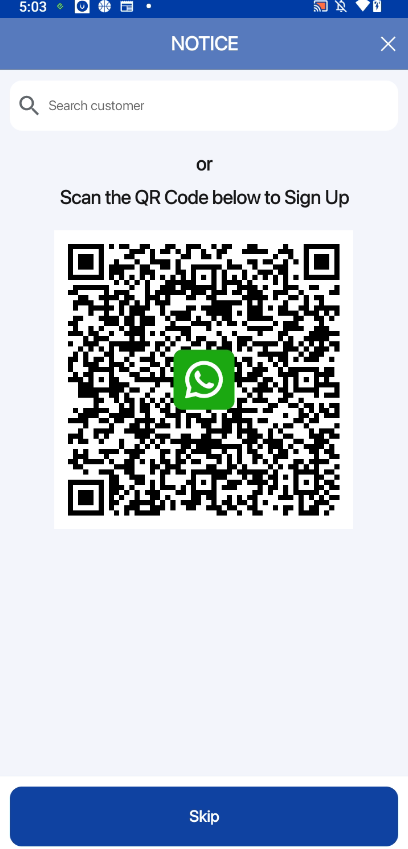
New WATI features are now available on Portrait POS for enhanced customer engagement.
- Membership Signup: Customers can scan a WATI QR code displayed on the POS to sign up for membership instantly.
- WhatsApp Receipts: Send digital e-receipts directly to your customer’s WhatsApp
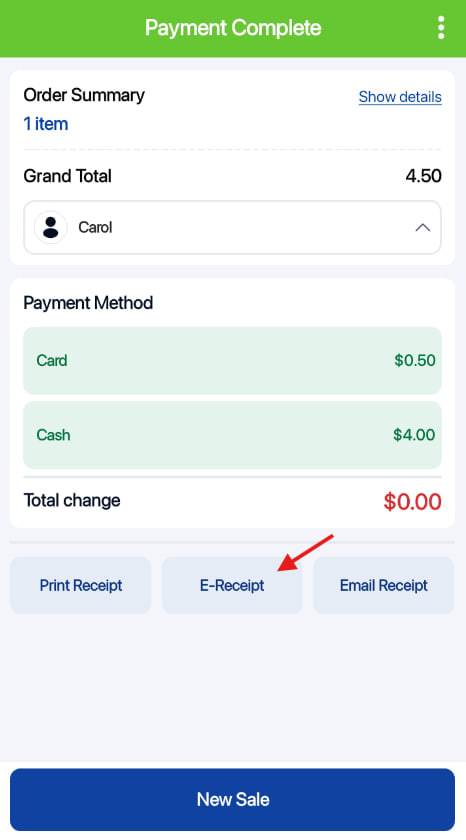
Note: This feature is exclusive to WATI subscribers only.
For more information, please click on this link!
Our Soundbox can now display static UOB PayNow QR!
You can now accept PayNow QR payments directly into your UOB bank account using the Soundbox. Every successful transaction will have instant audio and visual payment confirmation feedback!
Below is a short video on how this feature works:
✍️ NOTE: Current UOB enhancement does not support POS integration with Soundbox.
How to Update
For POS related features, user will need to update the POS to the latest version, version v2.543.
For Backend related features, users are not required to perform any actions, the new features would automatically be updated.
Feedback
We value your input! If you encounter any issues or have suggestions for further improvements, please don’t hesitate to contact us.
Stay Connected
Stay updated with the latest news and updates by following us on our social platforms.
Thank You
We appreciate your continued trust in EPOS. This update is just one of many steps we’re taking to provide you with the best POS system on the market.
If you have any questions or need assistance with the update, please contact our support team at:
Call: 6871 8833 / Email: [email protected] / Whatsapp: 8482 1888
![]()