This section provides a detailed description and step-by-step guide related to managing products in the backend portal.
Users are directed to the Products main page, where all registered products will be shown.
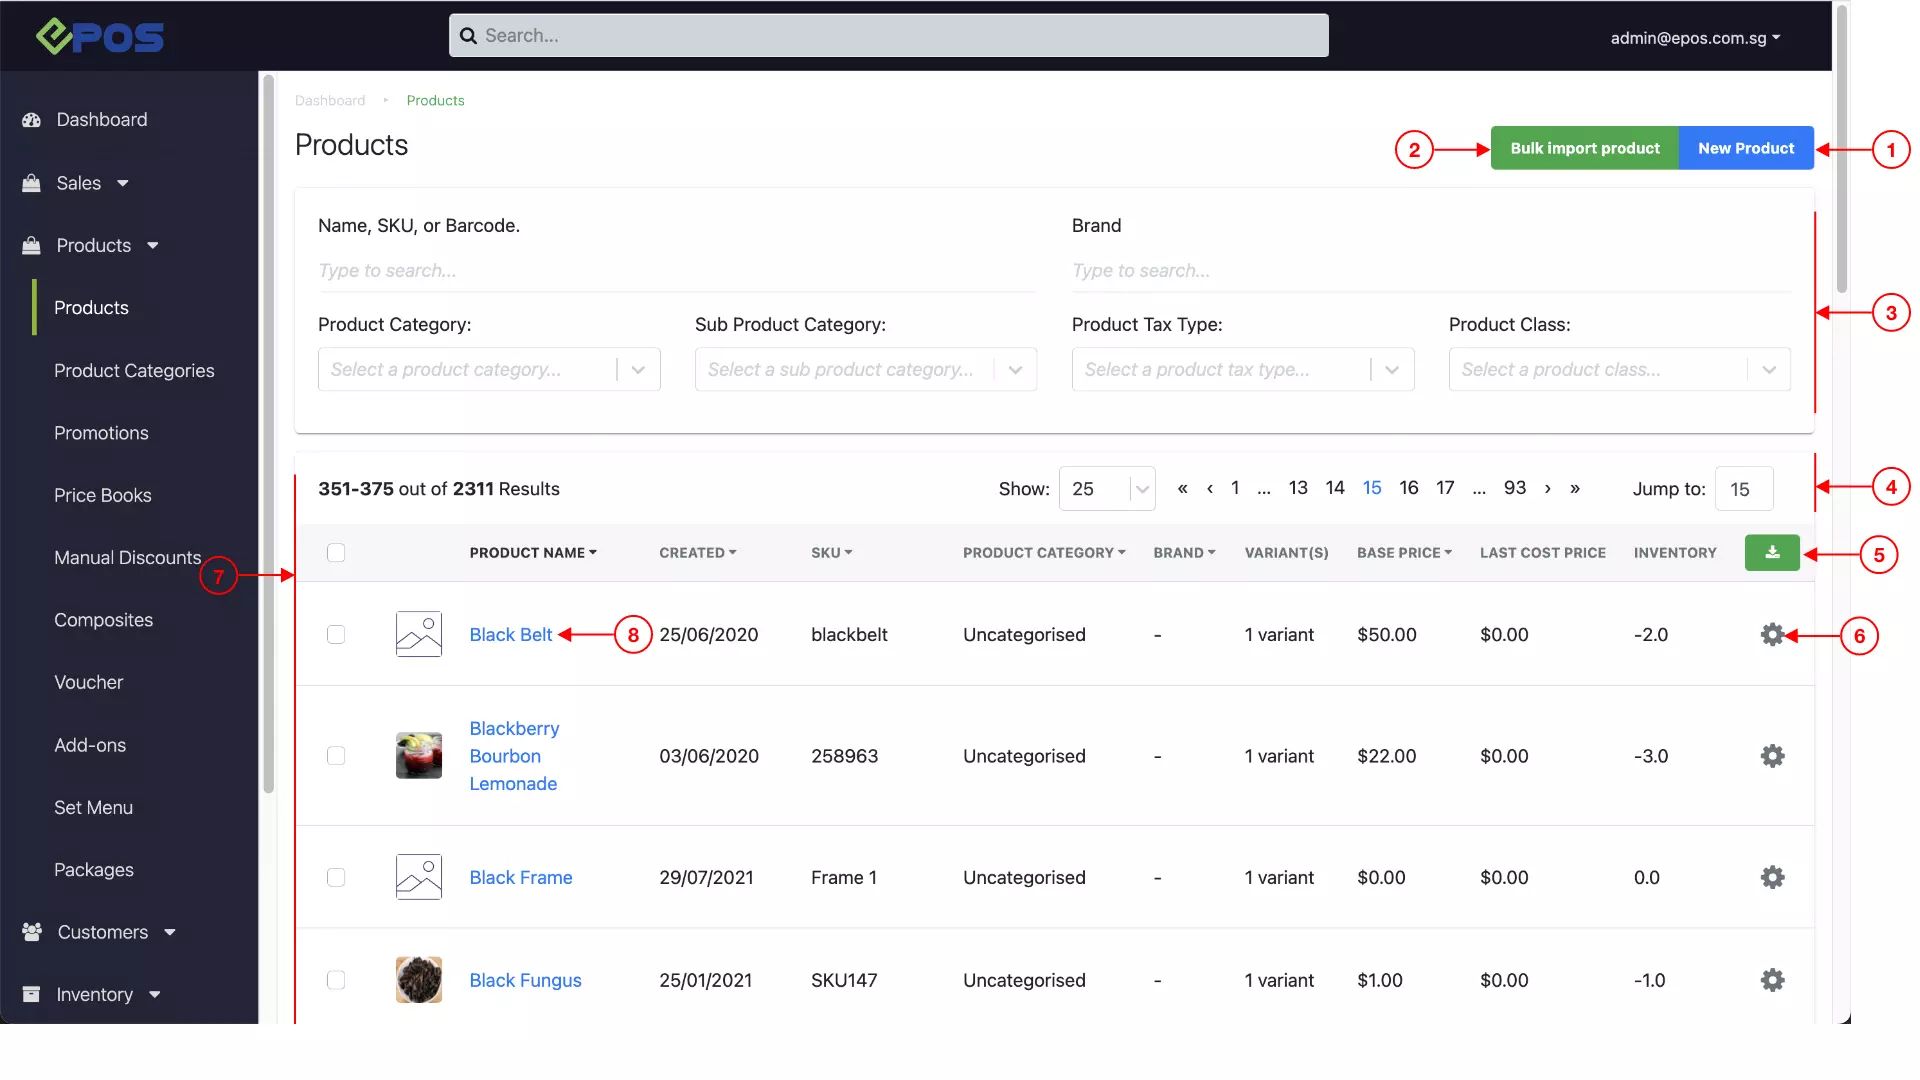
1. Adding a New Product
Enable users to create a single new product into the portal.
For more information, see the Add Single Product.
2. Bulk Import Products
Users can create multiple products simultaneously into the portal.
For more information, see Bulk Import Products.
3. Filter & Search
Provide users the ease to search for a particular product with specific criteria.
-
- Name / SKU / Barcode
- Brand
- Product Category
- Sub Product Category
- Product Class
4. Pagination
Allows users to select page number. Users can also type in the page number that they would like to access in the “Jump to:” field.
5. Export Product List
Download the selected products in CSV format.
6. Product Settings
Enable users to access quick settings of a particular product.
7. Product List
Shows the entire list of products registered into the portal based on the filter or search criteria defined by users. Contains information like:
-
- Product Name & SKU
- Created date and time
- Product Category
- Brand
- Number of variants
- Last Cost Price (based on Stock In and Purchase Orders)
- Inventory level
8. Product Configurations
Enables users to access product details i.e., Overview, Inventory, Performance, etc.
For more information, see Product Configurations.
Follow the steps below on how to add a new product at the backend.
To add a new product, access the Product main page and click on New Product.
The product window includes five sections:
- Product Detail
- More Product Fields
- Product Class
- Product Attribute
- Save Product
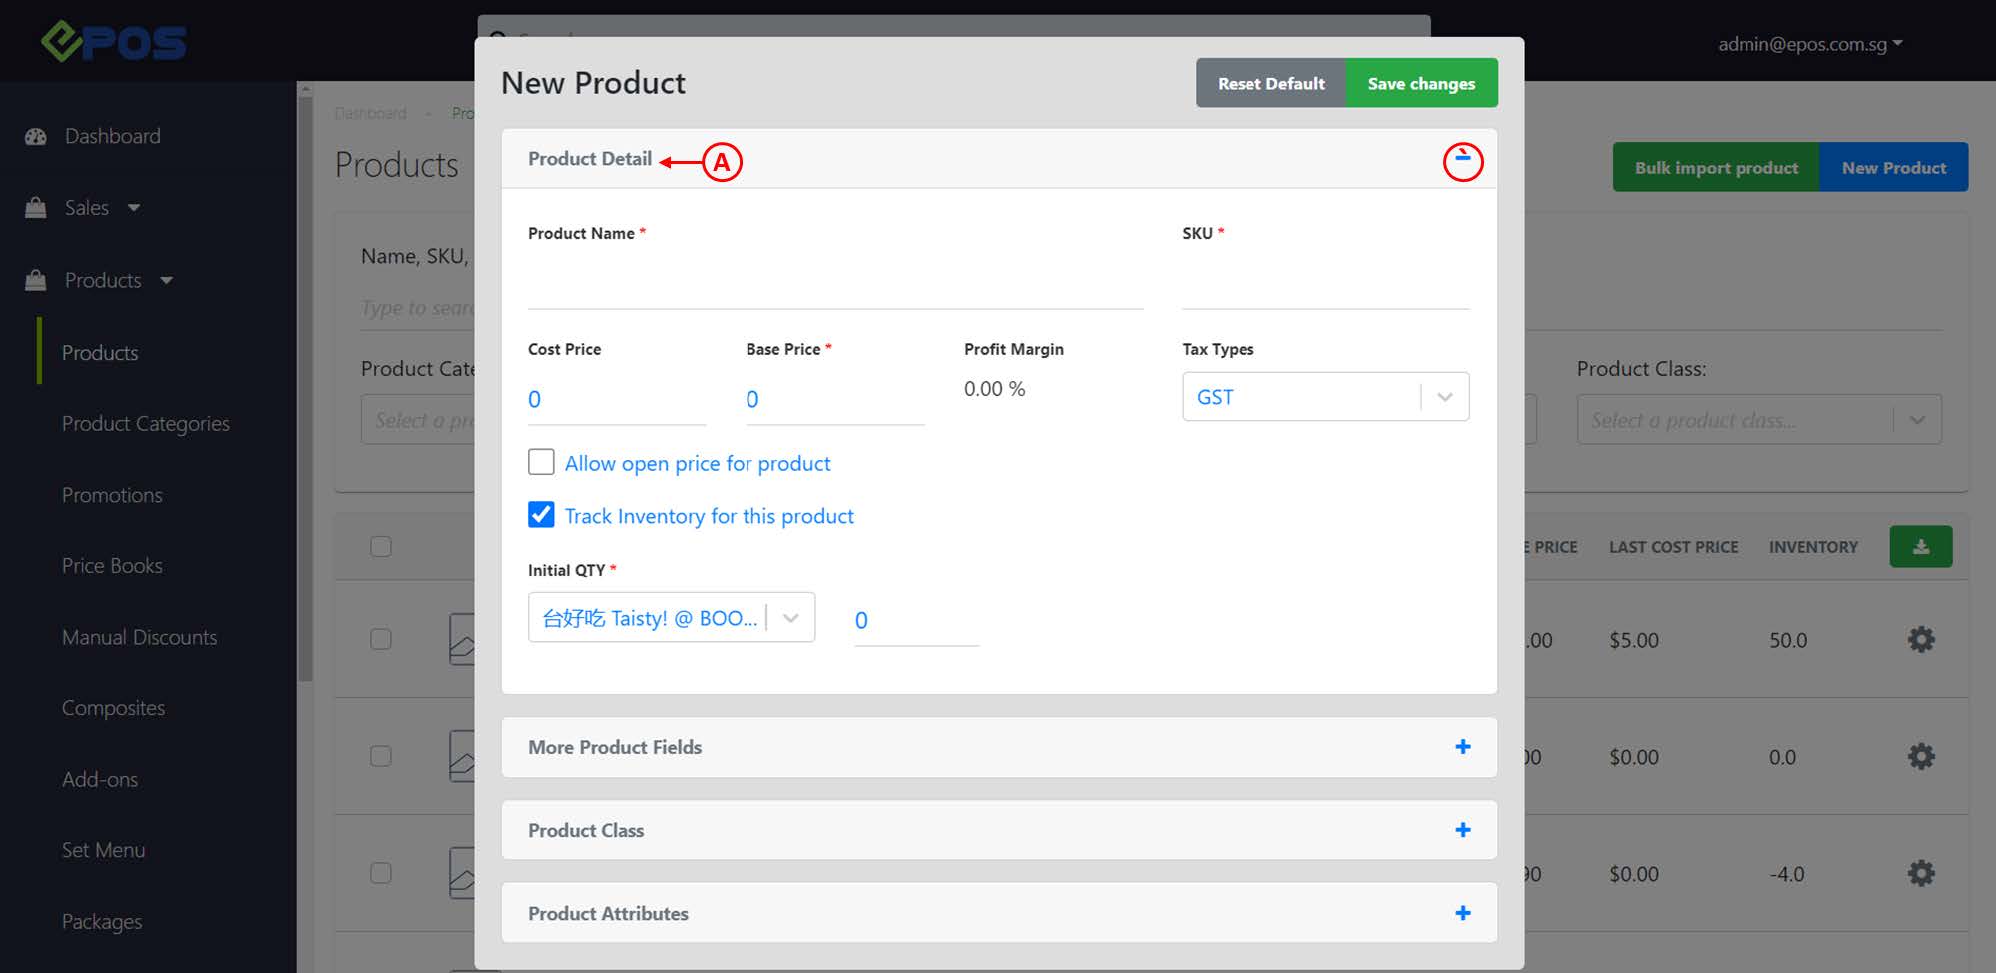
(A) Product Detail
-
- Product Name*
Enter the name of the Product. (supports multi-language input)
- SKU*
Stock Keeping Unit, unique identifier of the product.
💡 SKU field supports special characters – . _ ~ : / ? # [] @ ! $ & ‘ () * + =,”
- Cost Price
Enter the product’s cost price. (for profit margin calculation)
- Base Price*
Enter the product’s selling price.
- Profit Margin
Profit Margin = (Base Price – Cost Price) ÷ Base Price x 100
- Tax Types
Shows list of Tax Types which are registered into BACKEND PORTAL. Users can select Tax Type accordingly.
For more information, see Tax Rules Page Overview and Create New Tax Rule.
- Open Price
☑️ the checkbox to allow the selling price (base price) to be entered manually at the POS by the cashier on duty.
- Track Inventory
☑️ the checkbox to enable the inventory count of this particular product to be tracked.
For more information, see Inventory.
💡 Will be ☑️ as default.
- Initial QTY
Select the applicable outlet and insert qty-on-hand for this new product.
💡 If inserted, inventory level of this new product will be automatically at the selected adjusted once created.
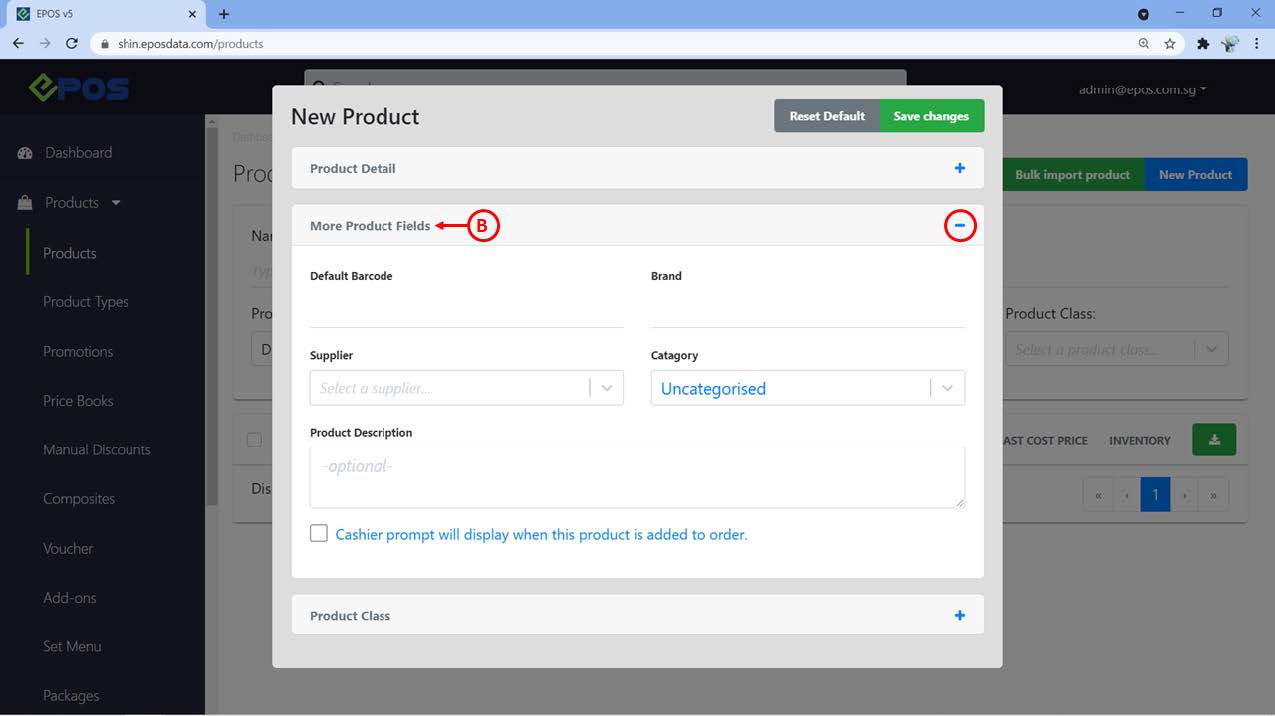
(B) More Product Fields
-
- Default Barcode
Enter product barcode manually or scan item barcode with a barcode scanner.
- Brand
Enter brand name. (if any)
- Supplier
Enter supplier name. (if any)
- Category
Show list of categories which were registered into BACKEND PORTAL. Users can select Category accordingly.
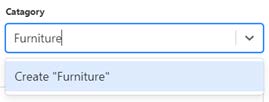
💡 Users can create a new category by entering the desired category, e.g. enter “Furniture” and click on Create “Furniture” to create a new category directly.
- Product Description
Enter the description for the particular product. ☑️ cashier prompt will display when this product is added to order (if needed)
💡This checkbox allows description to be shown when product is added to the cart in POS
(C) Product Class
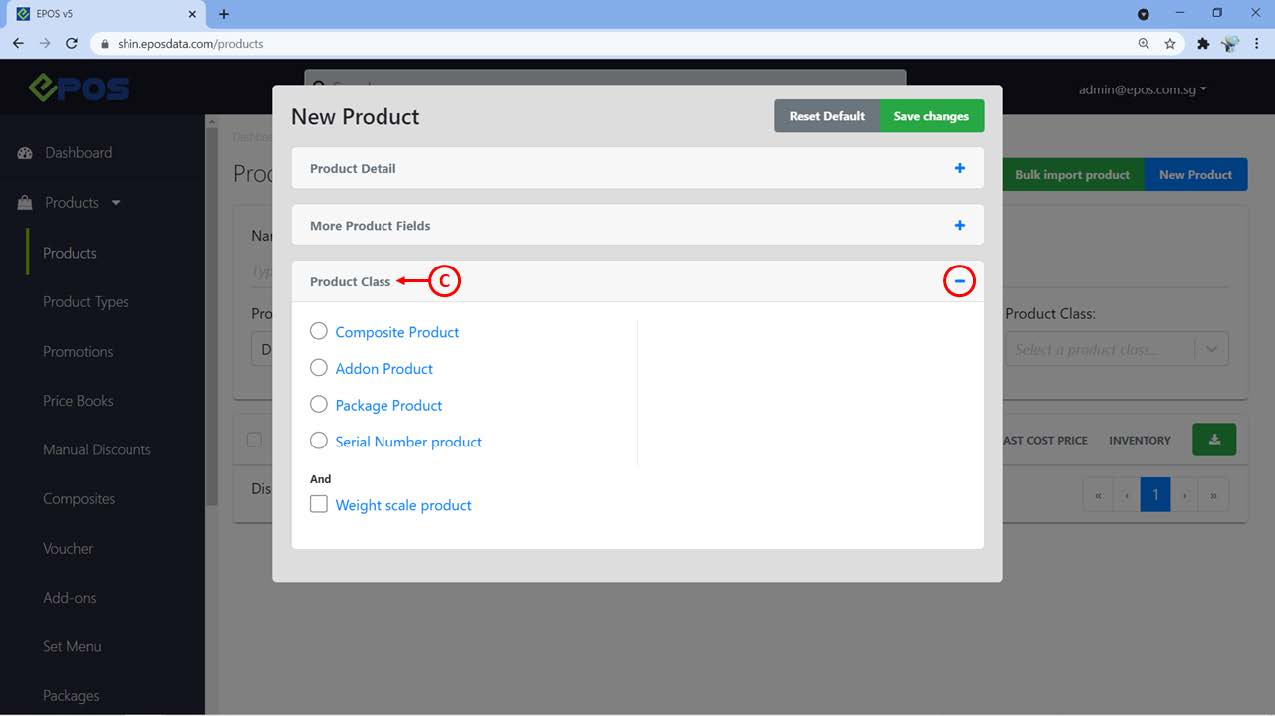
Users should not select any option in the product class section unless users are creating any of the following products: Composite Product, Add-on Product, Package Product, Serial Number Product and Weight Scale Products.
For more information, see Product Classes.
💡 Fields marked with * are mandatory fields which should not be left blank.
💡 Click on➕icon to expand the fields; click on➖icon to shrink the fields.
(D) Product Attributes
In this subsection, users insert product attributes for products that come with different variants based on a set of attributes.
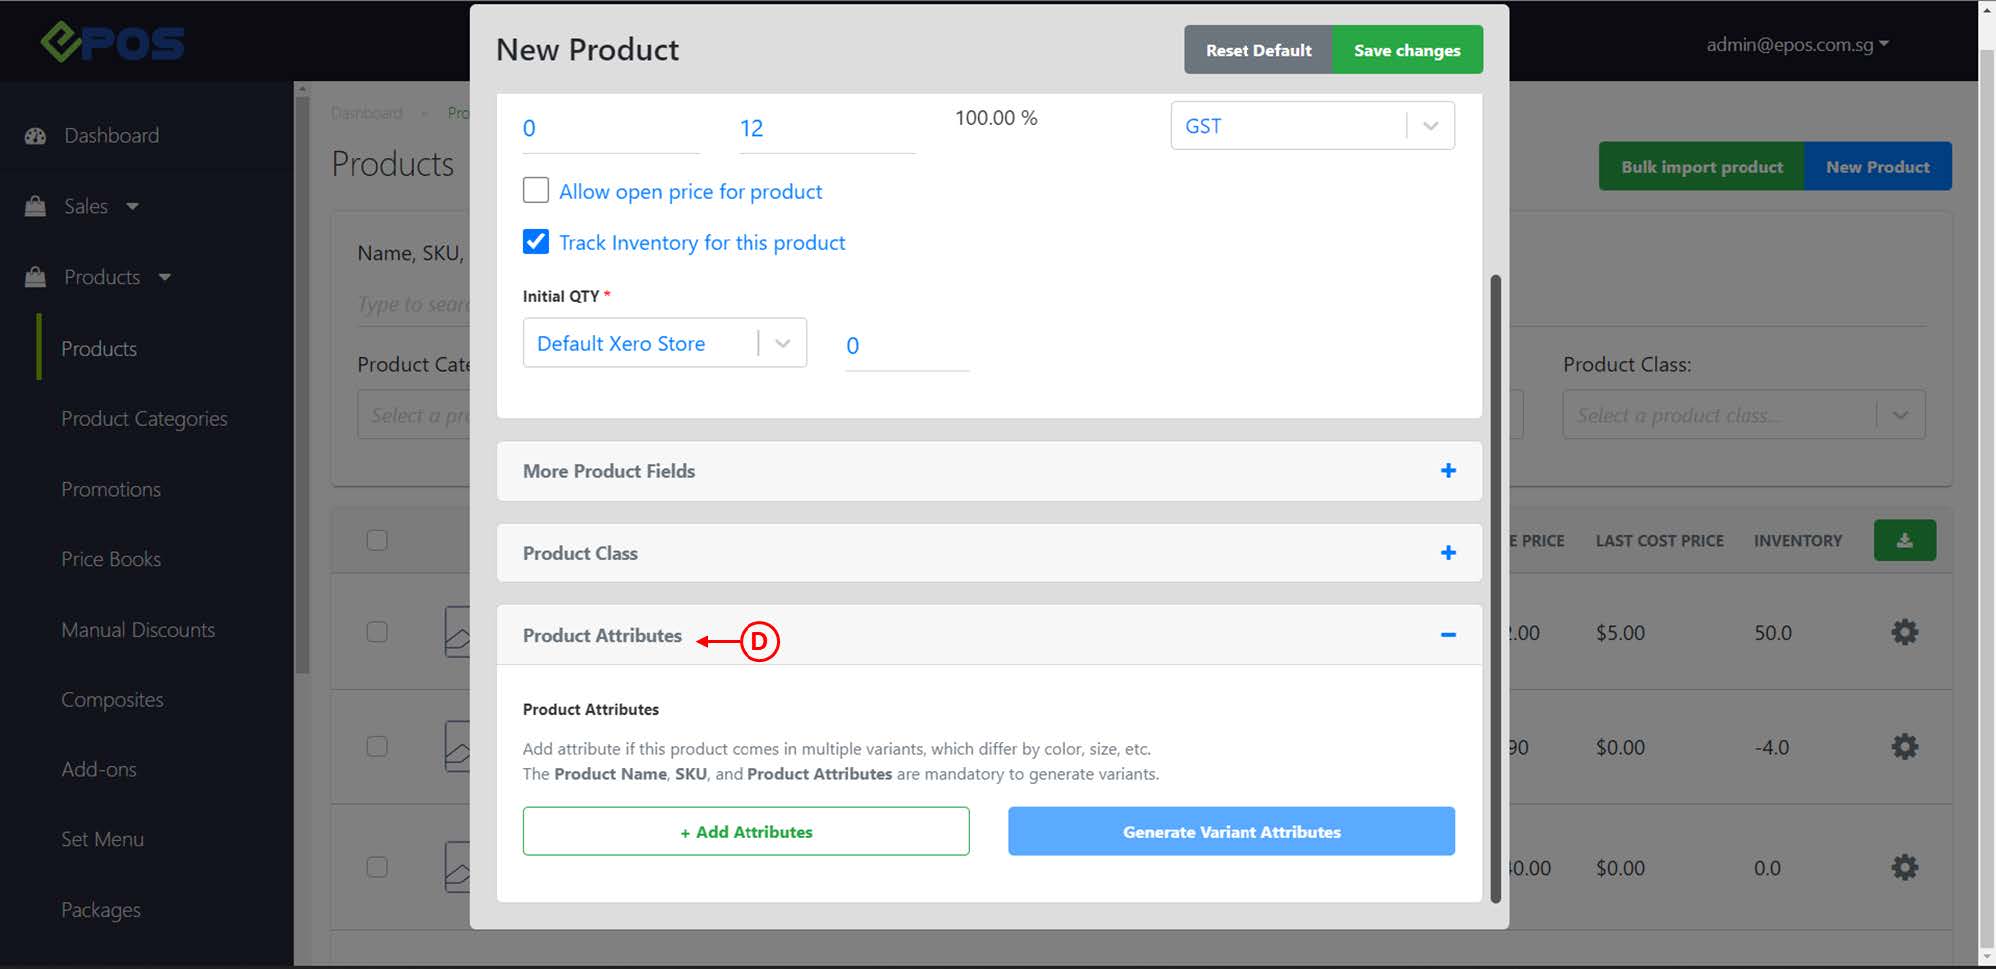
To add variants to a product, follow the steps below.
1. Fill in the necessary fields in the previous subsections, as shown. Click on Product Attribute to expand the subsection.
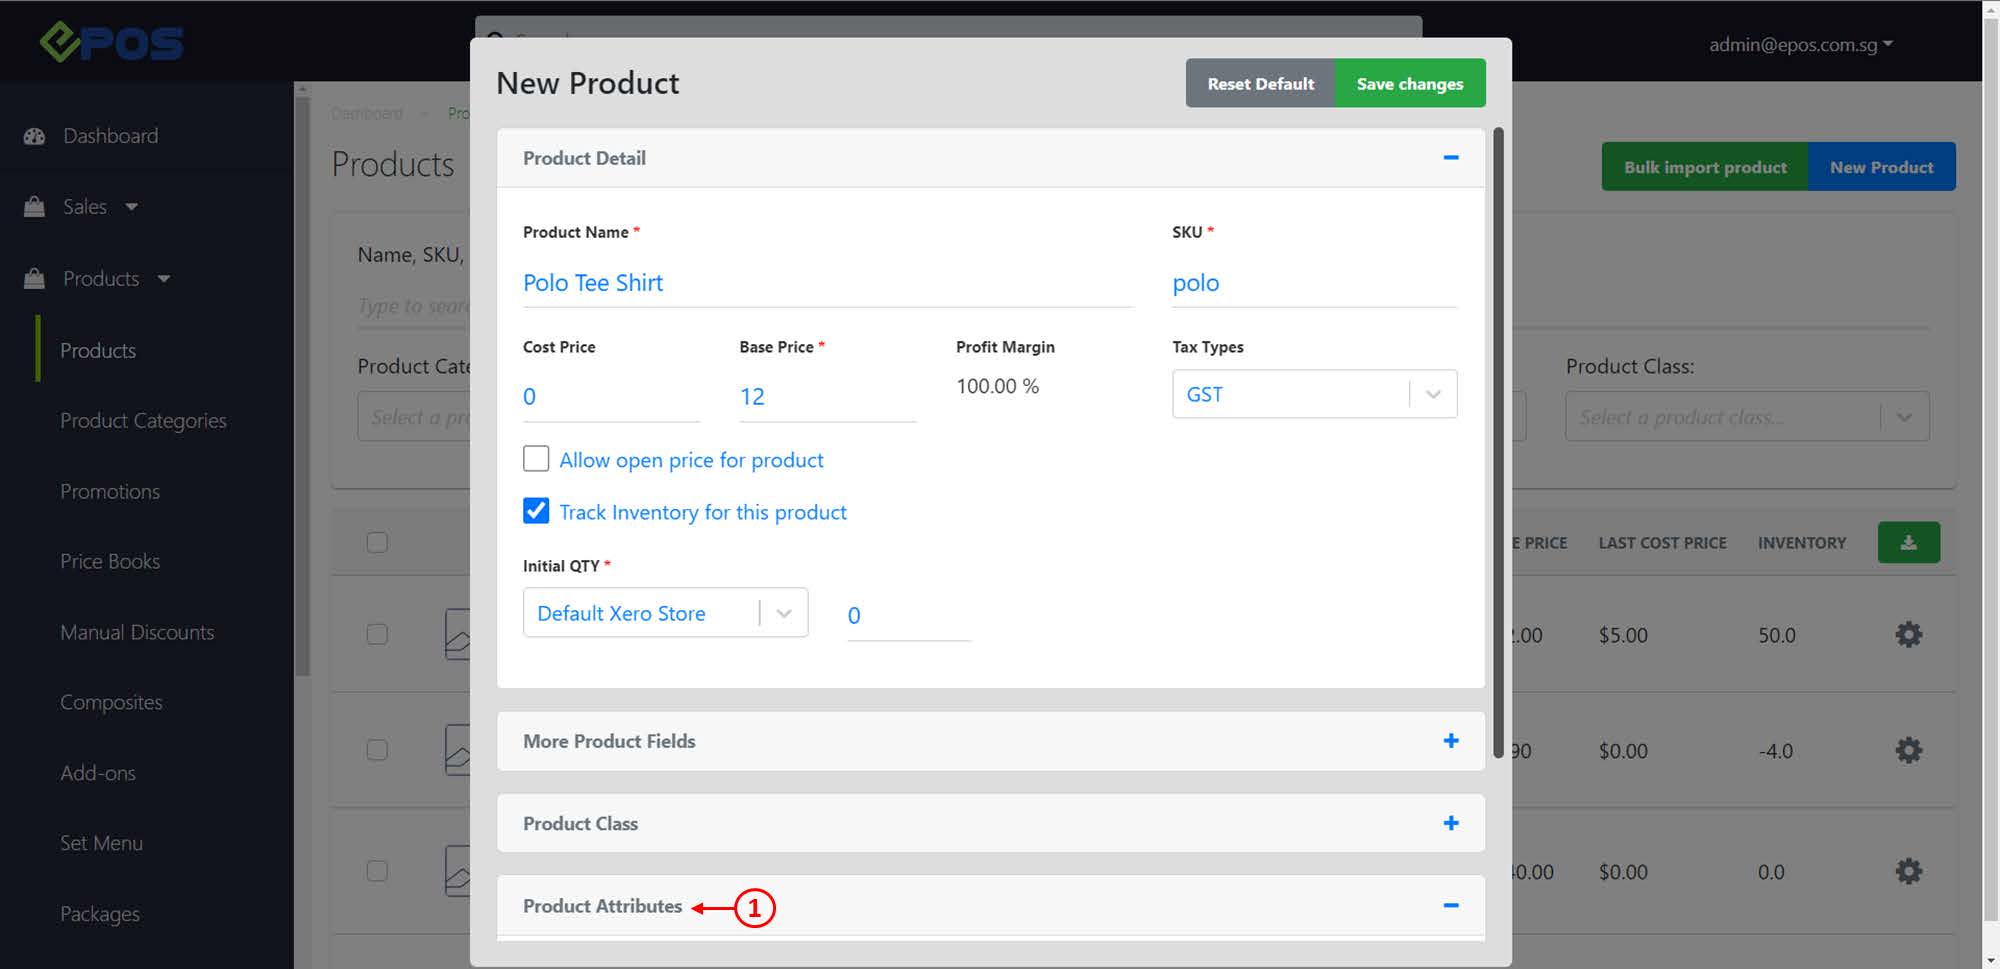
2. Click on + Add Attributes
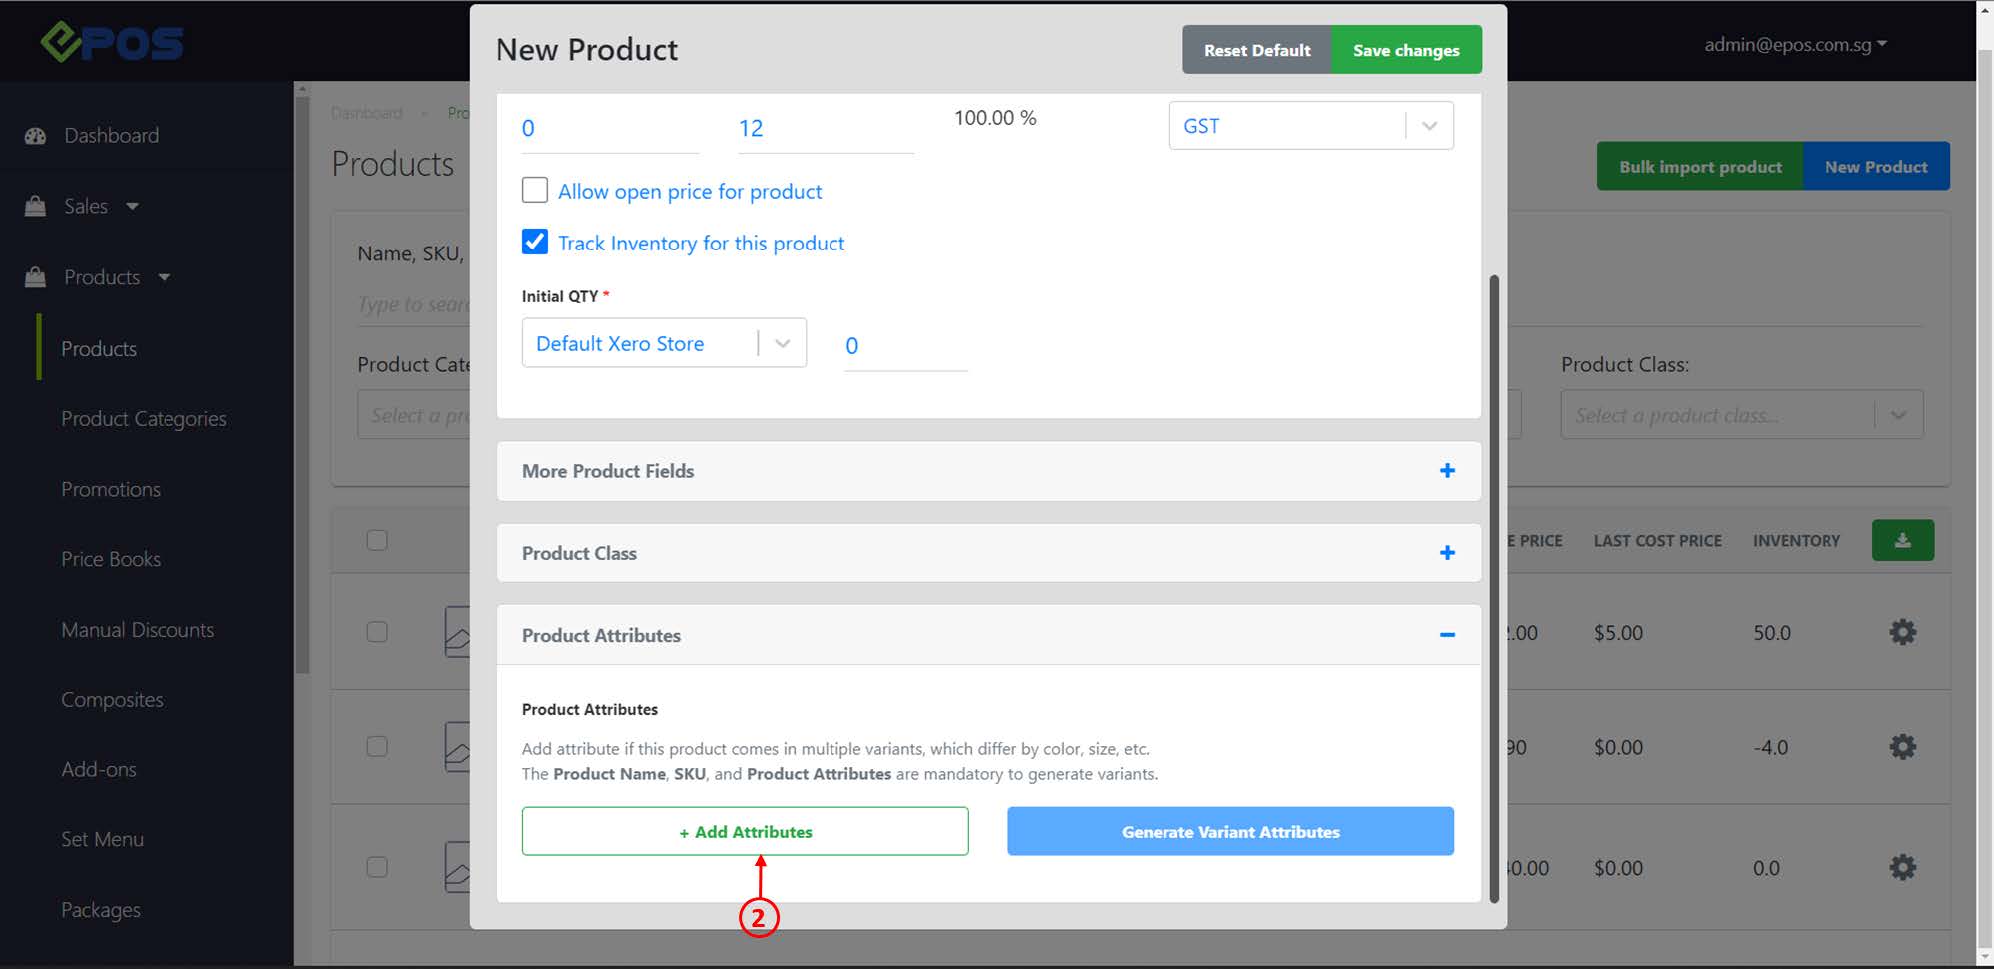
3. Insert Attribute and its set of values
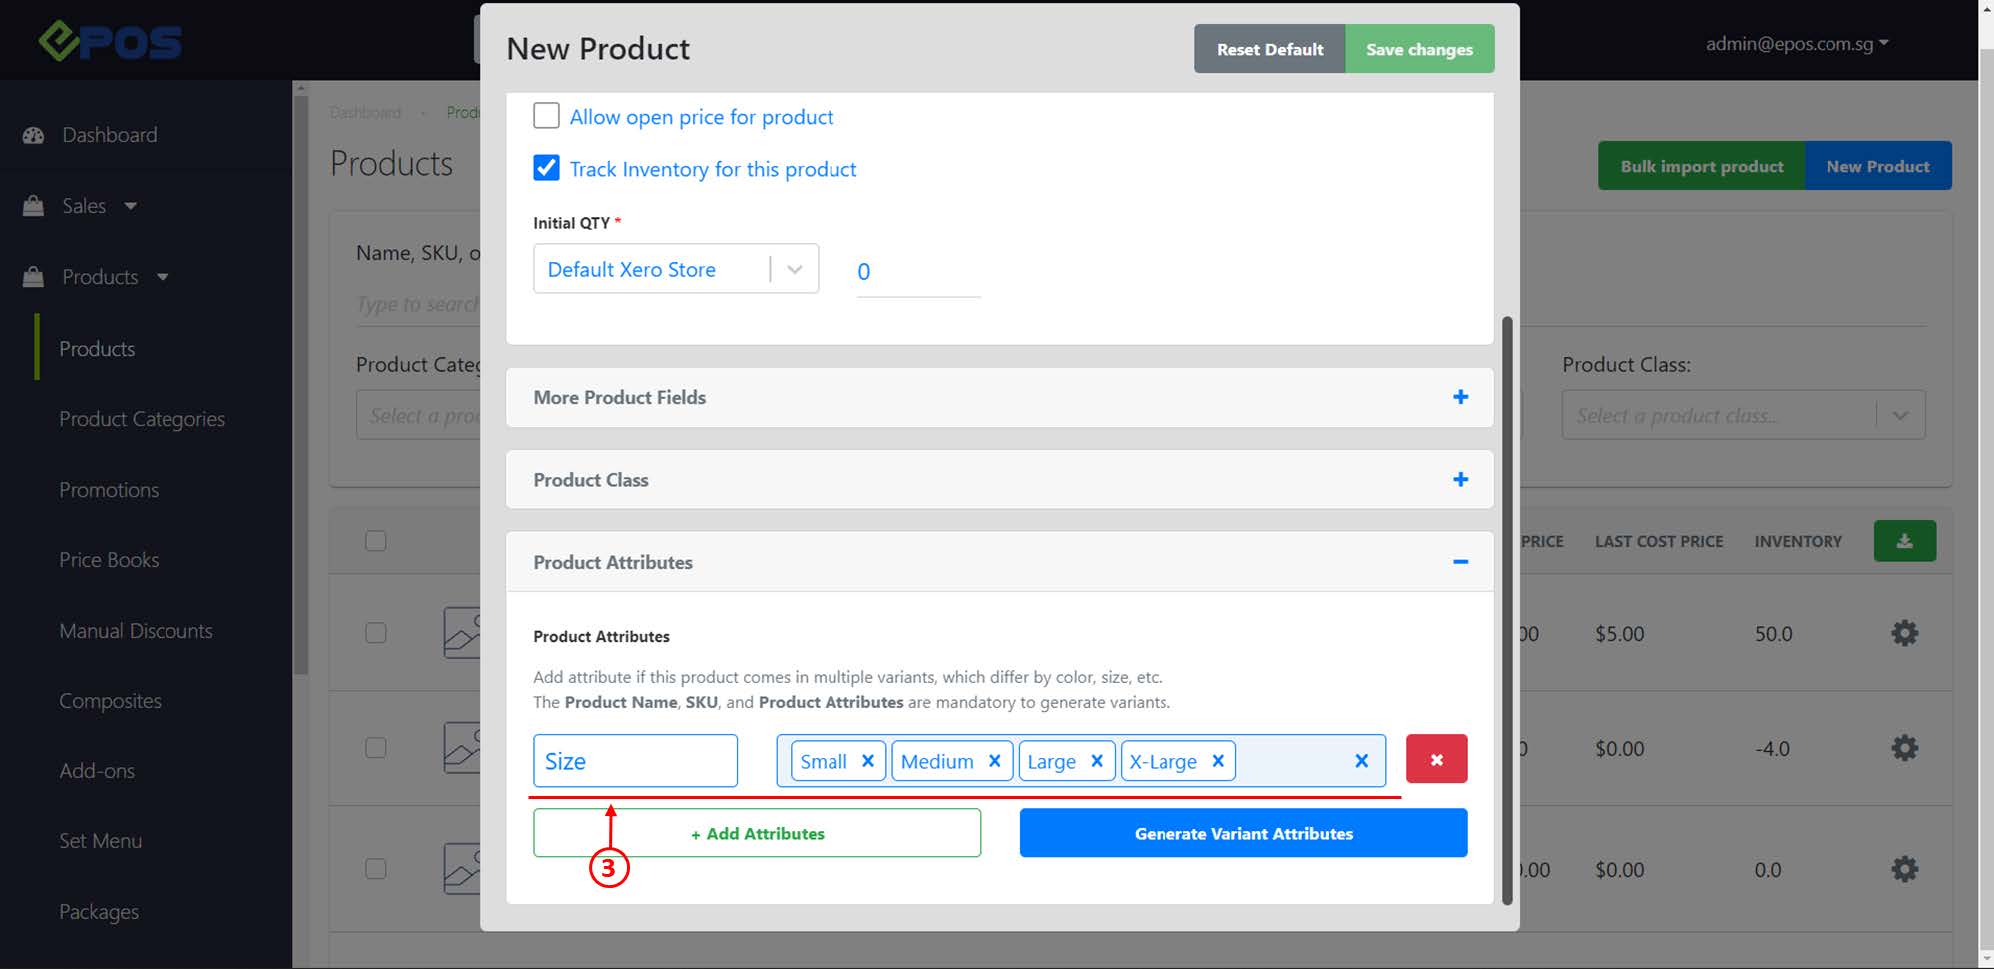
Eg: Size || Small ; Medium ; Large; X-Large
💡 To insert different attribute values,, hit on Enter key on the keyboard.
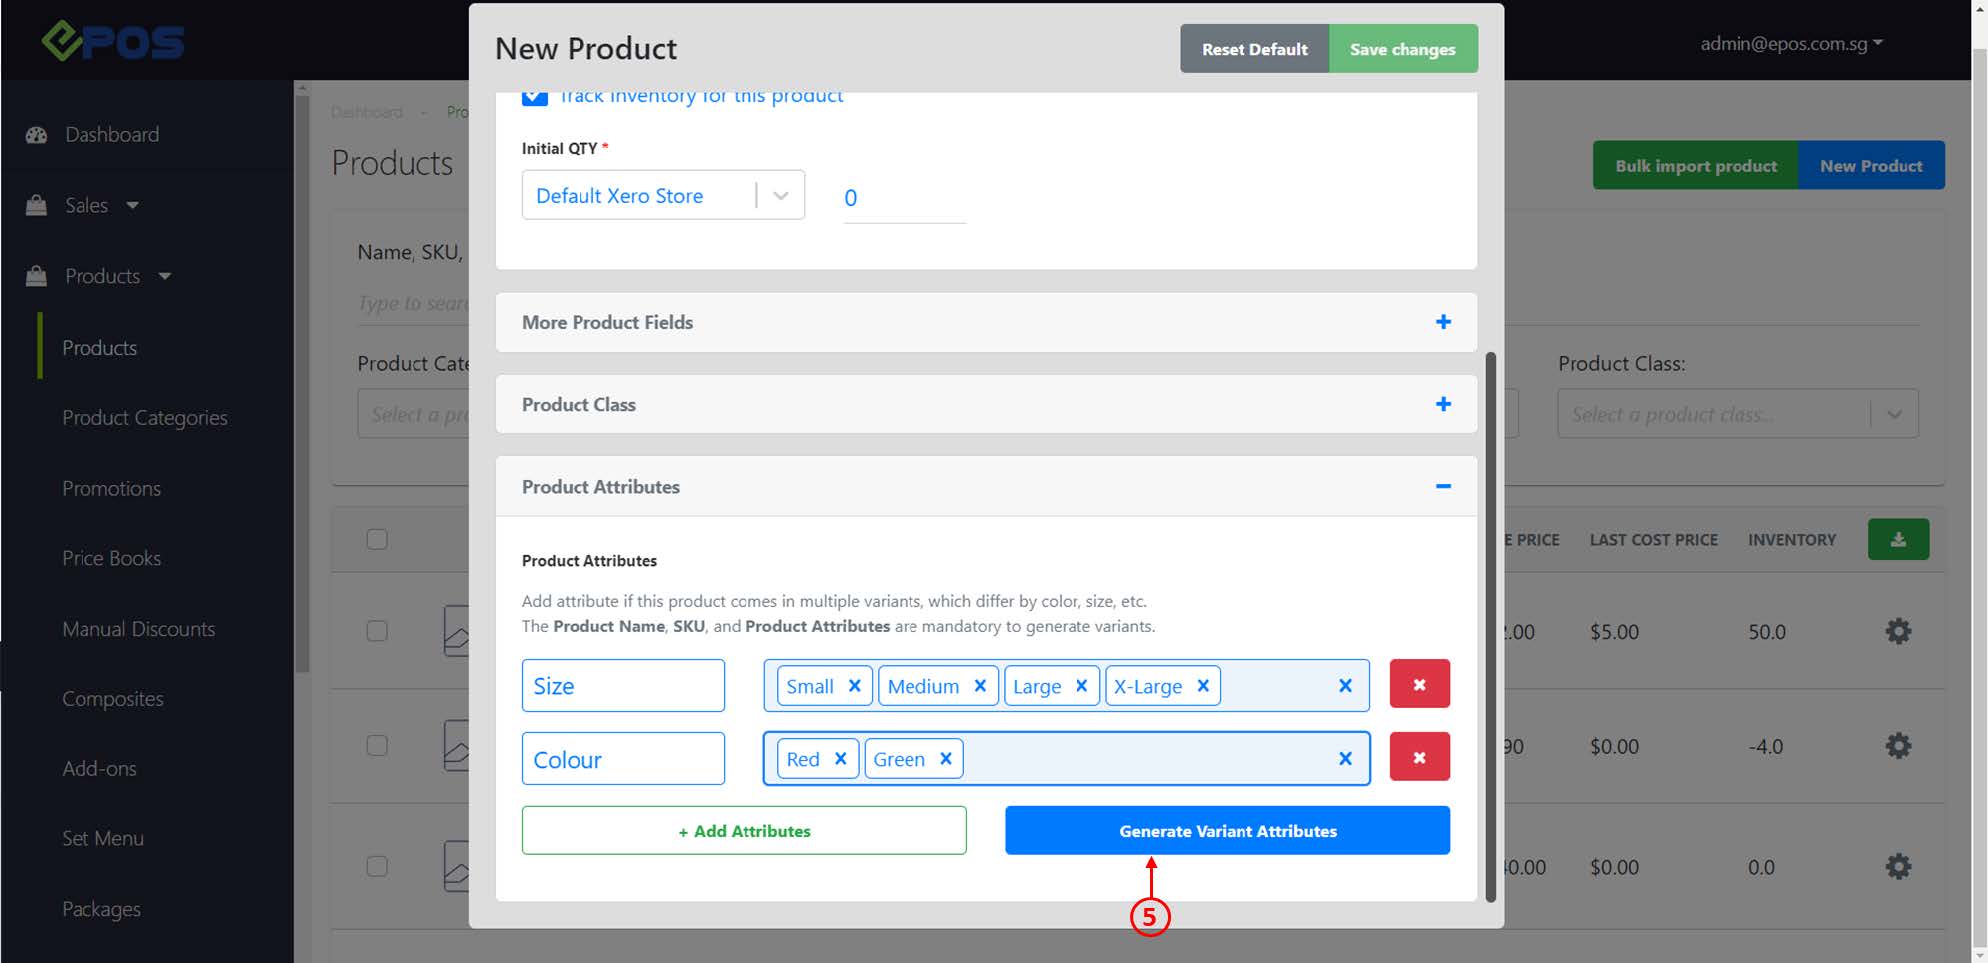
4. If users would like to add another attribute and attribute values. Click on + Add Attributes, empty fields will be shown. Users should then repeat step 2 and step 3 till all the relevant attributes are added.
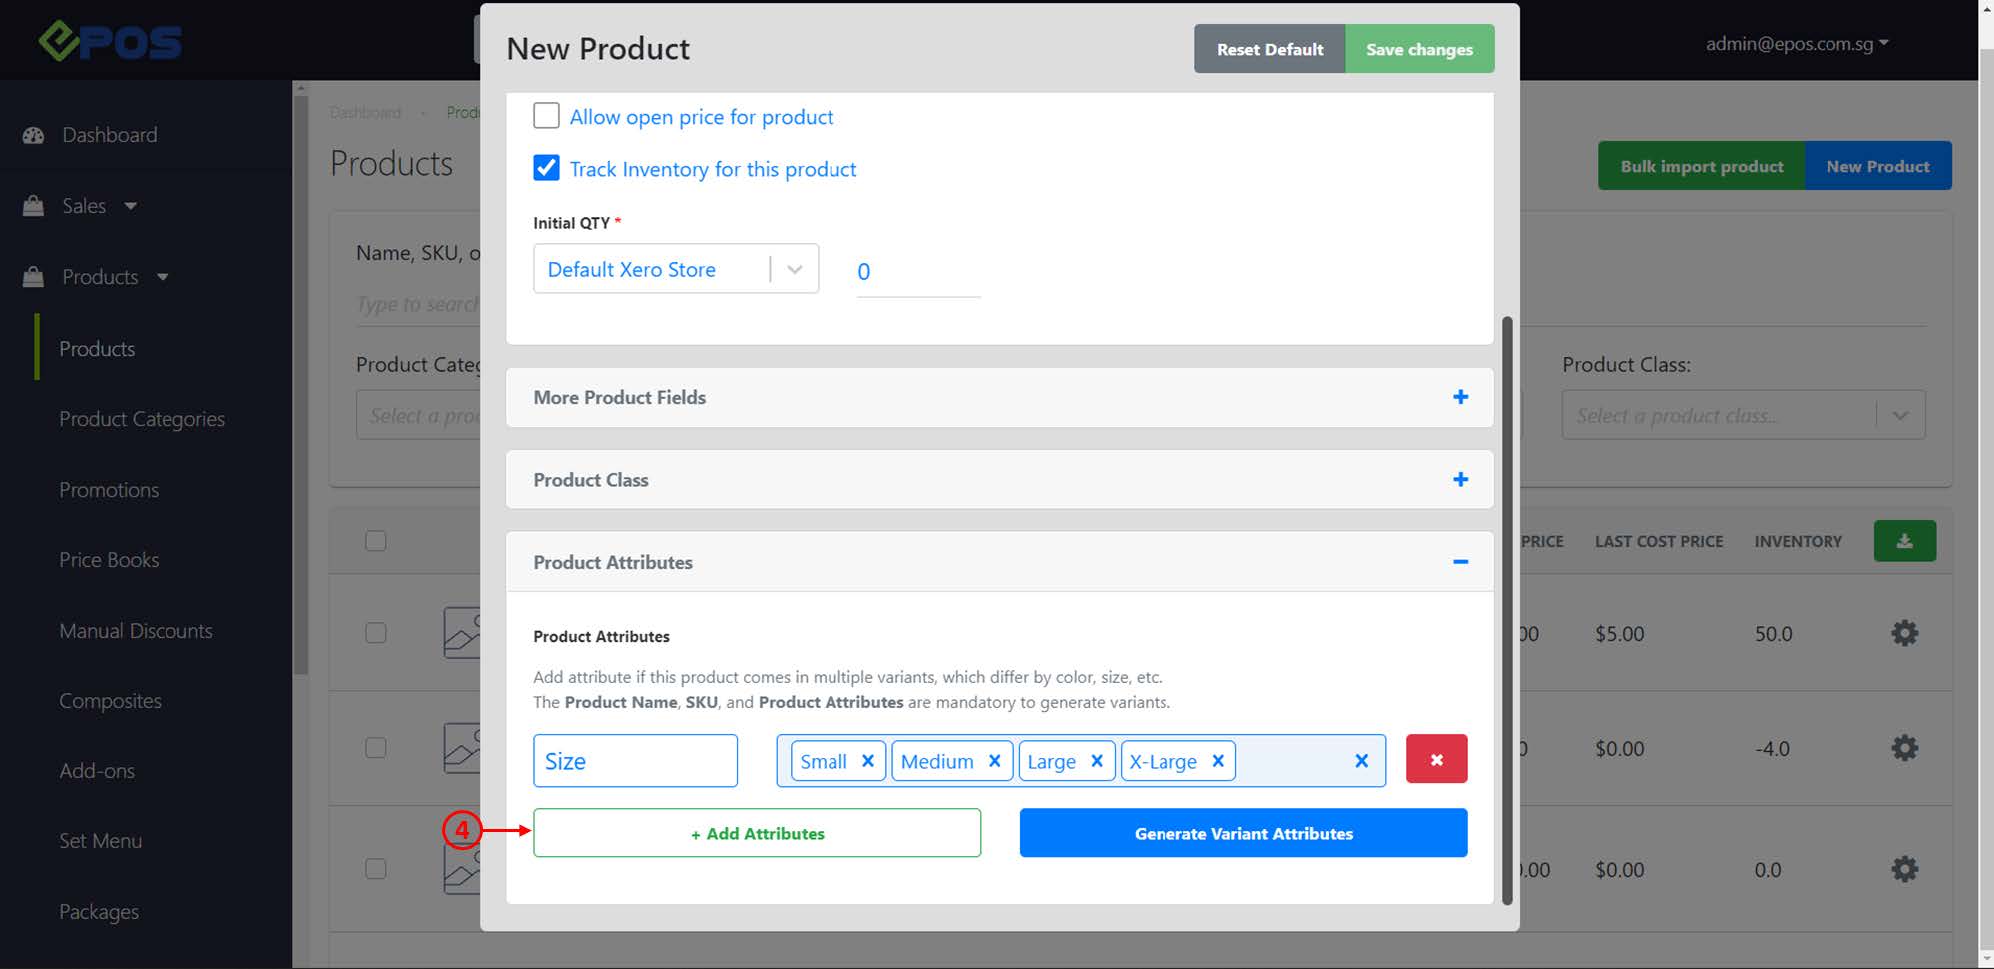
5. Once the attributes are finalised, click on Generate Variant Attribute, a list of variants will be automatically drafted.
6. From the list of variants, users may edit the SKU, Name, Cost Price and Selling Price. To edit the created variants refer to Product Variants.
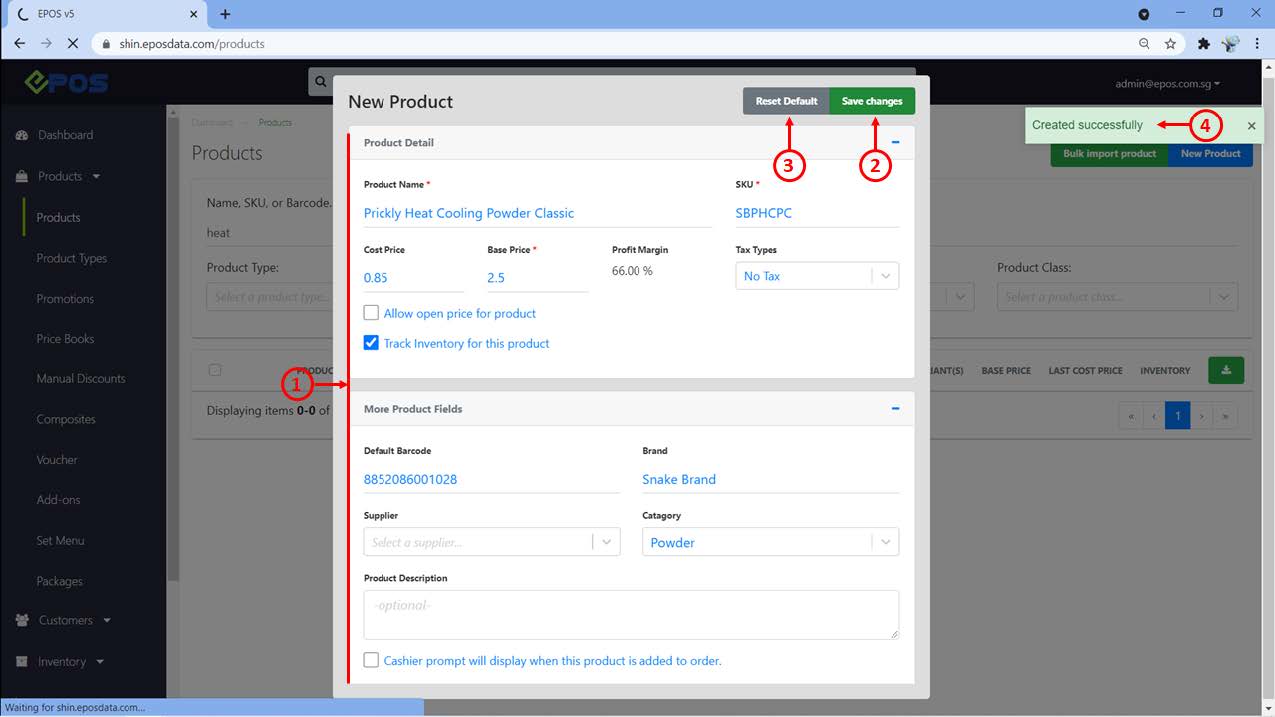
(E) To save a product
1. To create a new product, users are required to fill up all mandatory fields.
💡 Optional fields can be skipped and left blank
2. Click on Save changes to complete product creation.
3. To clear all inputs, users may click on Reset Default to restore every field to blank.
4. Product will now be registered in the Backend System once “Create successfully” is shown at the top right corner.
Follow the steps below on how to edit a product that has been created in the backend.
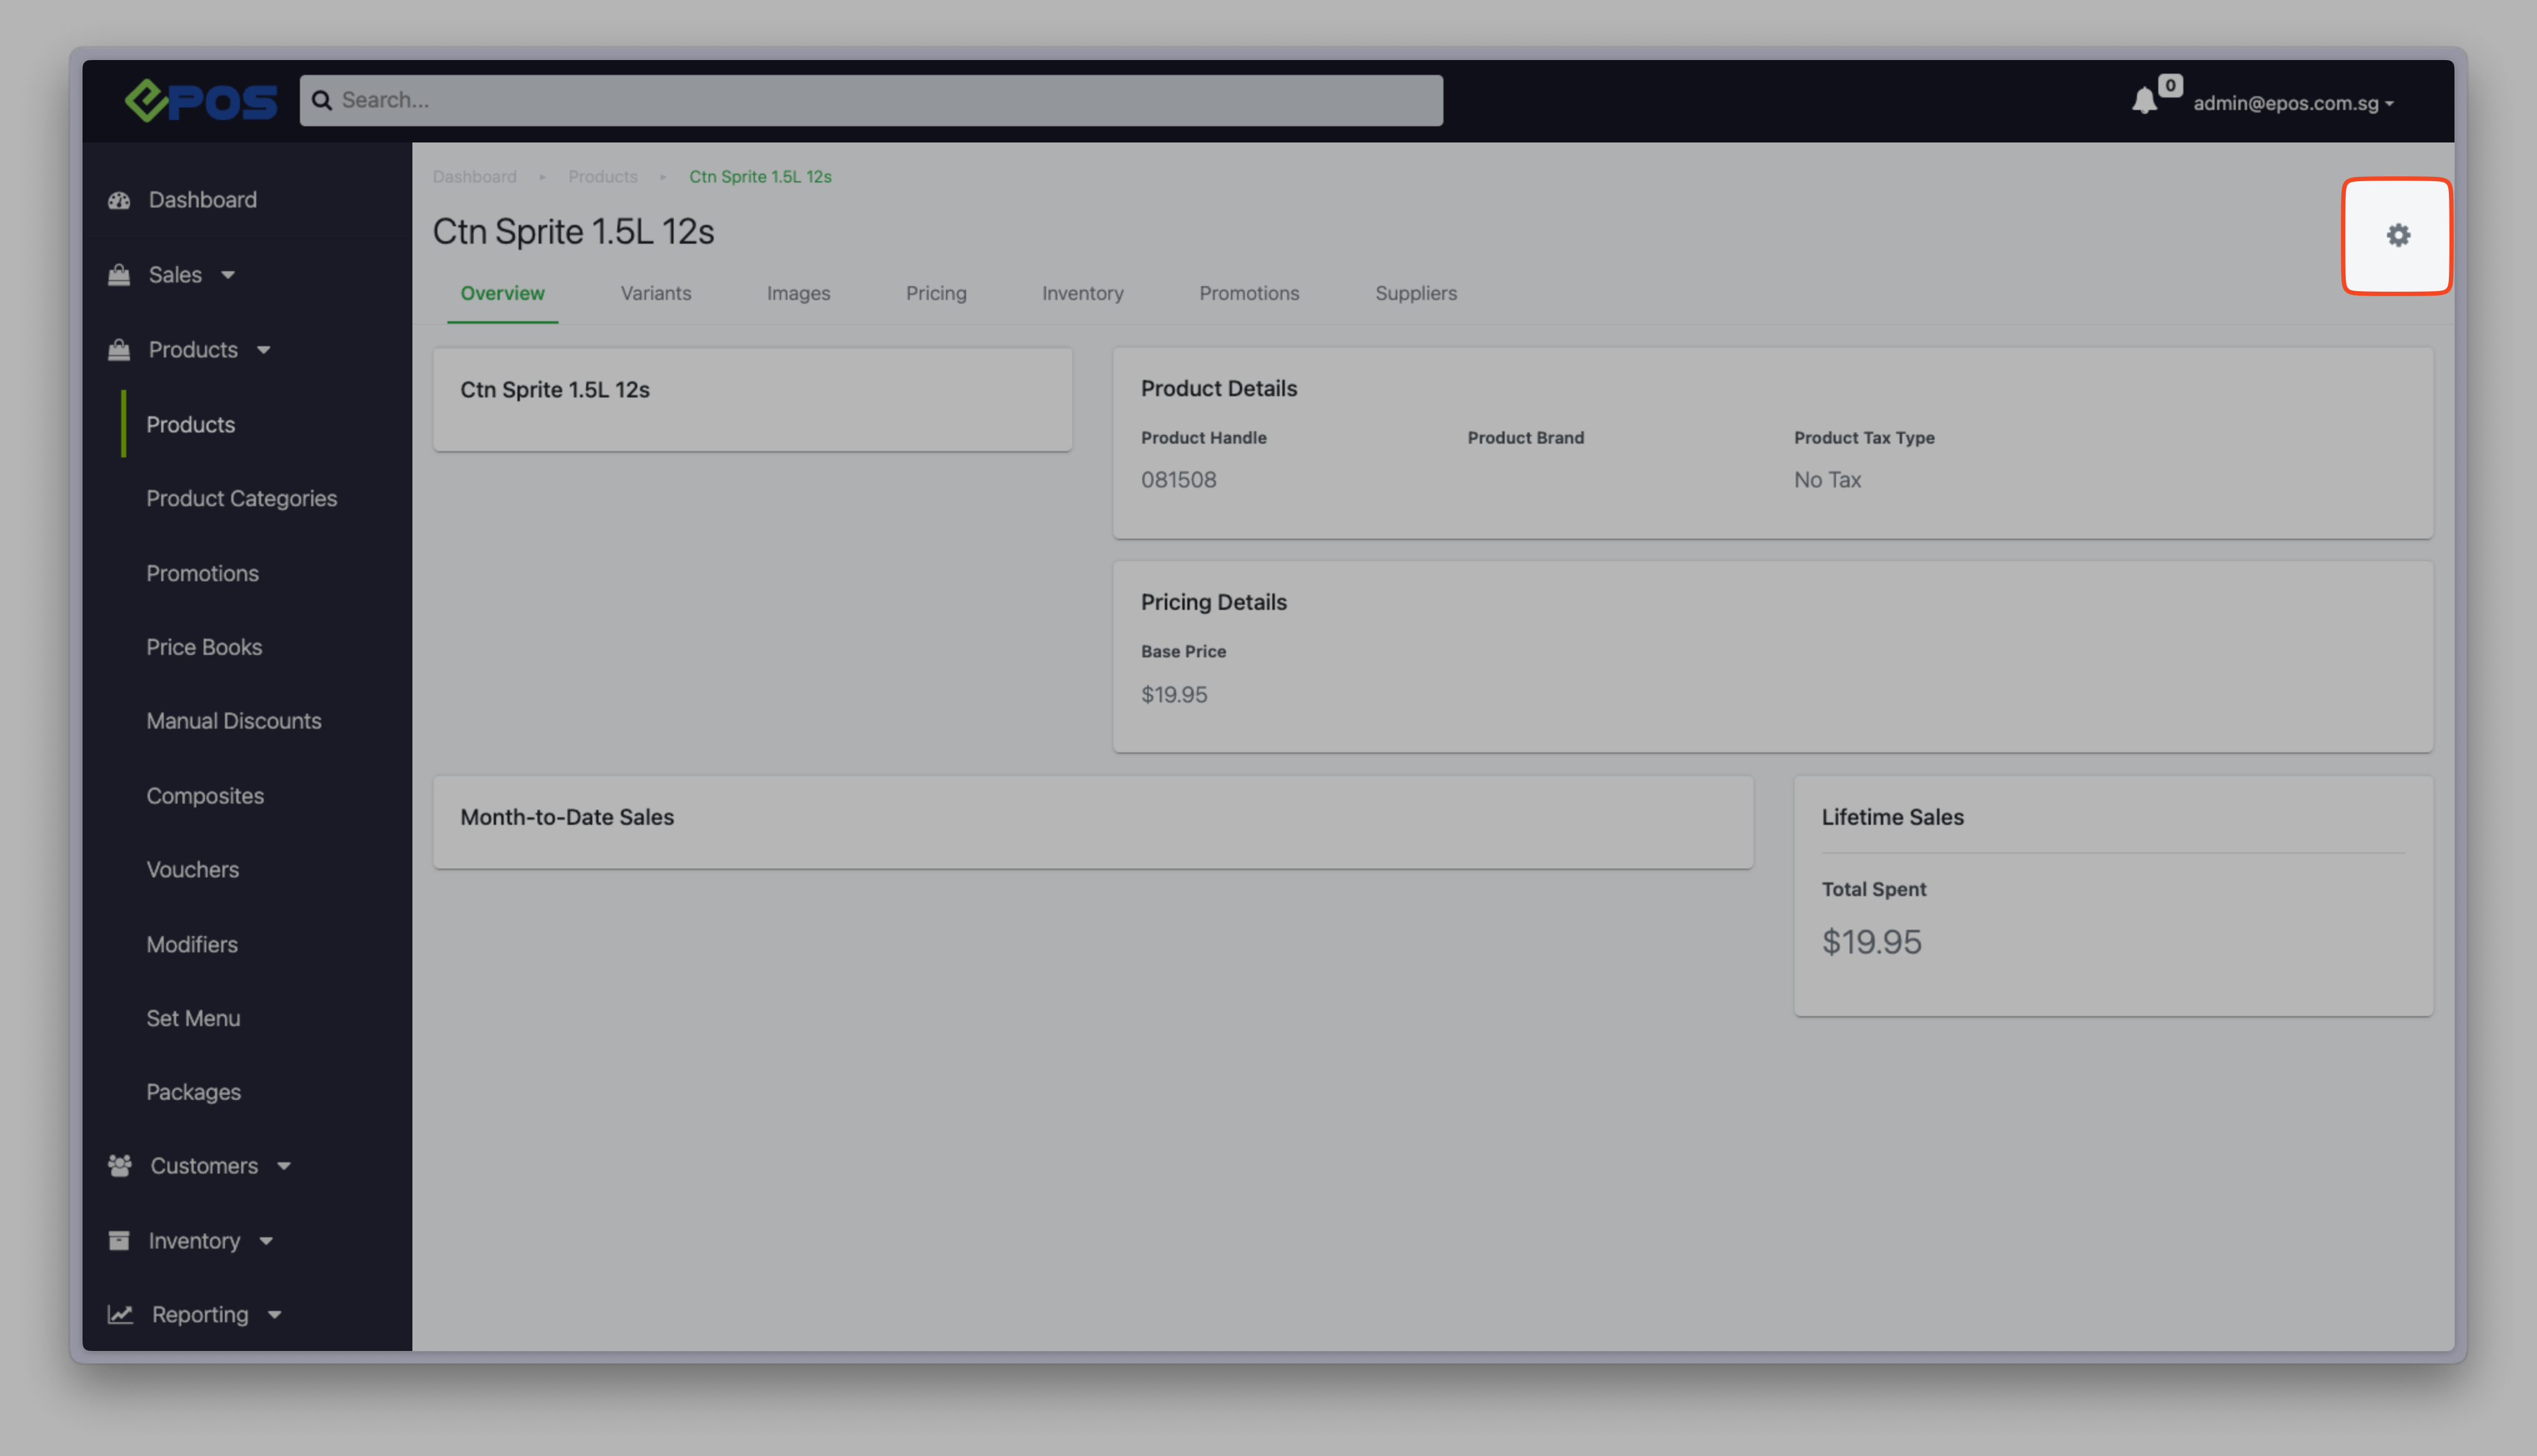
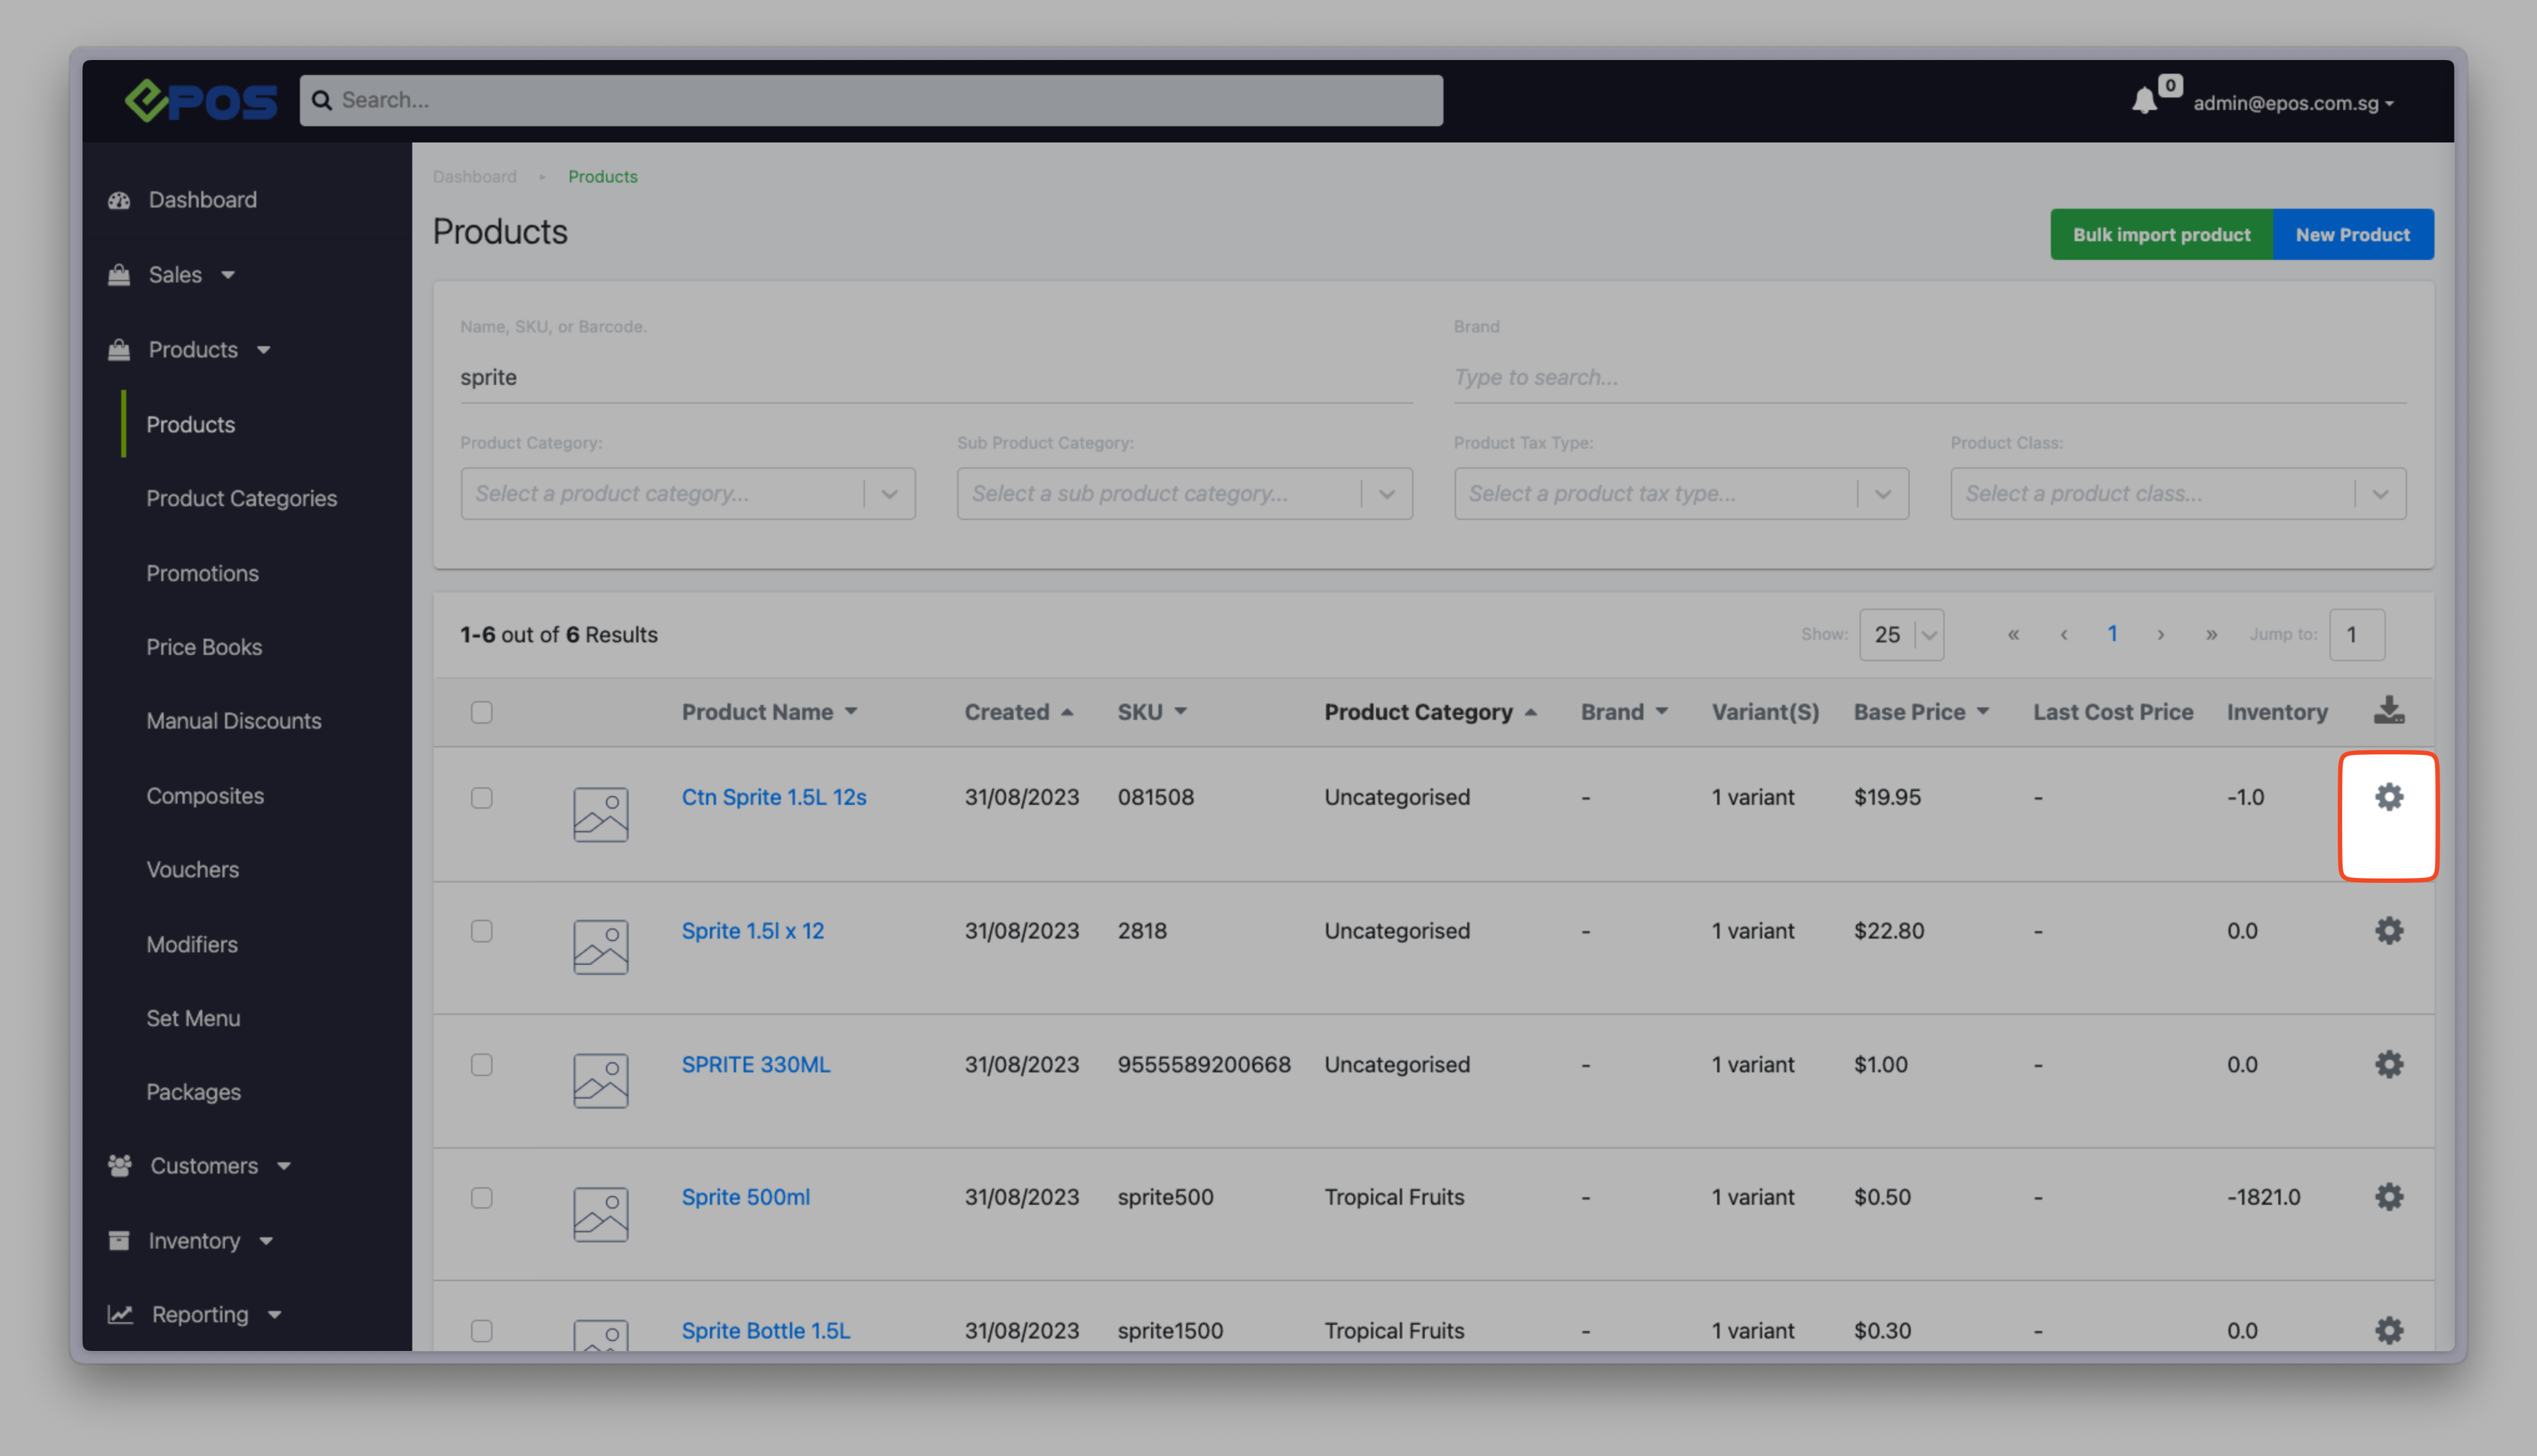
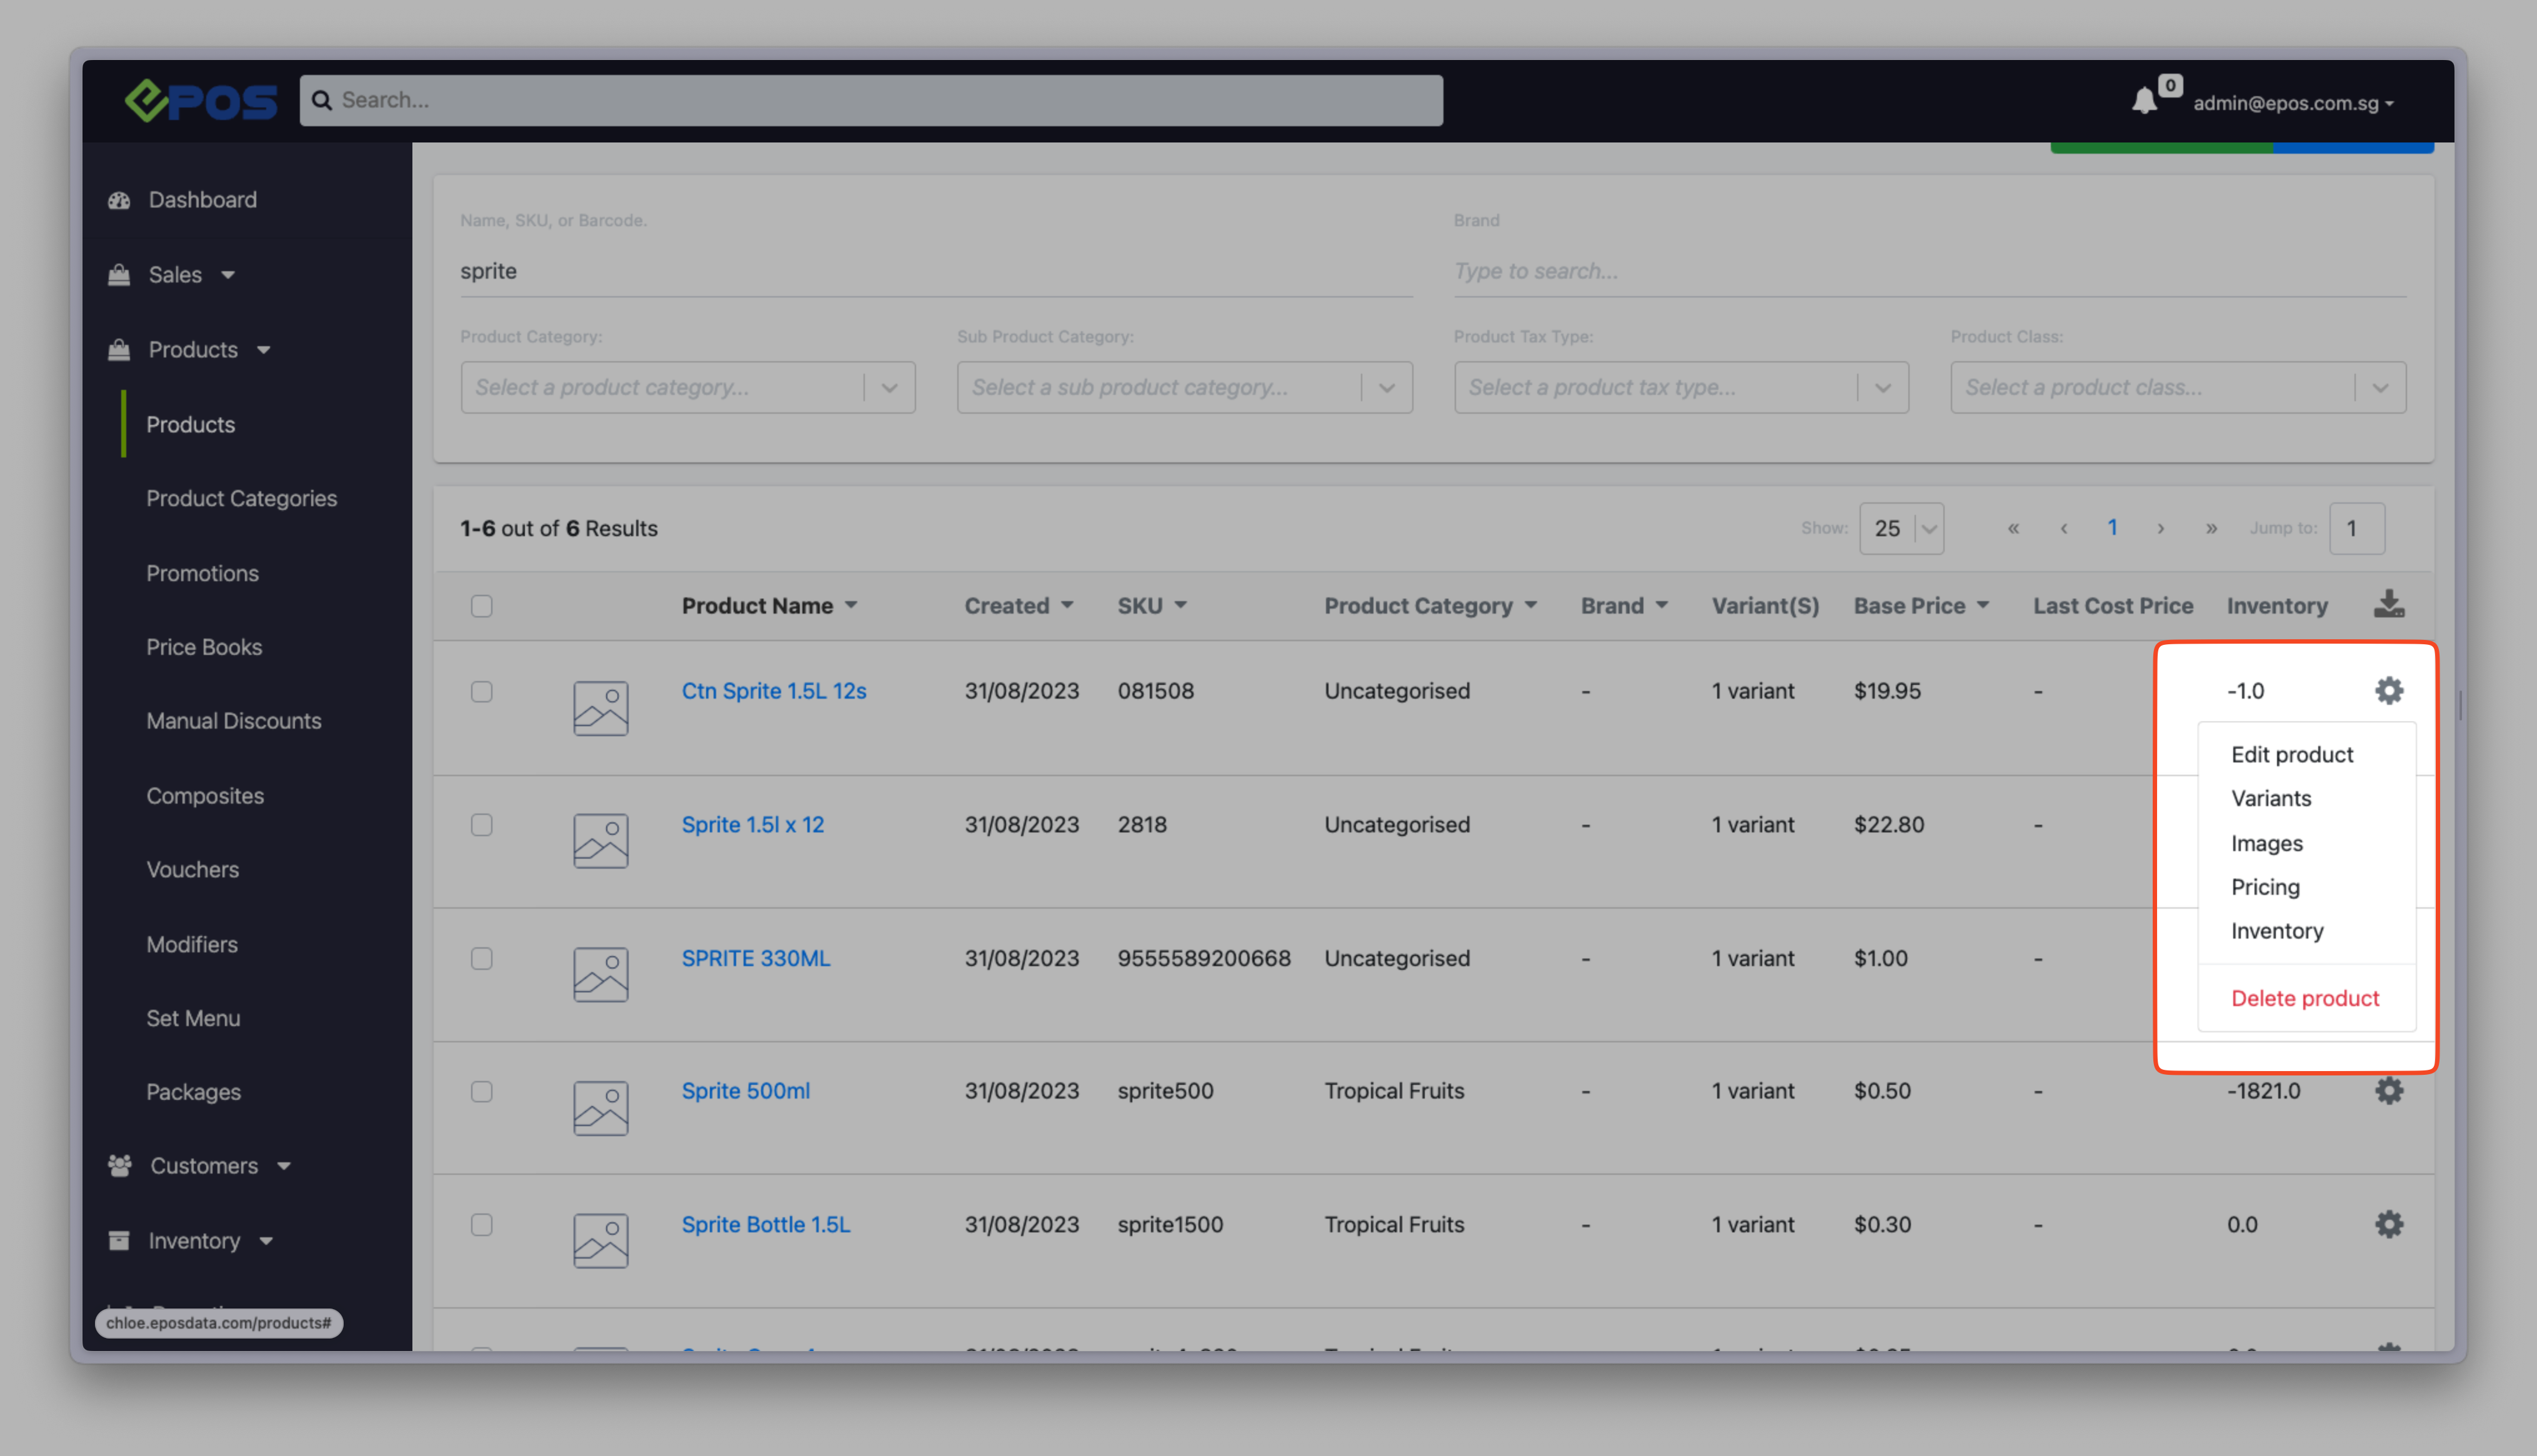
1. Click on the gear icon at product list page or product overview page to edit product details.
Product List Page:
Product Overview Page:
-
-
- Edit Product: Leads to the next step
- Variants / Images / Pricing / Inventory: Leads to the respective Product Configuration page
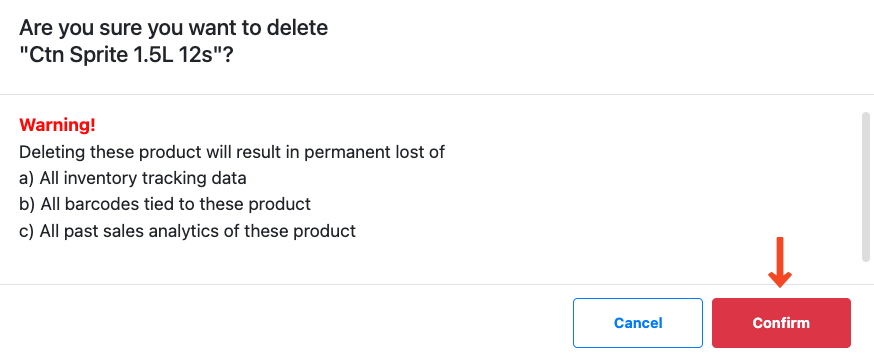
- Delete Product: Allows users to delete the selected product
2. A pop up window will appear, and users may edit the product details.
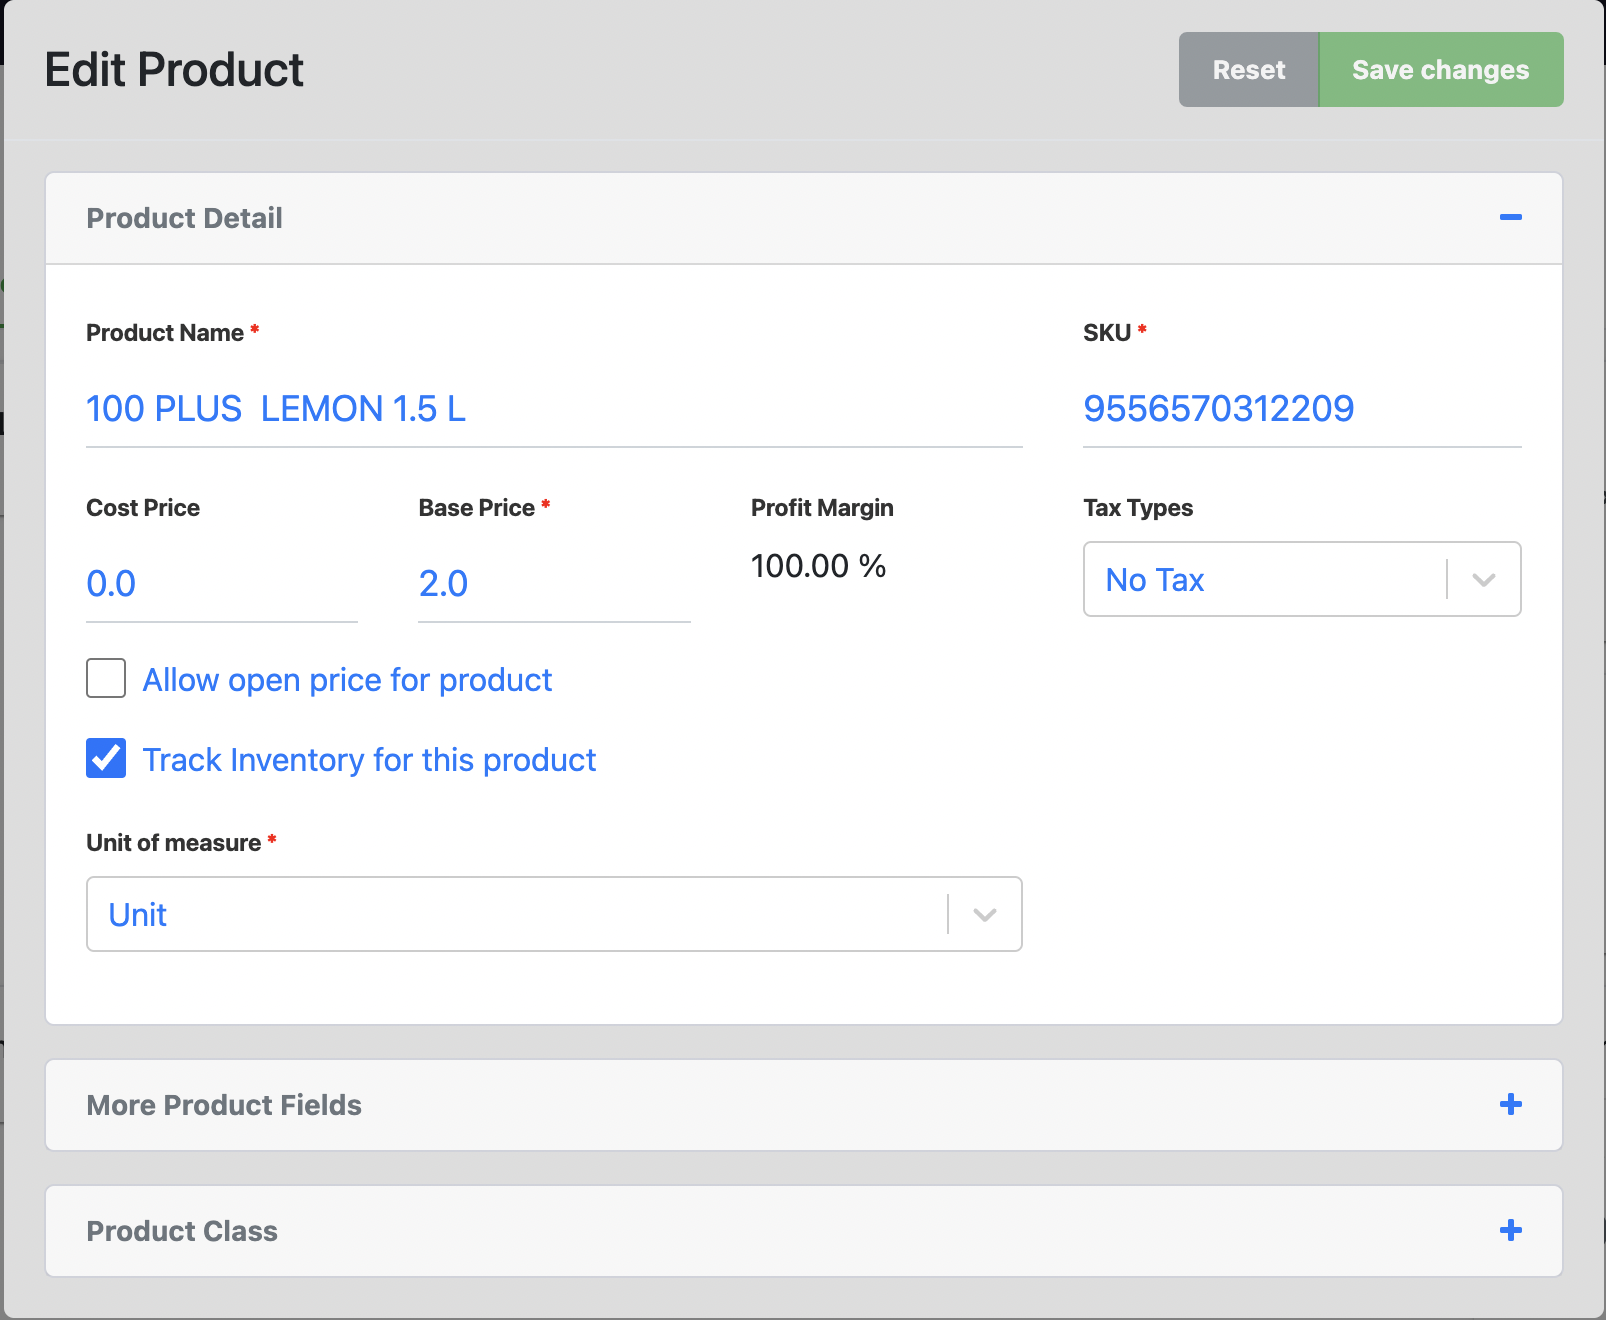
3. Click on Reset to restore previous product details.
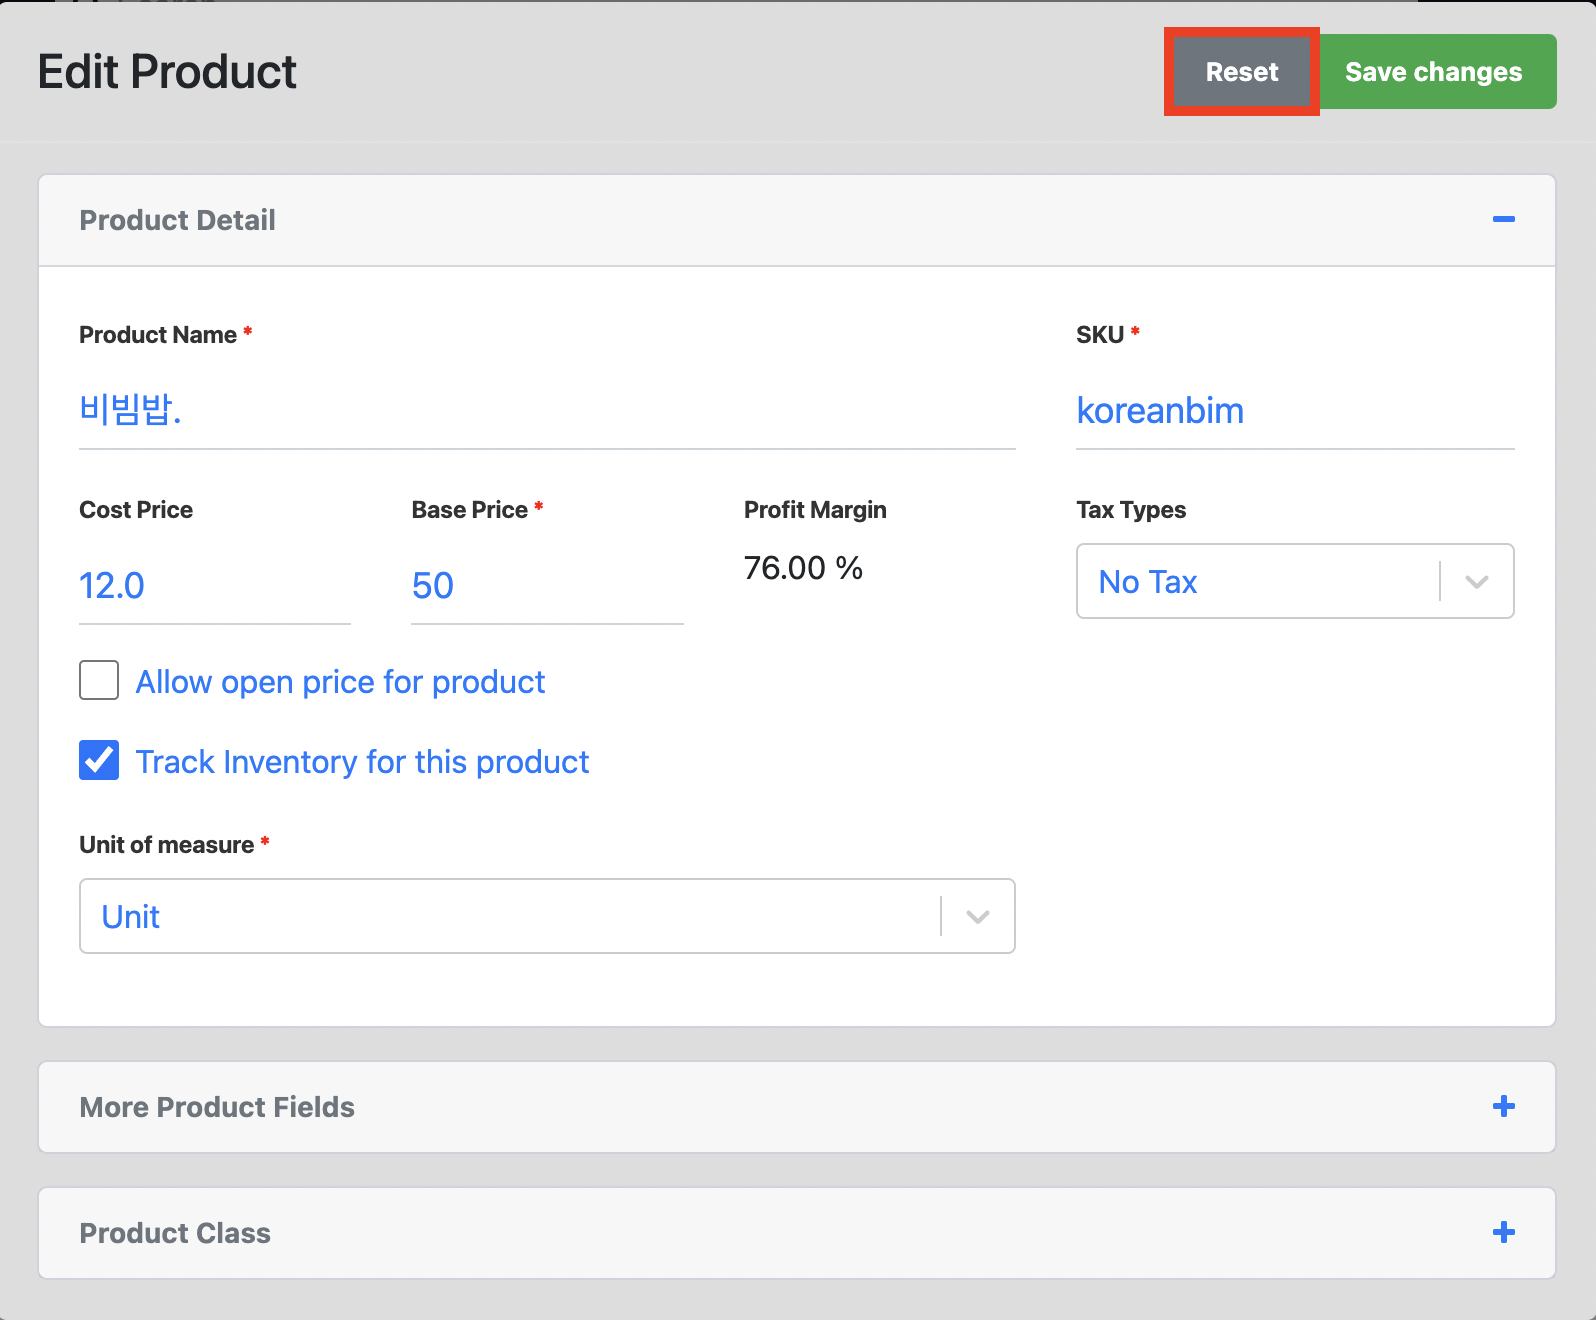
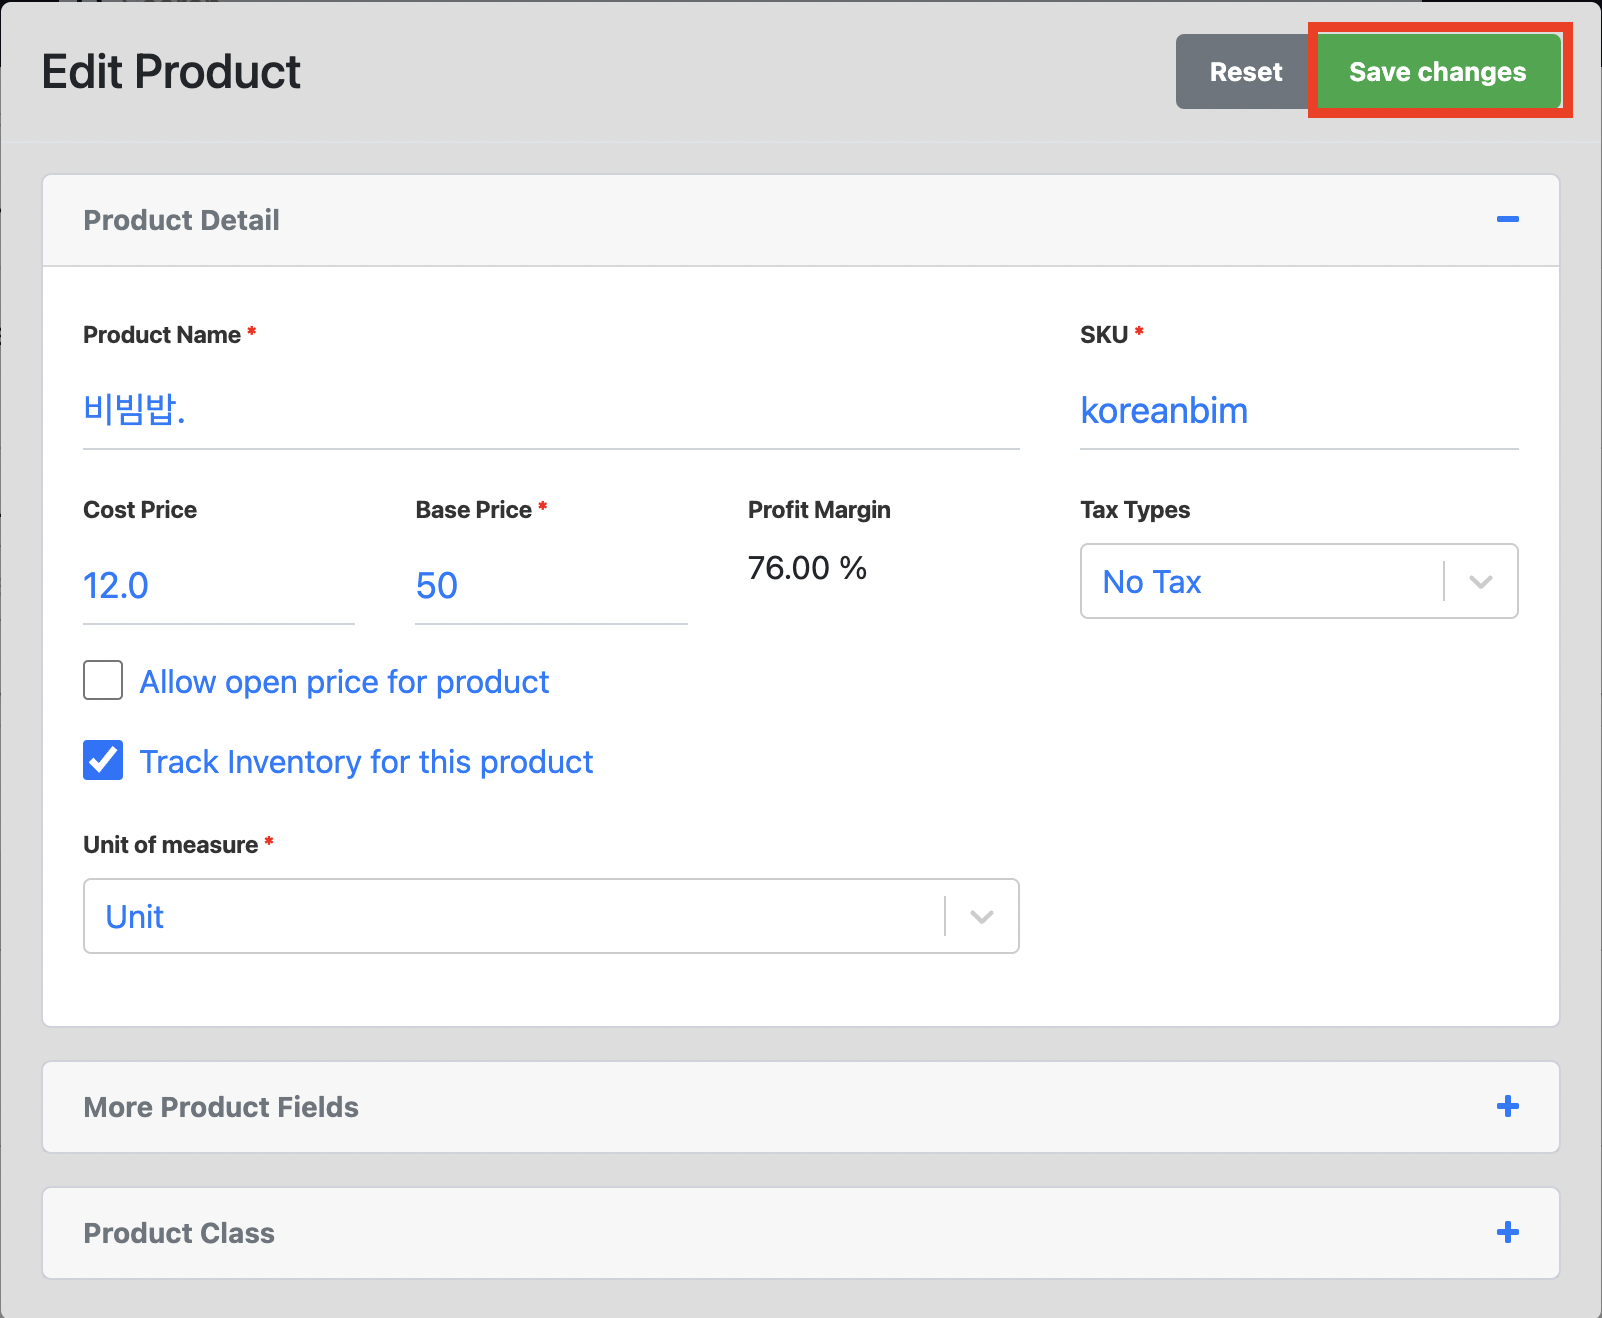
4. Click on Save changes once finished editing the product details.
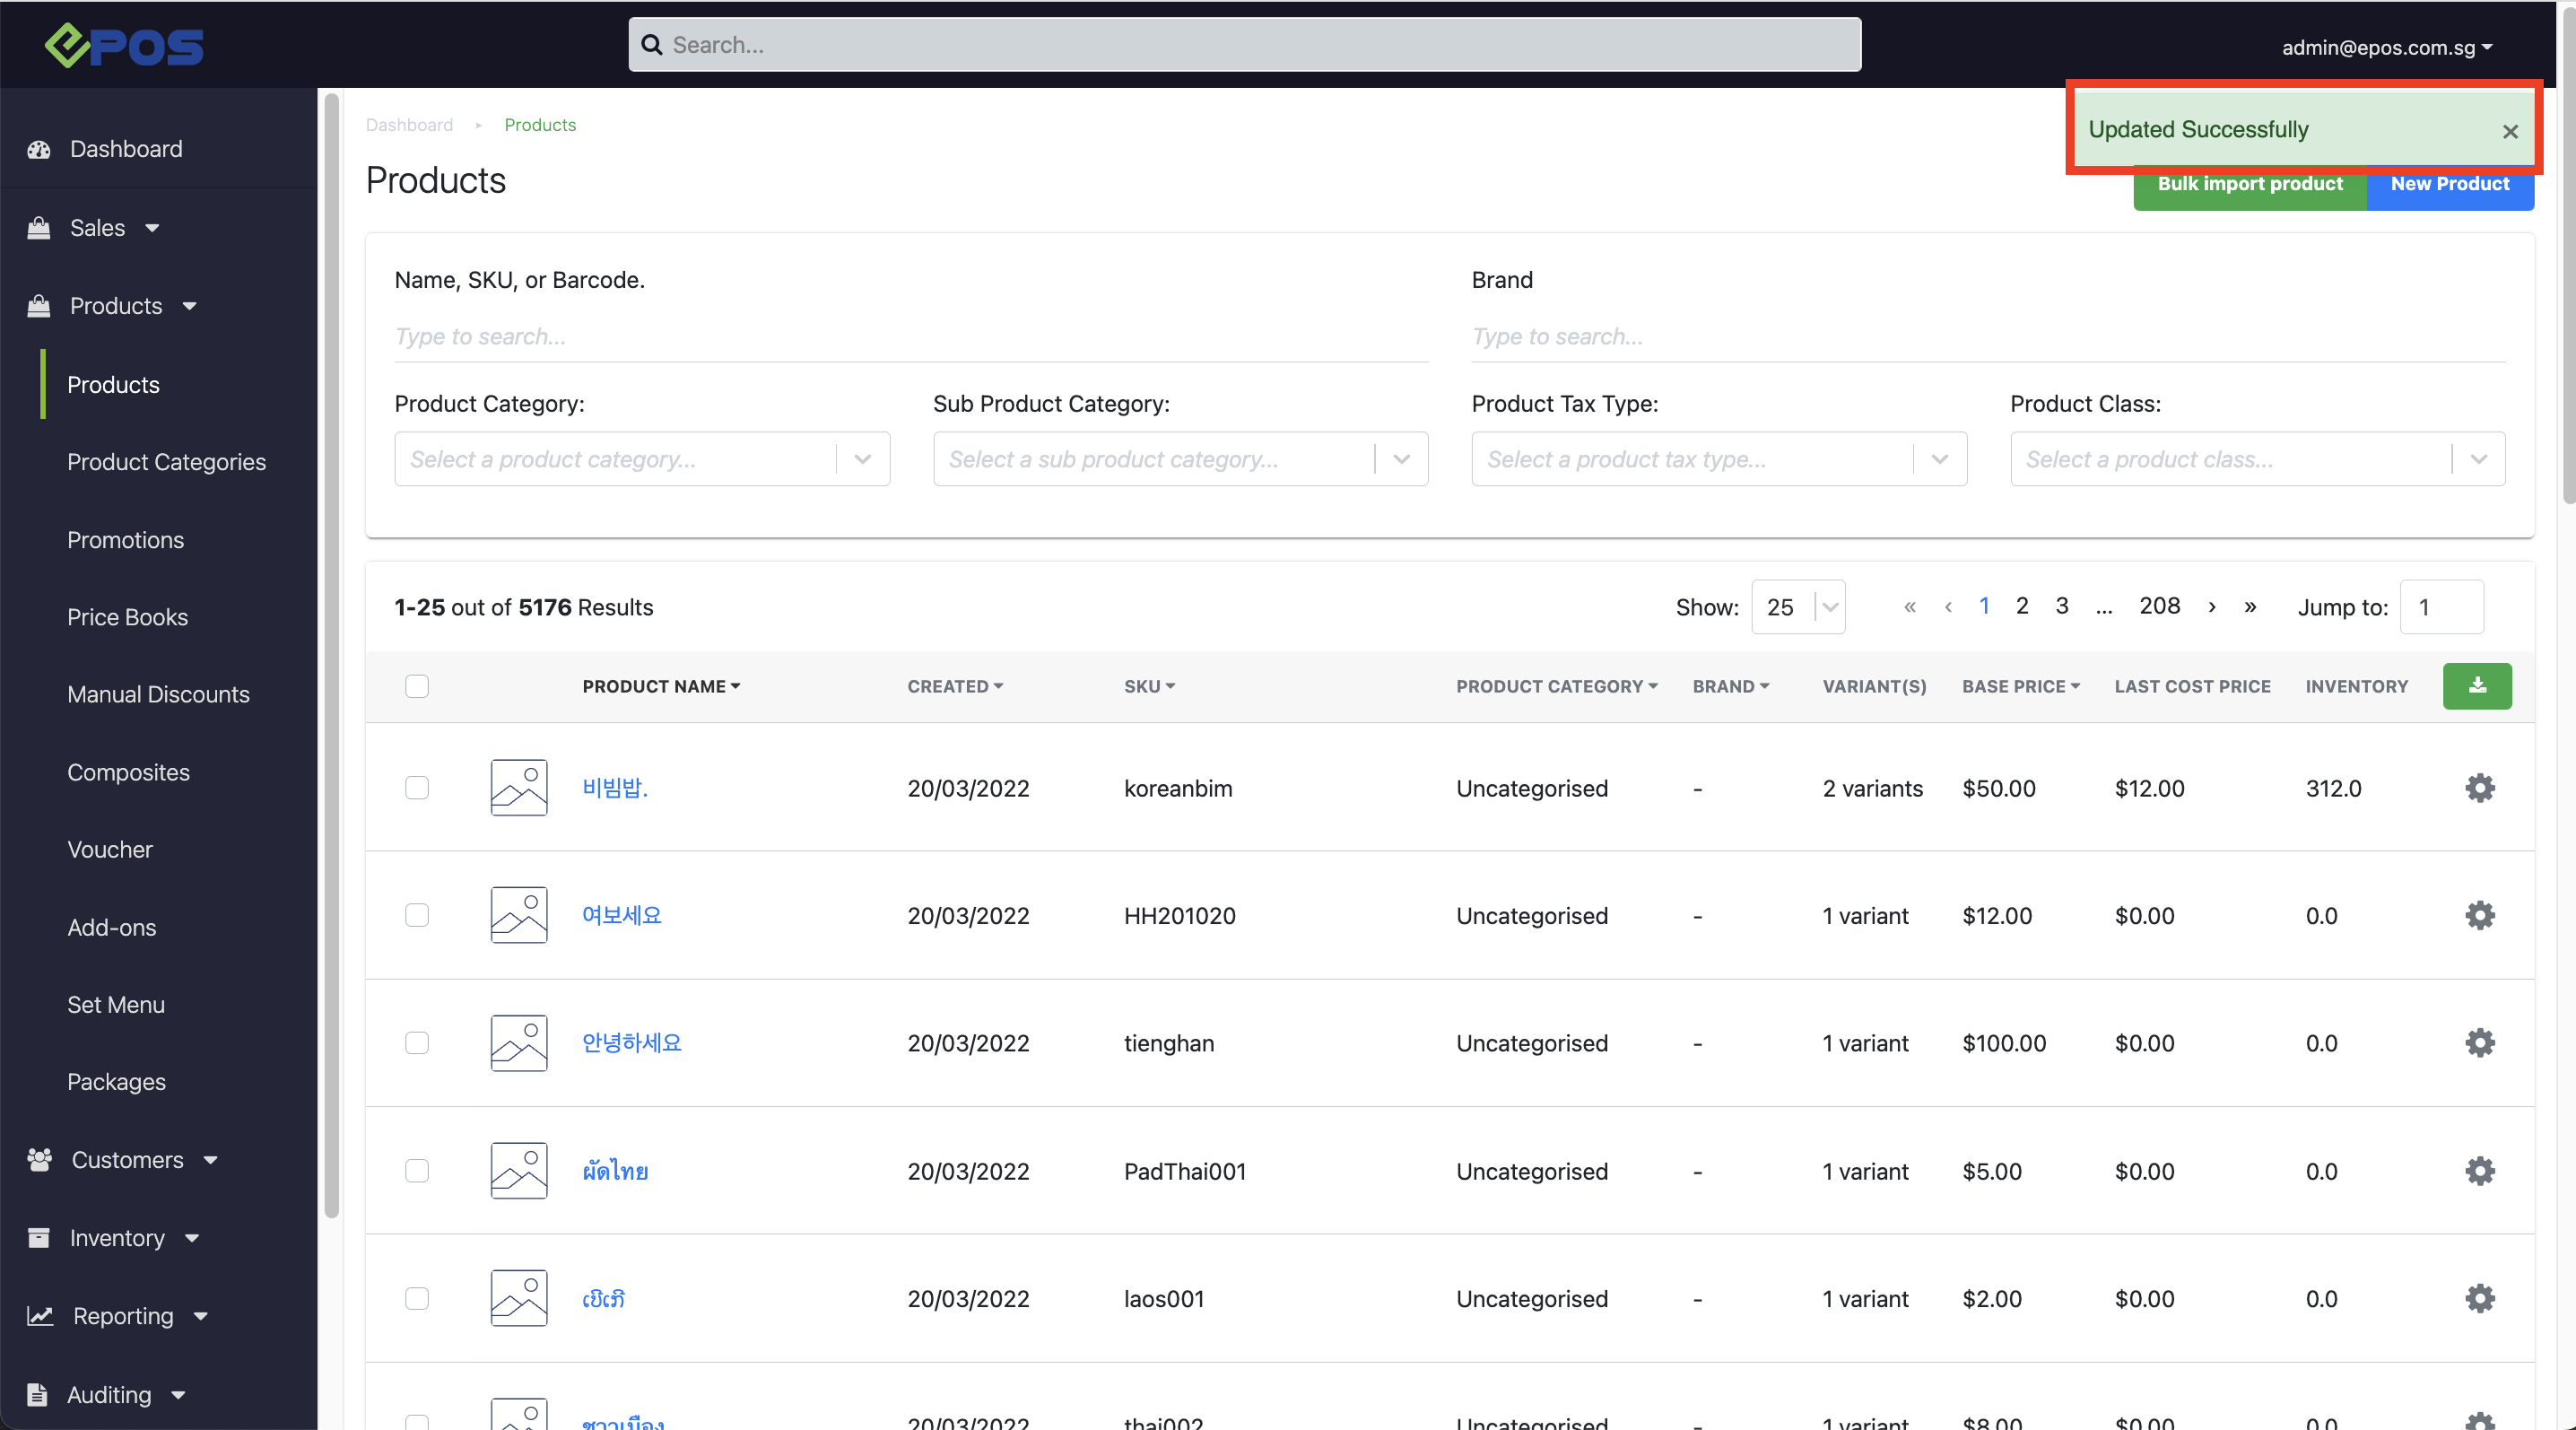
5. A pop-up message “Updated successfully” will be shown at the top right corner once done.
Follow the steps below to import products via the bulk import function on the backend
- Access the Product Page and click on Bulk Import Products.
- Download the (a) Basic Import Template or (b) Advanced Import Template to fill in the given template.
- Bulk import products to the backend.
(A) Basic Import Template
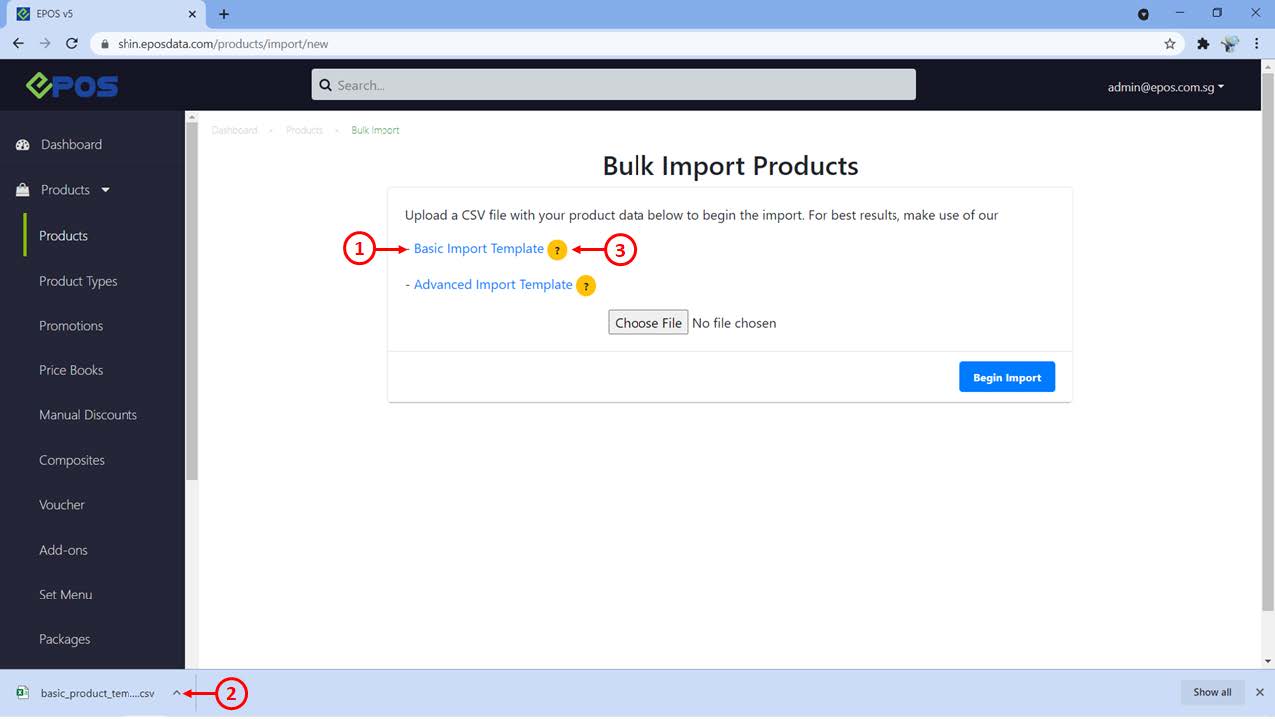
1. Click on Basic Import Template to download the basic version of product import template.
2. Open up the downloaded basic_product_template.csv. And remove the irrelevant data from the template.
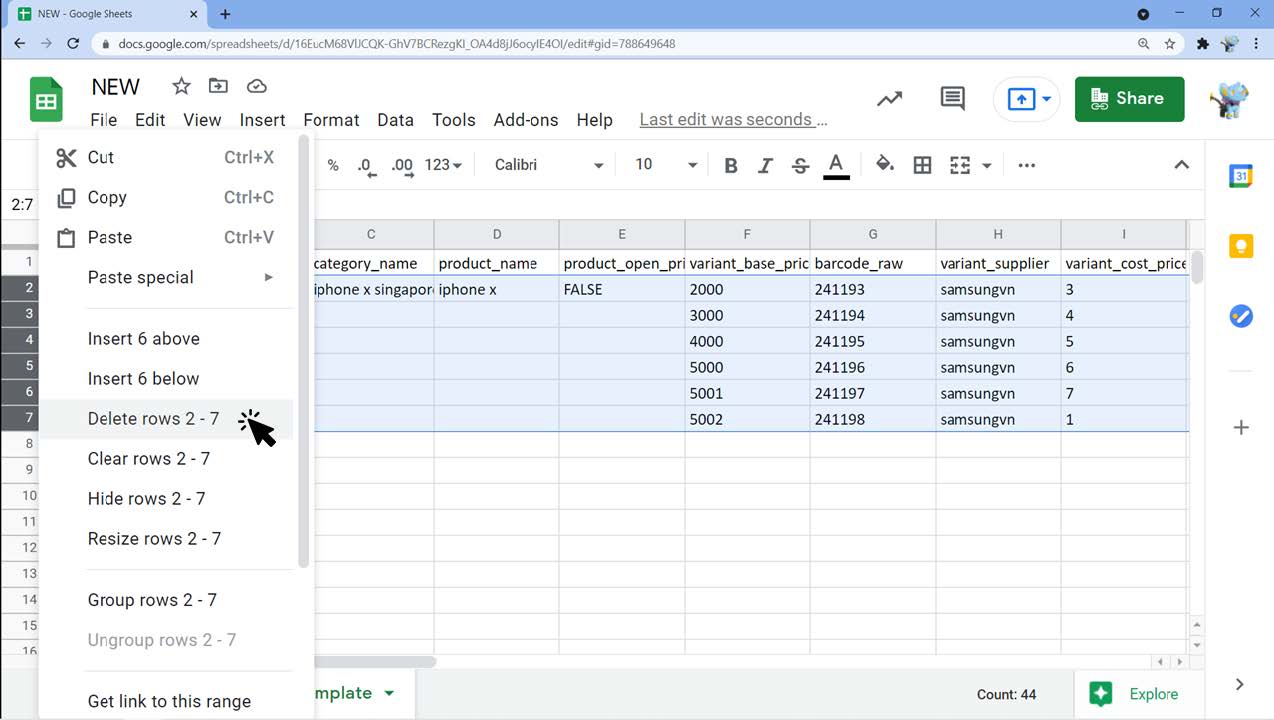
3. Fill up in the columns accordingly.
💡 Any optional columns which do not carry any data can be deleted to enhance data import speed.
For more information on the column details, refer to Product Basic Import Template Columns.
(B) Advanced Import Template
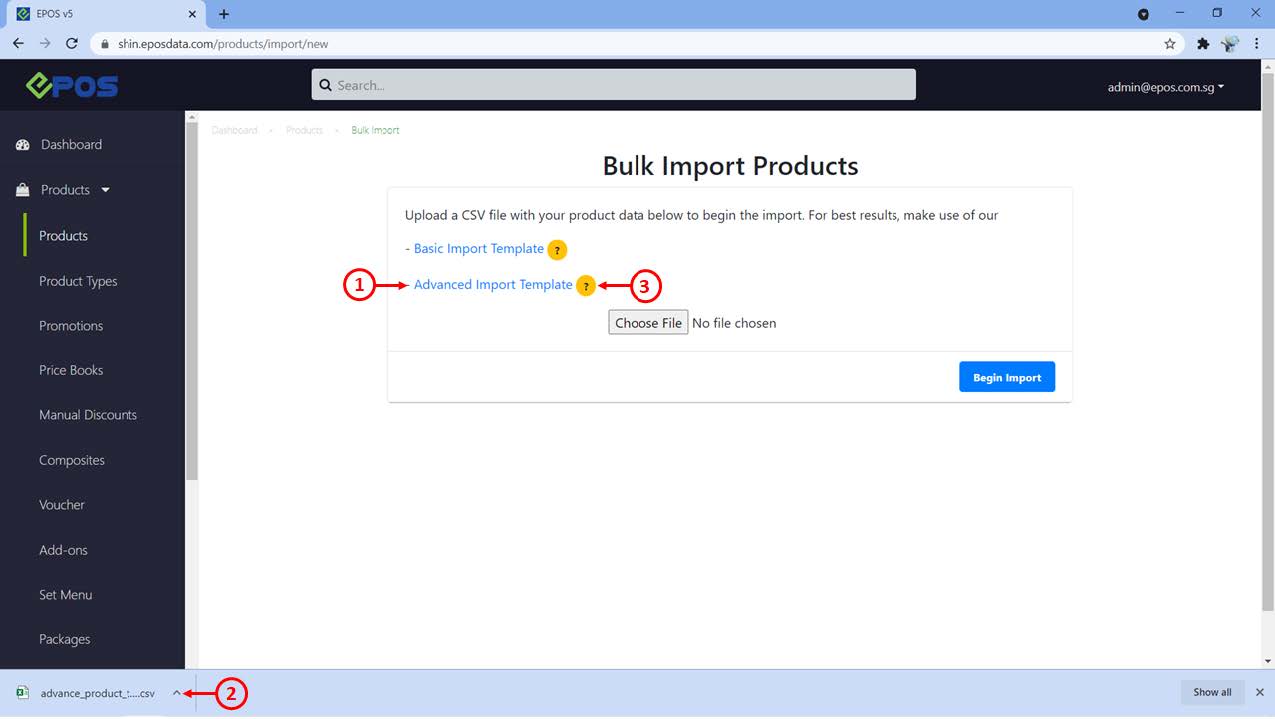
1. Click on Advanced Import Template to download the advanced version of product import template.
2. Open up the downloaded advance_product_template.csv. Remove all irrelevant data from the template.
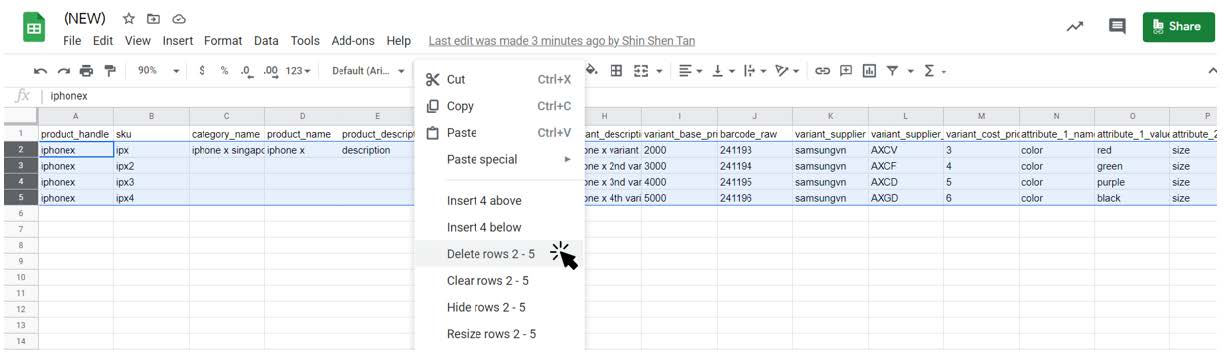
3. Fill up in the columns accordingly.
💡 Any optional columns which do not carry any data can be deleted to enhance data import speed.
For more information on the column details, refer to Product Advanced Import Template Columns.
Import Template into Backend
1. Save the CSV file once all data has been input into the spreadsheet.
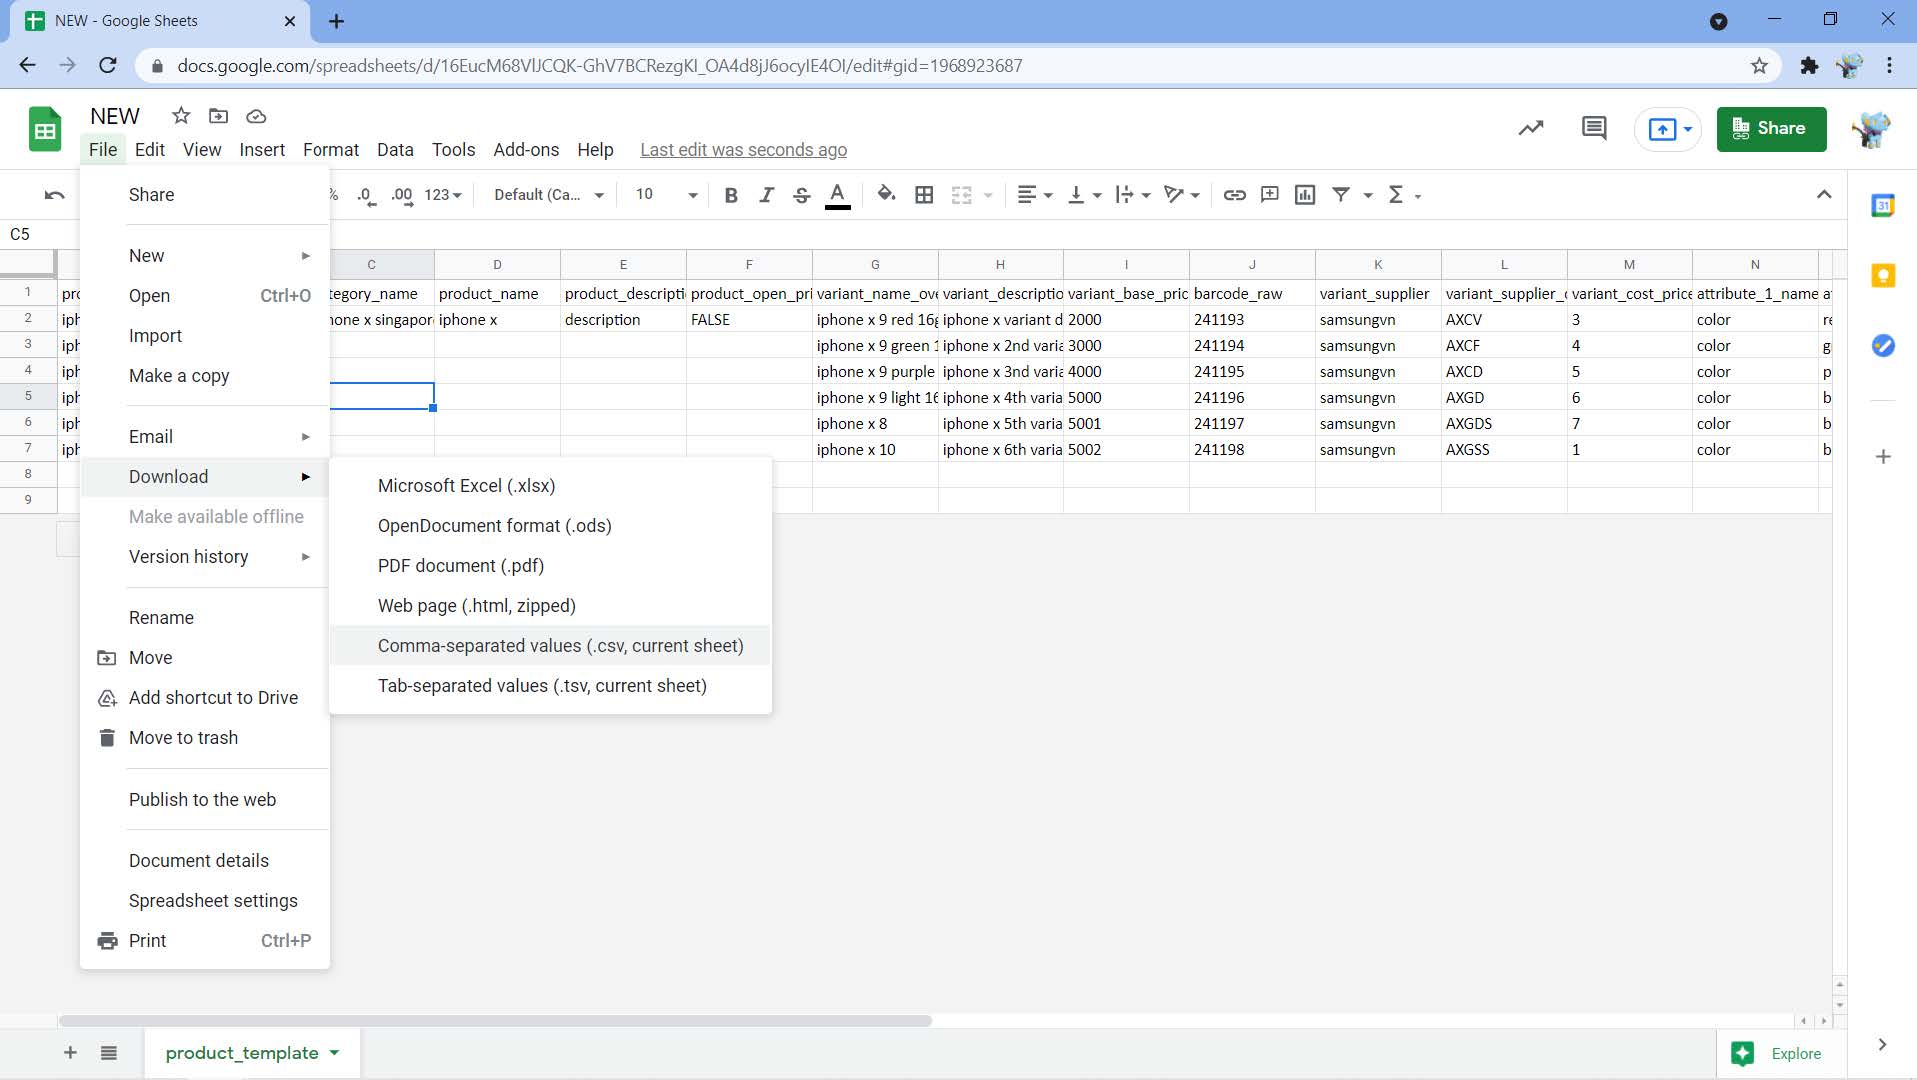
2. Import data
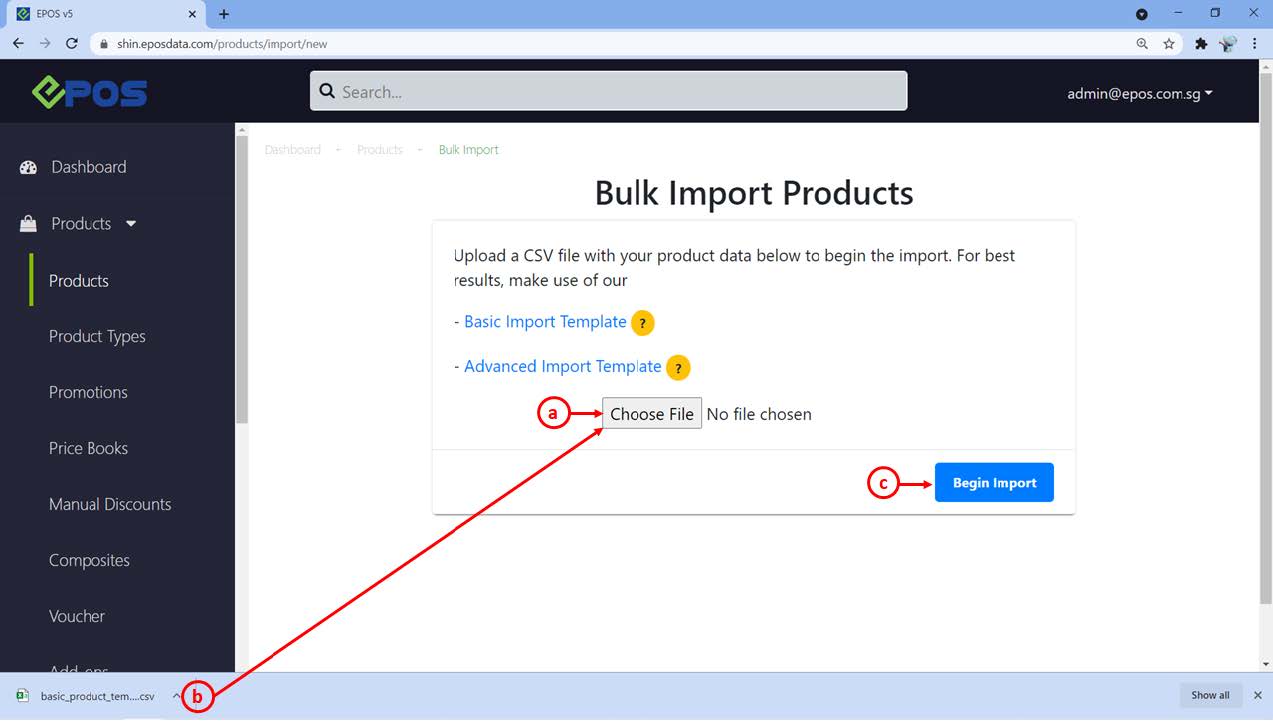
a. Click on Choose File to select the updated CSV file.
b. (or) Drag the downloaded CSV file to the Choose File area, “+” icon will be shown.
c. Click on Begin Import.
3. Once uploaded, users will be directed to this screen.
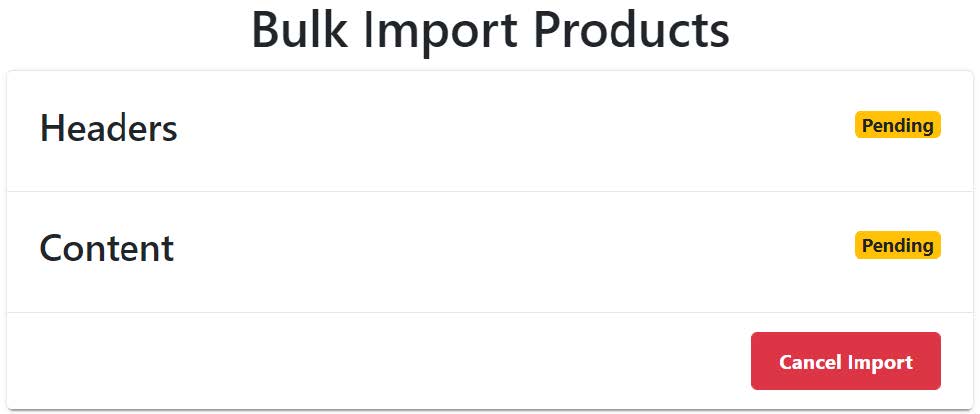
4. Wait until the Pending status turns Valid.
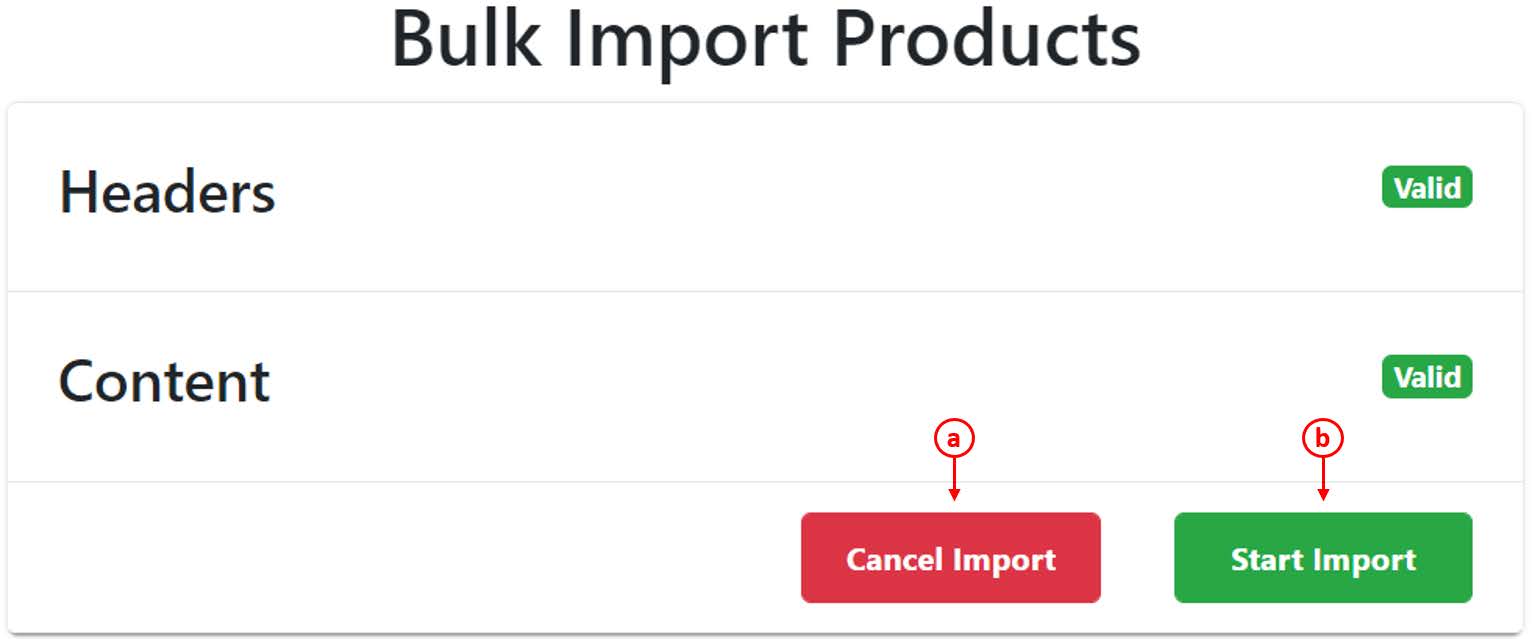
a. Click on Cancel Import to return to the previous page.
b. Click on Start Import to begin importing the products data in the CSV file.
5. Should there be Invalid status, users must take note of the error messages.
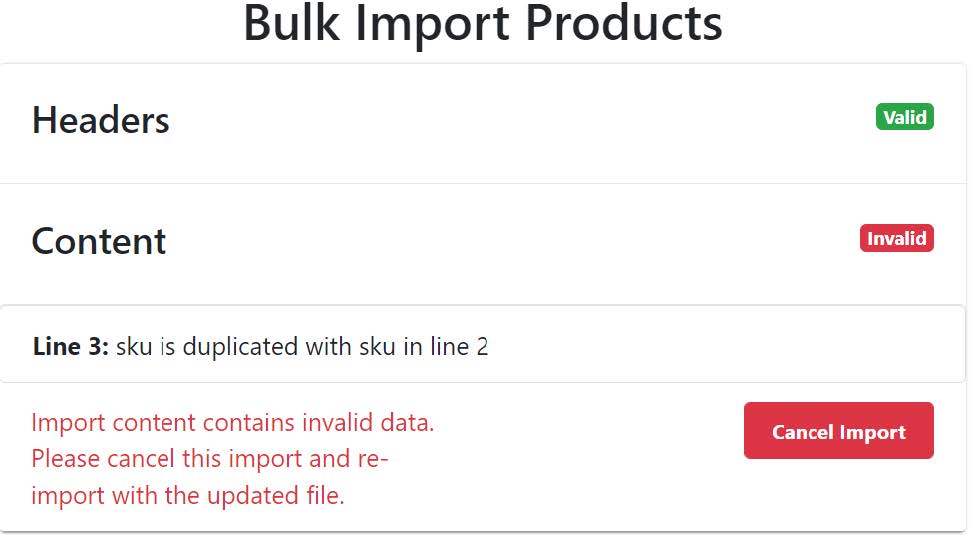
a. Click on Cancel Import to return to the previous page.
b. Users should amend the CSV file according to the remark given.
c. Re-import the CSV file once done.
Users should take note of common error messages during the process of bulk importing products data into backend portal.
For more information, refer to Common Error Messages for Bulk Import.
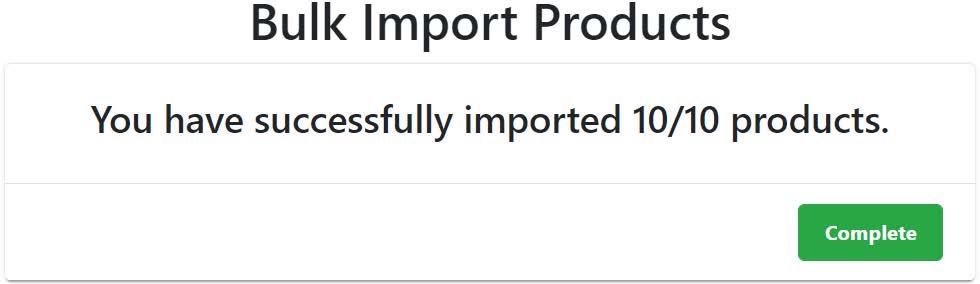
7. Upon successfully importing products, users will be prompted the total number of products imported. Click on Complete to return to the Product main page.
Follow the steps below on how to override product information after a product has been created at the backend.
1. To override product information, users shall follow the same steps entailed in the “Bulk Import Products” tab to upload the csv file.
2. Once the file is uploaded, users will then be directed to the window as shown below.
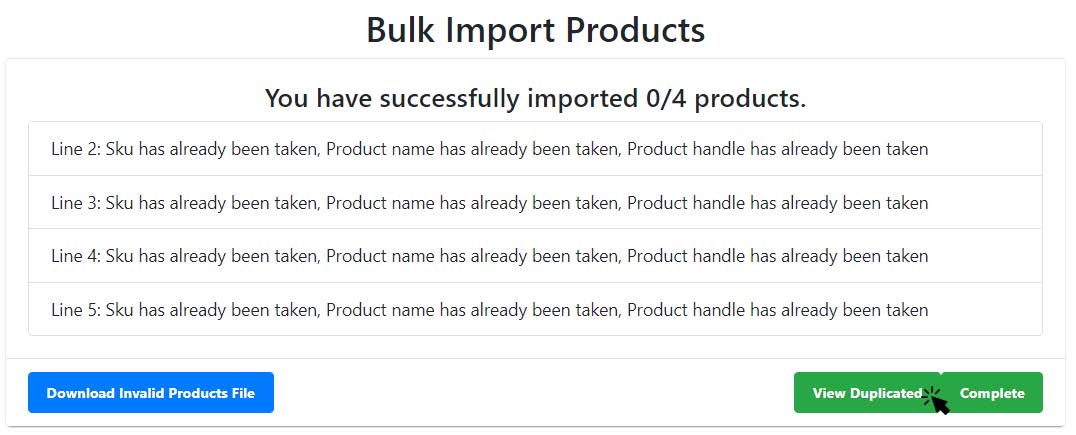
3. Click on View Duplicated to view the list of products which were previously registered in backend portal.
4. Users will then be directed to the Product Import Override page.
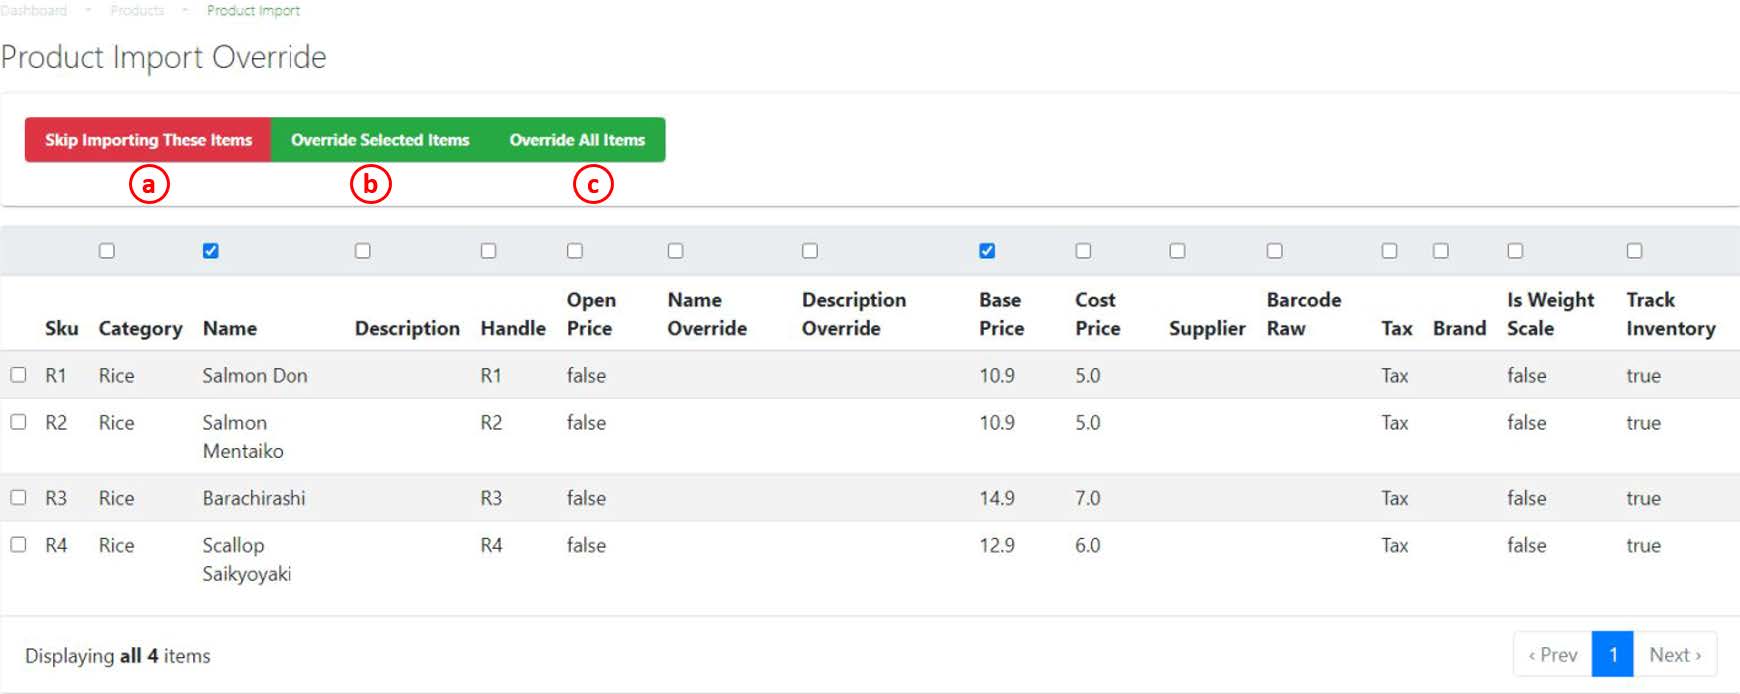
a. Skip Importing These Items
Terminate product override operations and return to Product main page.
b. Override Selected Items EPOS
☑️ required rows if only certain items need to be overridden.
c. Override All Items
☑️ required columns to override all items.
💡 SKU and is_composite_addon_setmenu columns cannot be overridden. Users will need to delete and re-create the product if any changes are to be made on these fields.
💡 If encounter this error message “undefined method “include?” for nil:NilClass”, this means users forgot to tick at least one column before selecting Override All Items.
During the transition period (April to September 2026), both existing barcodes (without deposit) and new BCRS barcodes (with $0.10 deposit) may be in circulation. Merchants are advised to configure BCRS barcodes accordingly to ensure accurate charging at POS.
Products can be marked as BCRS eligible in two ways:
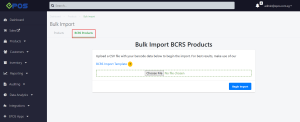
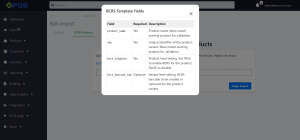
A. Bulk Import: Update the BCRS field for multiple products by uploading a CSV file under Products > Bulk Import > BCRS Products.
Bulk Import Scenarios
1. Enable Product as BCRS Product
| bcrs_eligible |
bcrs_barcode_raw |
Result |
| TRUE |
New barcode |
Product becomes BCRS eligible and BCRS barcode is created |
| TRUE |
Empty |
Product becomes BCRS eligible only |
⚠️ The barcode must not already exist in the system.
2. Revert BCRS Product Back to Normal Product
| bcrs_eligible |
bcrs_barcode_raw |
Result |
| FALSE |
Existing BCRS barcode |
Existing BCRS barcode is removed and product is reverted |
| FALSE |
Empty |
Import will be rejected if a BCRS barcode still exists |
⚠️ The existing BCRS barcode must be included in the import file to remove it successfully.
Notes:
- Only existing products can be updated using the BCRS import template.
- Only one BCRS barcode can exist per product variant.
- BCRS barcode must be unique in the system.
- BCRS Eligible value must be consistent across variants under the same product.
B. Manually: Create/Edit the product in the backend and enable “BCRS Eligible.”
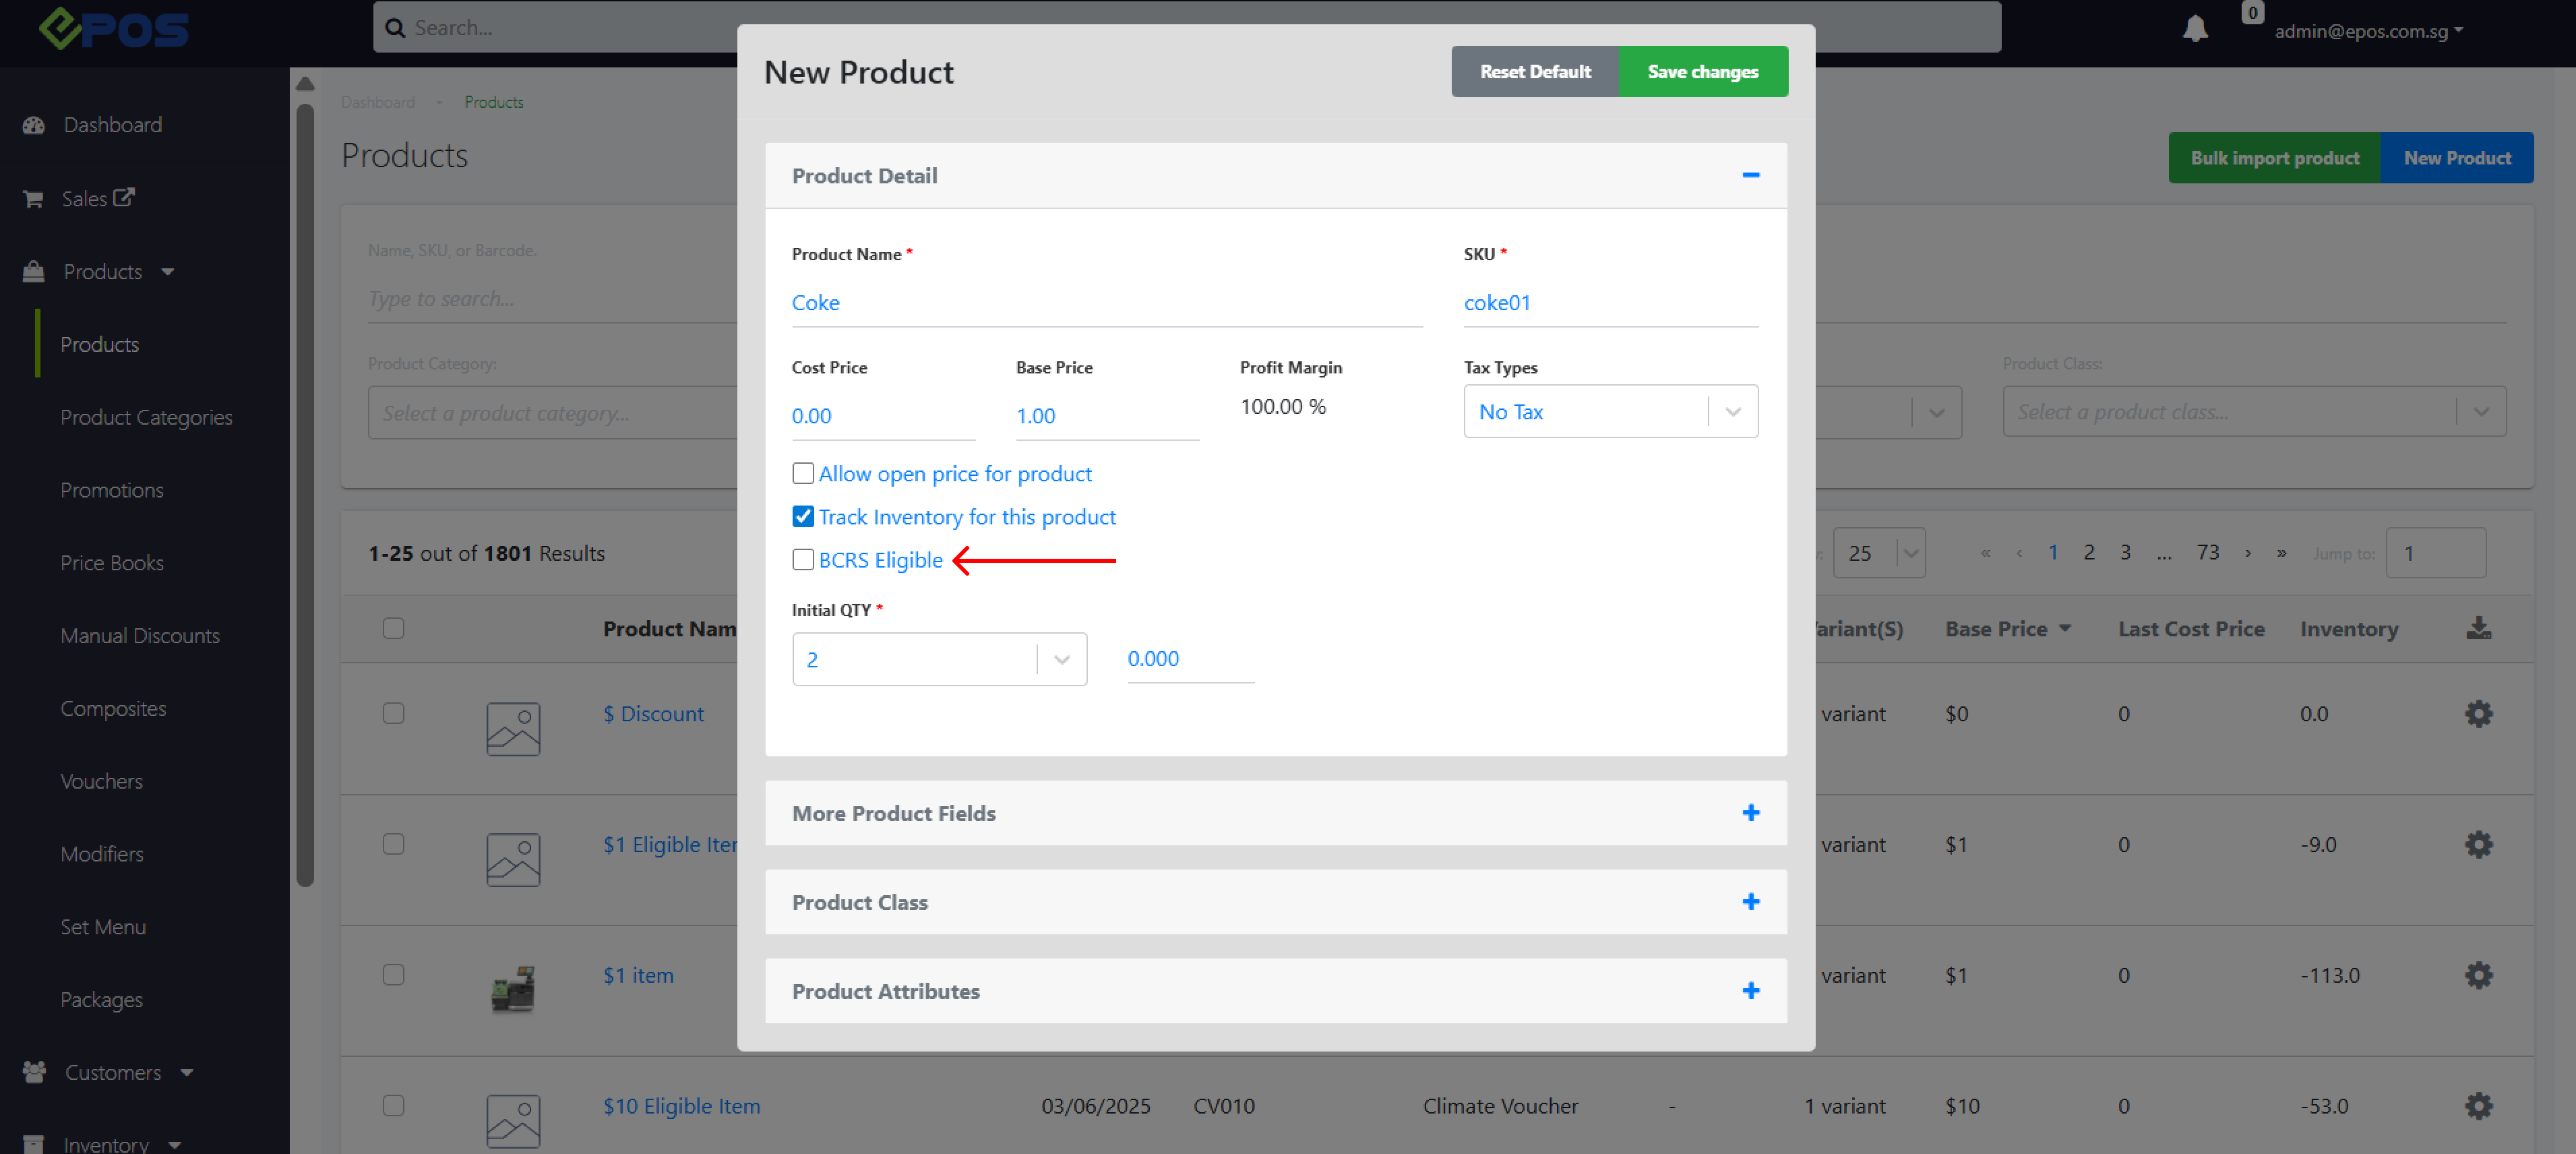
- Navigate to your product list in the backend and select the product you wish to configure, or click New Product to create a new one.
- On the product details page, locate the “BCRS Eligible” checkbox, which appears below the “Track Inventory for this product” option. By default, this checkbox is unchecked.
- Check the “BCRS Eligible” checkbox to mark the product as eligible for the $0.10 BCRS deposit.
Creating a BCRS Barcode for a Product
Once a product has been marked as BCRS-eligible, you can assign a dedicated BCRS Barcode to it. This barcode is separate from the product’s standard barcode and is used to trigger the $0.10 BCRS deposit at POS. It is created at the variant level, as barcodes in the system are managed per variant.
- On the product details page, navigate to the Variant section.
- Select the option to add a new barcode.
- In the barcode creation form, you will see a “BCRS Barcode” checkbox. This is unchecked by default.
- Check the “BCRS Barcode” checkbox and enter the barcode value in the field provided and click Create Barcode to save.
- Once created, the barcode will be tagged to indicate it is a BCRS Barcode, making it easy to distinguish from standard barcodes.
‼️Only one BCRS Barcode can be created per product variant. If a BCRS Barcode already exists for a product variant, the “BCRS Barcode” checkbox will be greyed out and cannot be selected when adding another barcode.
Composite Products
For composite products, BCRS should be configured at the child (individual item) level, as the deposit is applied per container.
- Ensure all relevant child items are marked as BCRS Eligible.
- If the parent and child items have different barcodes, please add the barcode under the parent product as well.
- When the composite product is added at POS, the system will detect the quantity defined in the child items and apply the BCRS deposit accordingly.
Set Menu / Modifiers
For set menus and modifiers, BCRS follows your product configuration:
- If modifier items are marked as BCRS Eligible, do not mark the parent/set item as BCRS Eligible to avoid double charging.
- The BCRS deposit will be applied based on the selected modifier items.
👉 Ensure BCRS is applied only once per container based on your setup.
Click here to view Windows POS user flow.
Click here to view Android POS user flow.