This section provides a detailed description on the product classes available to aid users in picking the right options while creating a new product.
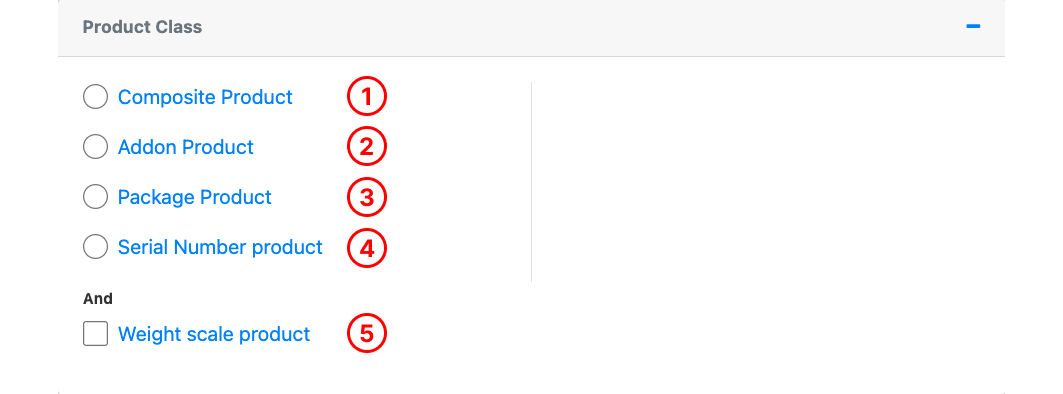
1. Composite Product
Usually used to sell products in bundled packs, products made of a few other products, e.g. a cocktail is made of a few different spirits and beverages.
For more information, see the composite tab.
2. Modifier Product
Used for products that serve as additional modifiers to a main product, e.g. additional shot of espresso, or additional toppings.
For more information, see the modifier tab.
3. Package Product
Usually used for services sold in a bundle which can be redeemed in the future by customers.
For more information, see the package tab.
4. Serial Number Product
Used for products that are tagged with a unique serial number or IMEI number for tracking purposes, e.g. Mobile phones.
For more information, see the serial number tab.
5. Weight Scale Product
Used for products which are tracked with weight and sold by price per unit weight.
For more information, see the weight scale tab.
💡 Once a product is created as one of the product class shown above, amendments cannot be made to the product class using the Edit Product function. Users must delete the product and re-create a new product of desired class.
The composite product function is best used when products are being sold in packs of multiples, e.g. a bundled pack containing 6 cans of Coke. With this setup, every time a composite product is sold, the inventory count of the corresponding variant will be recorded in the backend portal.
💡 A parent product may be linked to a single child product and/ or multiple children products. To do so, users will need to create the parent product as a composite product and the children’s products as individual products.
To create composite products:
1. Create the parent composite product.
💡 Add Single Products Manually / Bulk Import Product
💡 A product needs to be created then identified as a composite product in the product class section.
2. Under Product Class, ☑️ the checkbox for Composite product.
3. Create the child linked product which is to be linked to the parent composite product.
💡 Add Single Products Manually / Bulk Import Product
4. DO NOT ☑️ the checkbox for Composite product.
5. Once a composite product (parent product) and linked product (child product) are created, users may refer to the Composite Page to further configure the Composite Products.
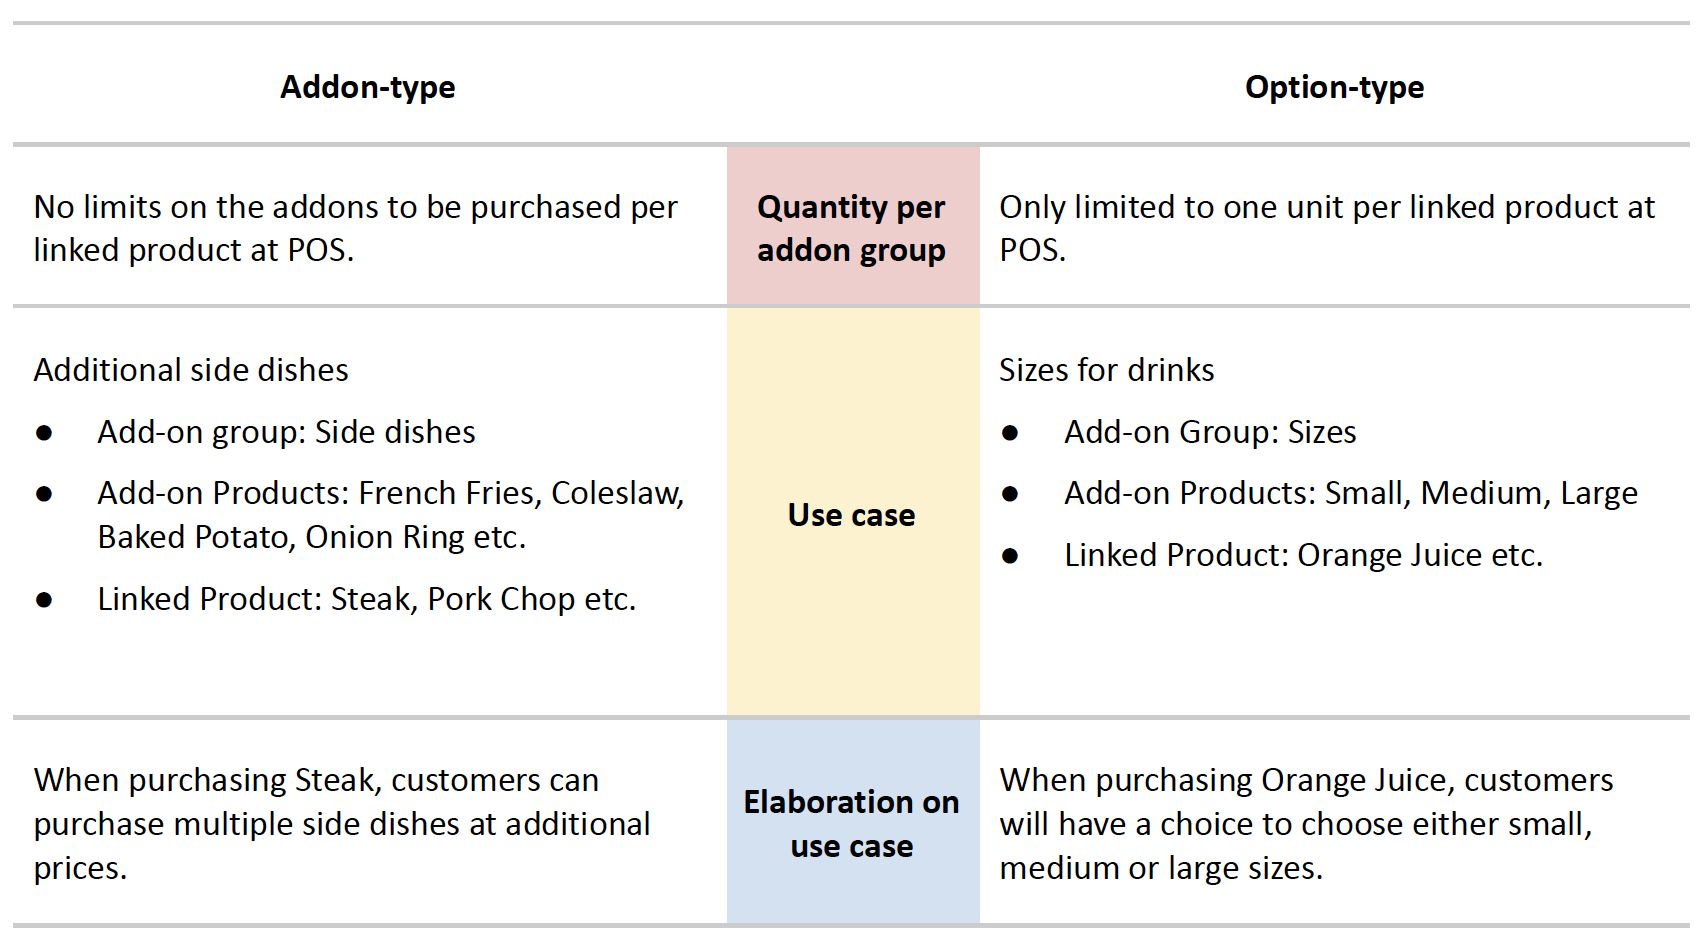
The modifier product function can come as an add-on or option product. It is best used when they are sold as a “tag-along” item or an “optional” item for a linked product, e.g. Drinks toppings, Drinks sugar level, and Portion Sizes.
With this setup, users will be able to choose the relevant addon at the POS whenever a sale of a linked product is made.
💡 Users can assign multiple add-on/option products to a single or multiple linked products.
To create a Modifier Product:
1. Create the modifier product.
💡 Add Single Products Manually / Bulk Import Product
💡 A product needs to be created then identified as a modifier product in the product class section.
2. Under Product Class, ☑️ the checkbox for either Add-on or option product.
3. Once the modifier products are created, users should also ensure the linked product is created.
Here is an example of a cup of Milk Tea.
Linked Product = Milk Tea;
Add-On Products = Pearls, Aloe Vera;
Option Products = 0%, 25%, 50%, 75%, 100%
Do not ☑️ the checkbox for Linked products.
4. After both products are created, proceed to Modifier Page, to further configure the Add-on Products.
The package product function is best used when they are being sold to customers as a combination of products or services which enable customers’ redemption, e.g. spa services, consultation services, food and beverage, and gymnasium packages. The combination of products or services is hereinafter known as a redeemable product.
To create a Package Product and Redeemable Product:
1. Create the package product.
💡 Add Single Products Manually
💡 Package products cannot be imported to EPOS BACKEND PORTAL in bulk.
2. Under Product Class, ☑️ the checkbox at Package product.
3. Once a package product is created, users should also ensure that redeemable products are created.
Here is an example of a Hair Salon Package.
Package Product = Hair Salon Package;
Redeemable Products = Cut & Wash, Colouring, Bleach
DO NOT ☑️ the checkbox at Redeemable Products.
4. After both package product and redeemable product are created, continue to package page for further configurations to set the package product ready for use.
The Serial Number product function is best used when products with the same SKU come in different serial numbers or IMEI numbers. Eg. electrical appliances, mobile devices, vouchers. With this setup, the cashier is required to also enter the Serial number / IMEI number to be able to retrieve the exact product when sales of these products are made at the POS.
To create a Serial Number Product:
1. Create the serial number product.
💡 Add Single Products Manually / Bulk Import Product
💡 A product needs to be created then identified as a serial number product in the product class section.
2. Under Product Class, ☑️ the checkbox at the Serial Number product.
3. Additional required fields will be enabled.
Users should ☑️ either the Serial number or IMEI number.
💡 IMEI numbers are usually used for mobile devices.
4. Once a serial number product is created, users should proceed to Serial Number / IMEI to further configure the Serial Numbers and IMEI numbers of the product.
The Weight Scale product function are best used for products which are sold with price per unit weight, usually $/kg. For this setup, users should also have a weighing scale connected to the POS. This enables the price of the product to be auto-calculated based on the weight.
To create a Weight Scale Product:
1. Create the weight scale product.
💡 Add Single Products Manually / Bulk Import Product
💡 A product needs to be created then identified as a weight scale product in the product class section.
💡 The Base Price entered will be the price per unit weight.
2. Under Product Class, ☑️ the checkbox at the Weight Scale product.
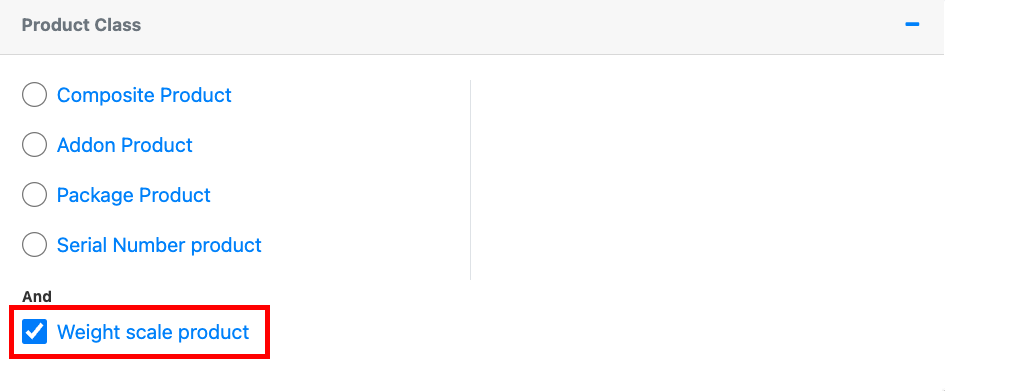
3. Click Create Product once done.
Thereafter, when the product is being placed on the weighing scale, price will be calculated and shown at the POS automatically based on the weight and base price of the product.
