The product configurations can be accessed on the Product Overview page.
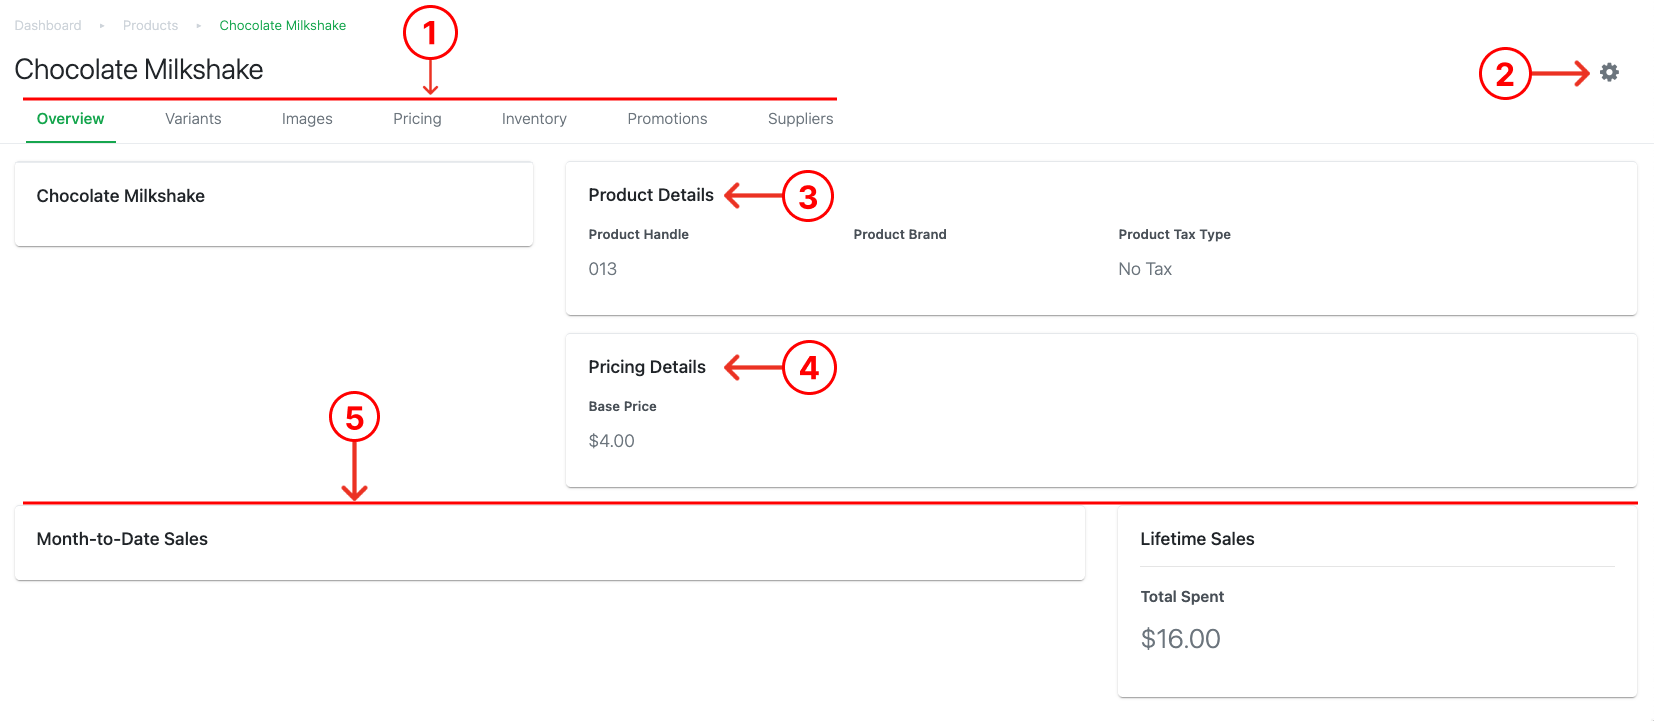
1. Product Configuration Toggler
Directs users to different configurations of a product
2. Edit Product Button
Edit Product Window will be shown. (similar to Edit Product)
3. Product Details
Show Information on
-
- Product Handle
- Product Brand
- Product Tax Type
4. Pricing Details
Shows user the Base Price assigned to the product
5. Sales details
Shows user the total sales made by the product
-
- Month-to-date sales
- Lifetime Sales = All time sales EPOS
Product variants are used when there are products of the same type with different variations. Users can differentiate the products with different attributes. Add-on Products are more commonly used for this functionality.
This example shows APPLE WATCH which was created as the default product.
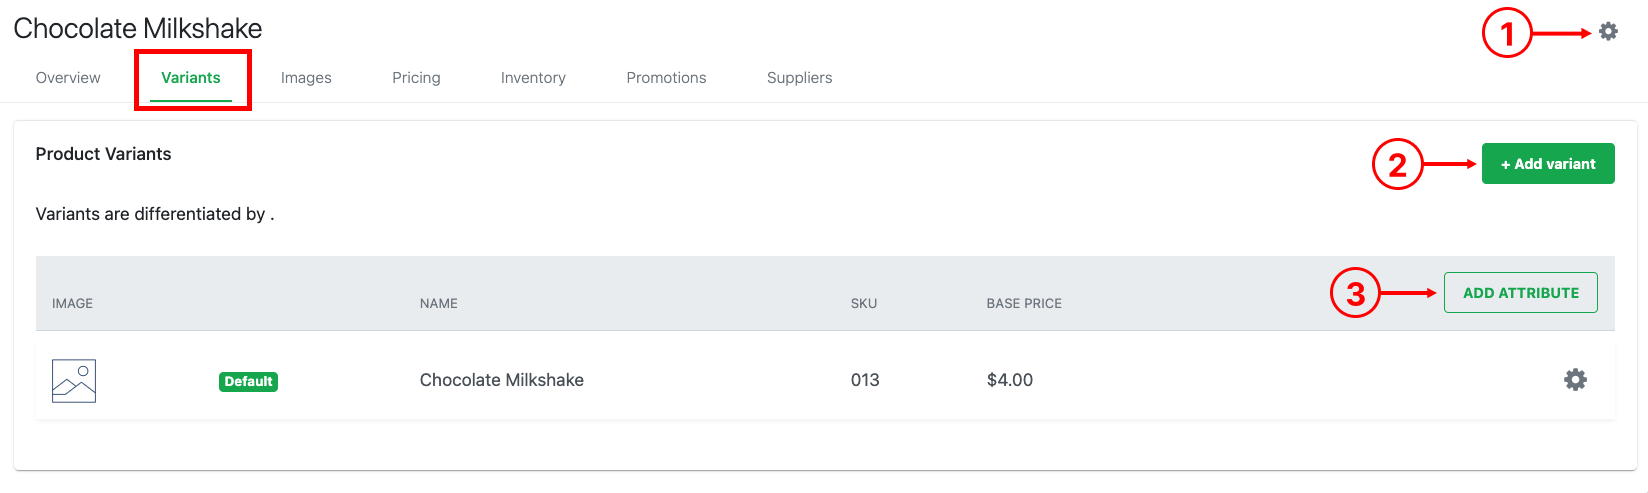
1. Edit Product Button
The Edit Product window will be shown. (similar to Edit Product)
2. Add another product variant
Displays new Product Variant Window.
Follow the steps below to create a new variant for APPLE WATCH
1. Click on Add Attribute, enter Attribute Name and Default Value accordingly.
2. Click on Add Variant to create a similar product with different attribute values. Enter each field accordingly.
3. Once a new variant is added, both products will be shown.
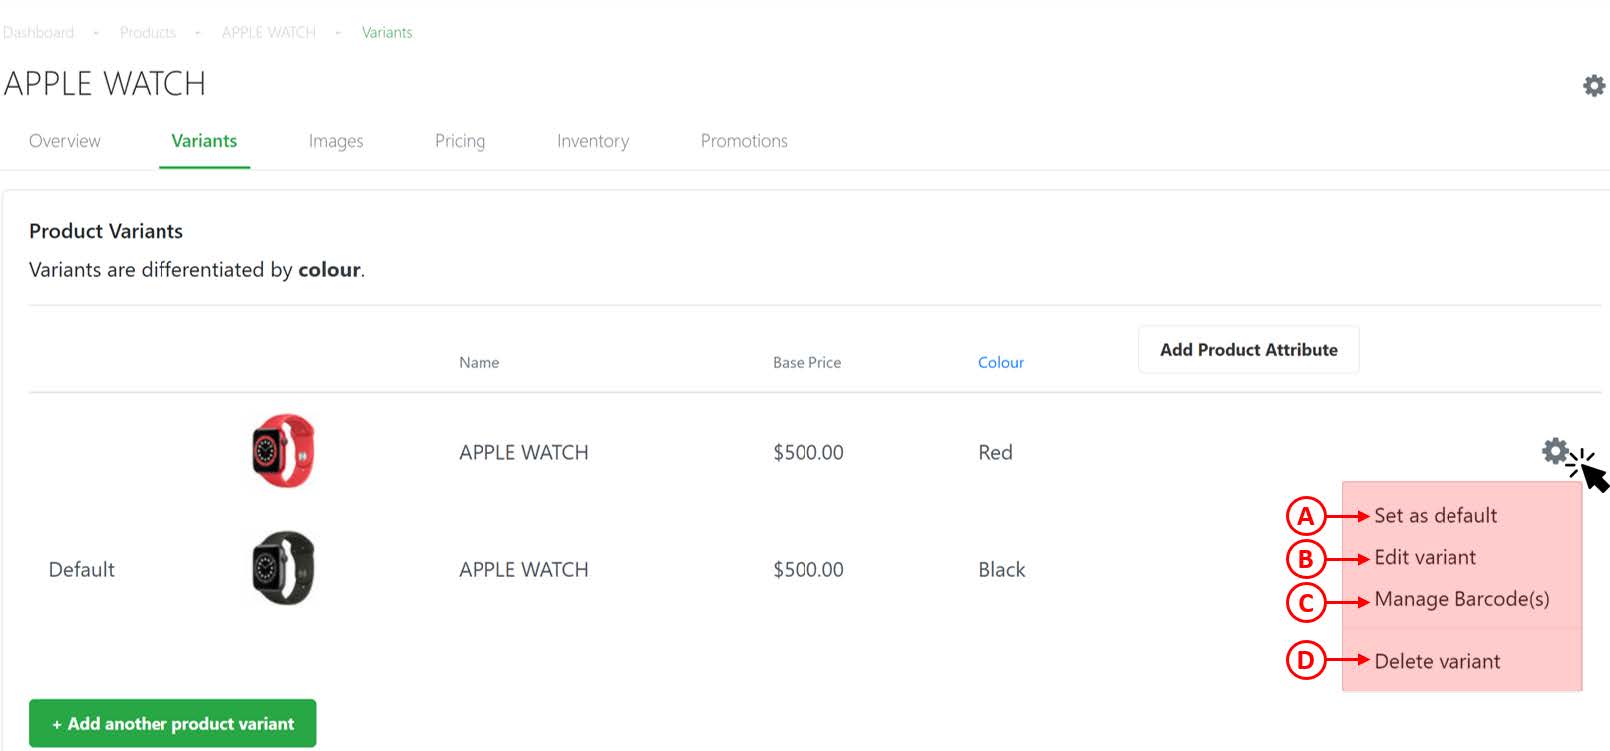
Click on the gear button to access the product variant settings.
A) Set as Default
Sets the selected product variant as default.
B) Edit Variant
Displays the Edit variant window.
C) Manage Barcode(s)
Allows user to add/edit barcodes for the selected product variant. For more information, refer to Manage Barcode.
4. Add Product Attribute
Displays New Product Attribute window.
a. Name: Enter Attribute Name, e.g. Color.
b. Default Value: Enter default value for assigned attribute.
c. Click on Create Product Attribute once done.
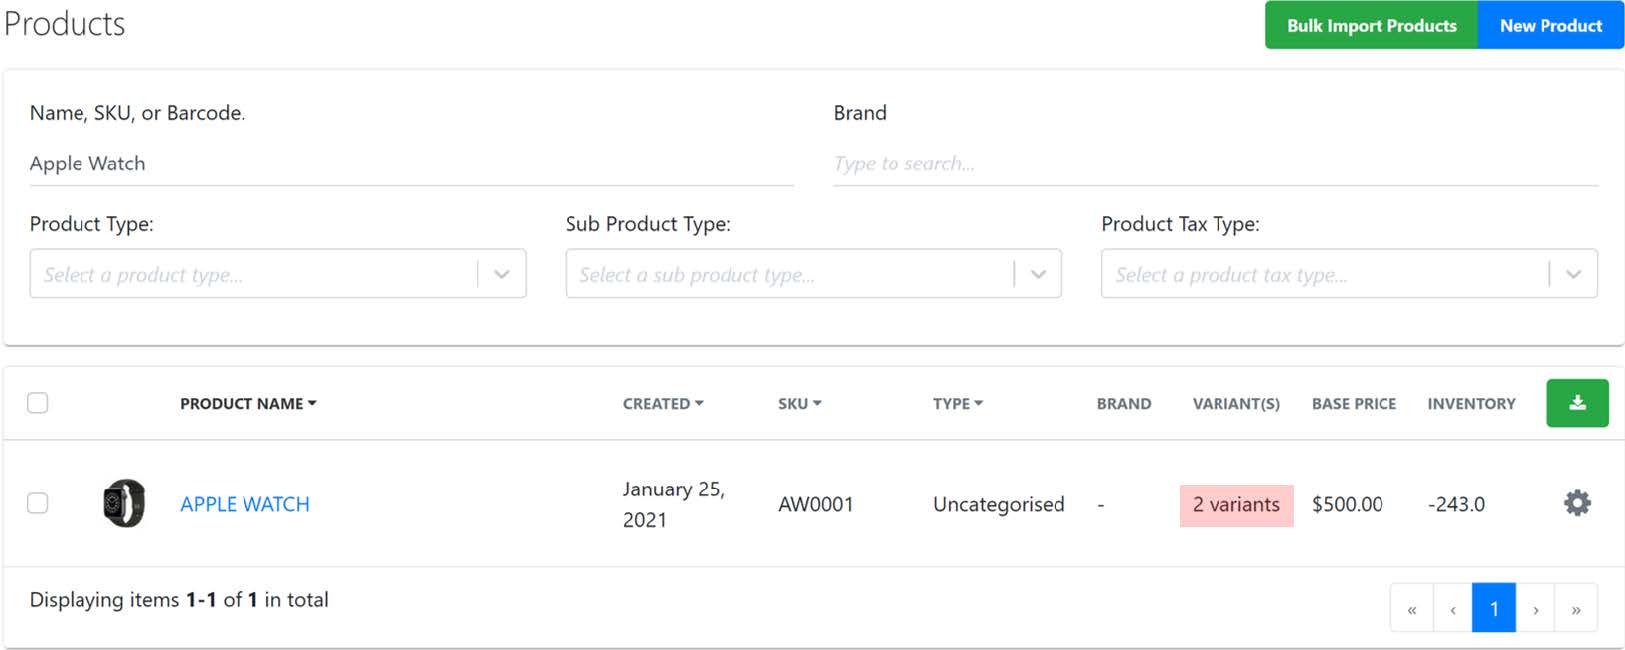
5. Users can also see the number of variants registered for “APPLE WATCH” in the product main page.
Follow the steps below to upload product images
- Uploading Image Through Product Main Page
- Uploading Image Through Product Configuration.
A. Uploading Image Through Product Main Page
1. Access Products main page and search for the relevant product. Example “APPLE WATCH”.
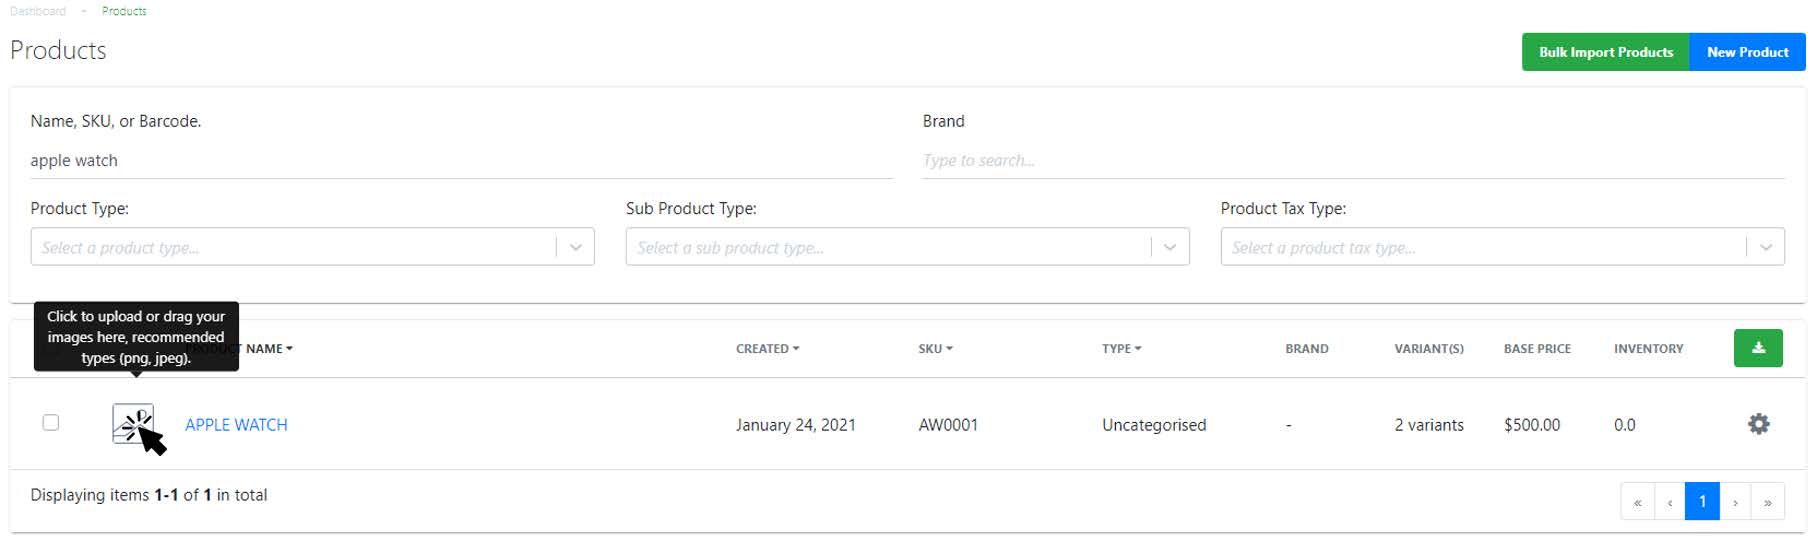
2. To upload image, users can either
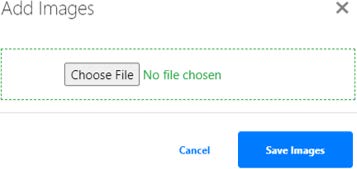
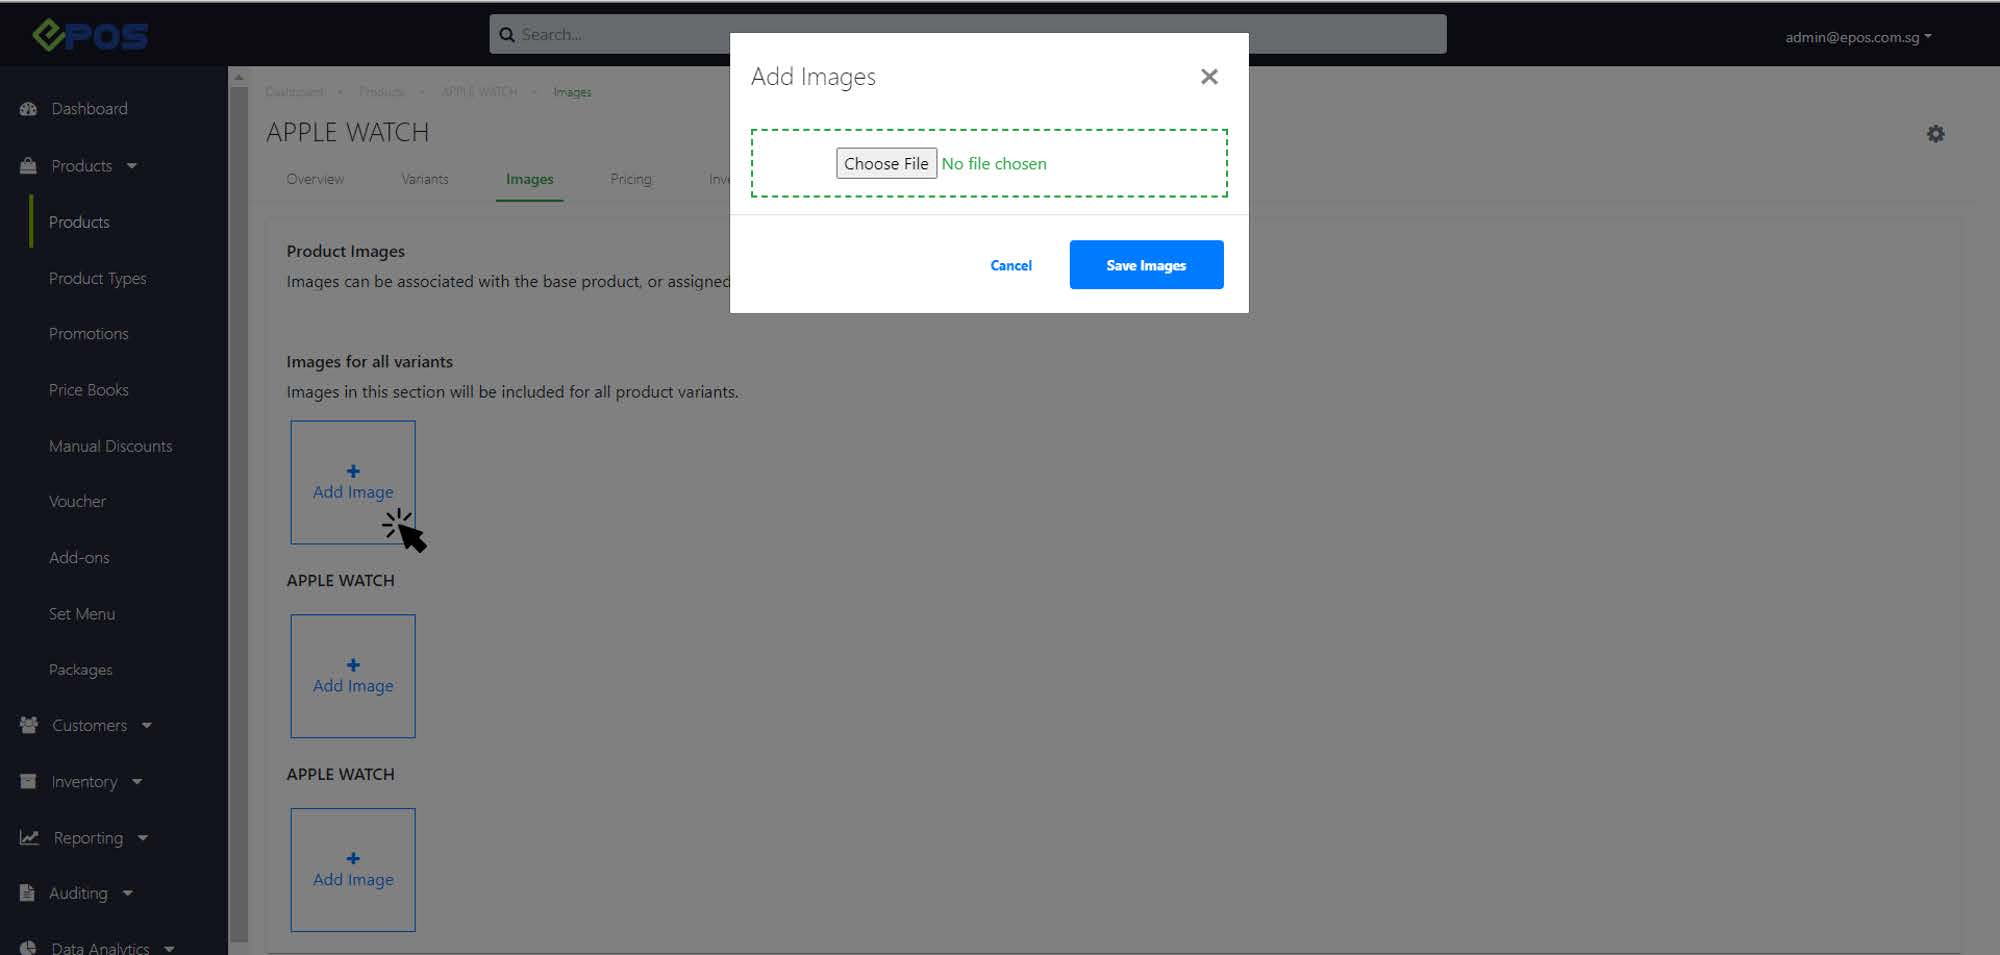
a. Click on image (as shown in step 1). A window will be shown to allow users to upload an image. Click on Choose File to choose image and click on Save Images.
b. Utilize the drag and drop function.
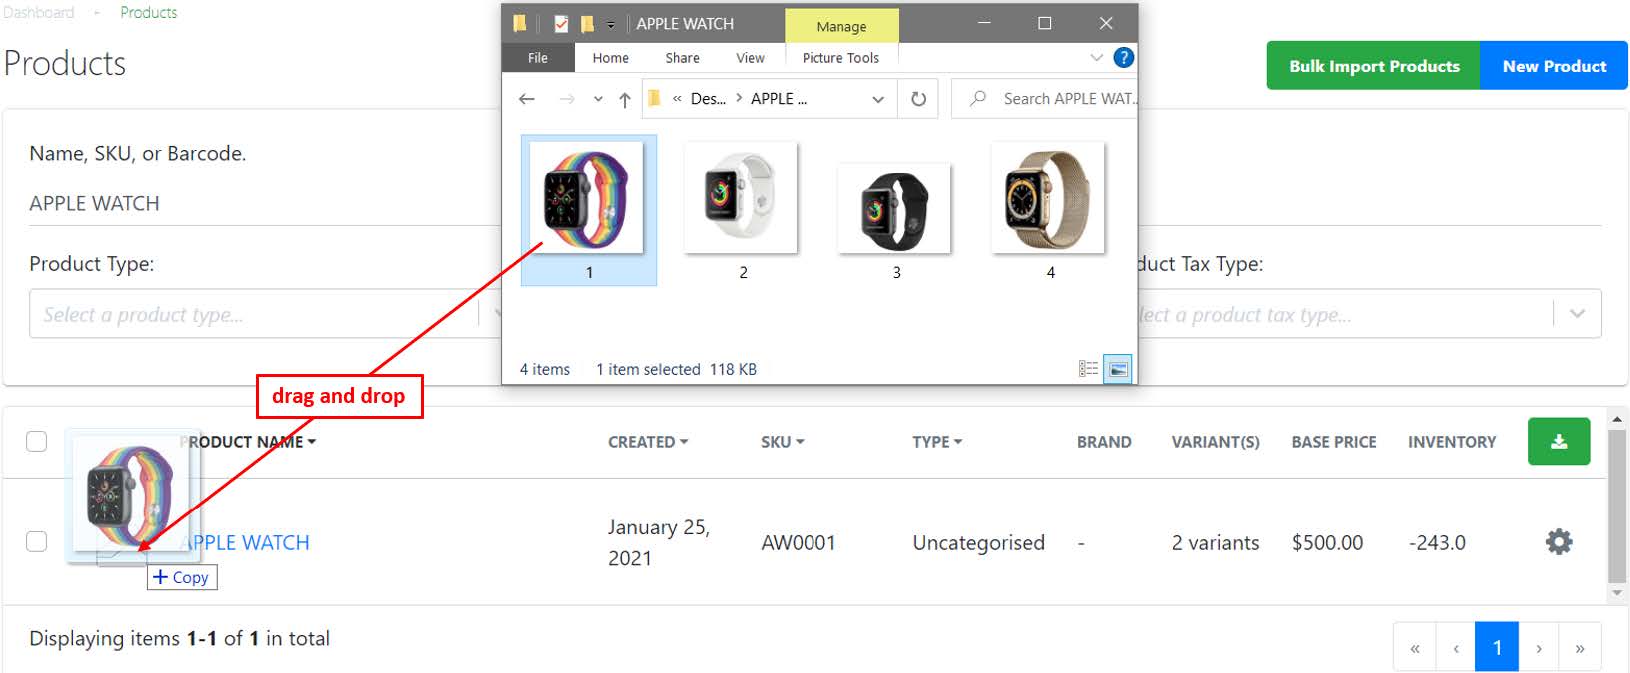
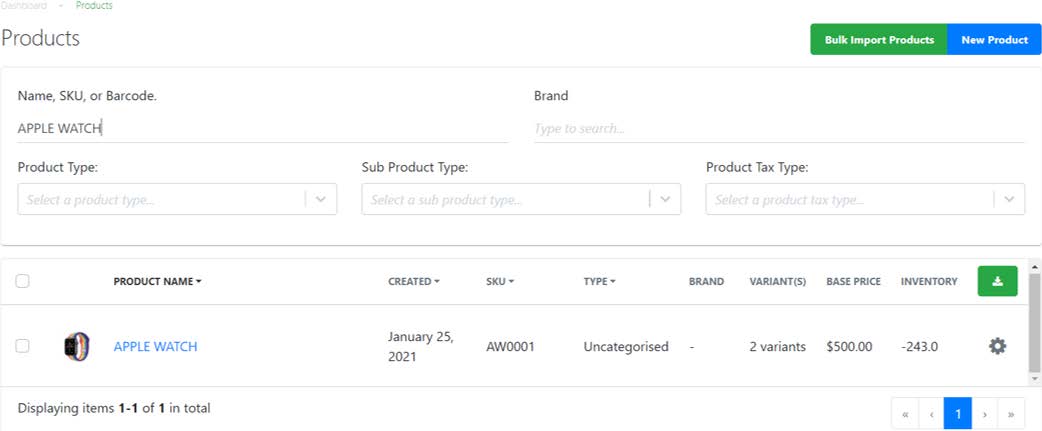
3. Once the image is uploaded, the product image will be shown.
B. Uploading Image Through Product Configuration
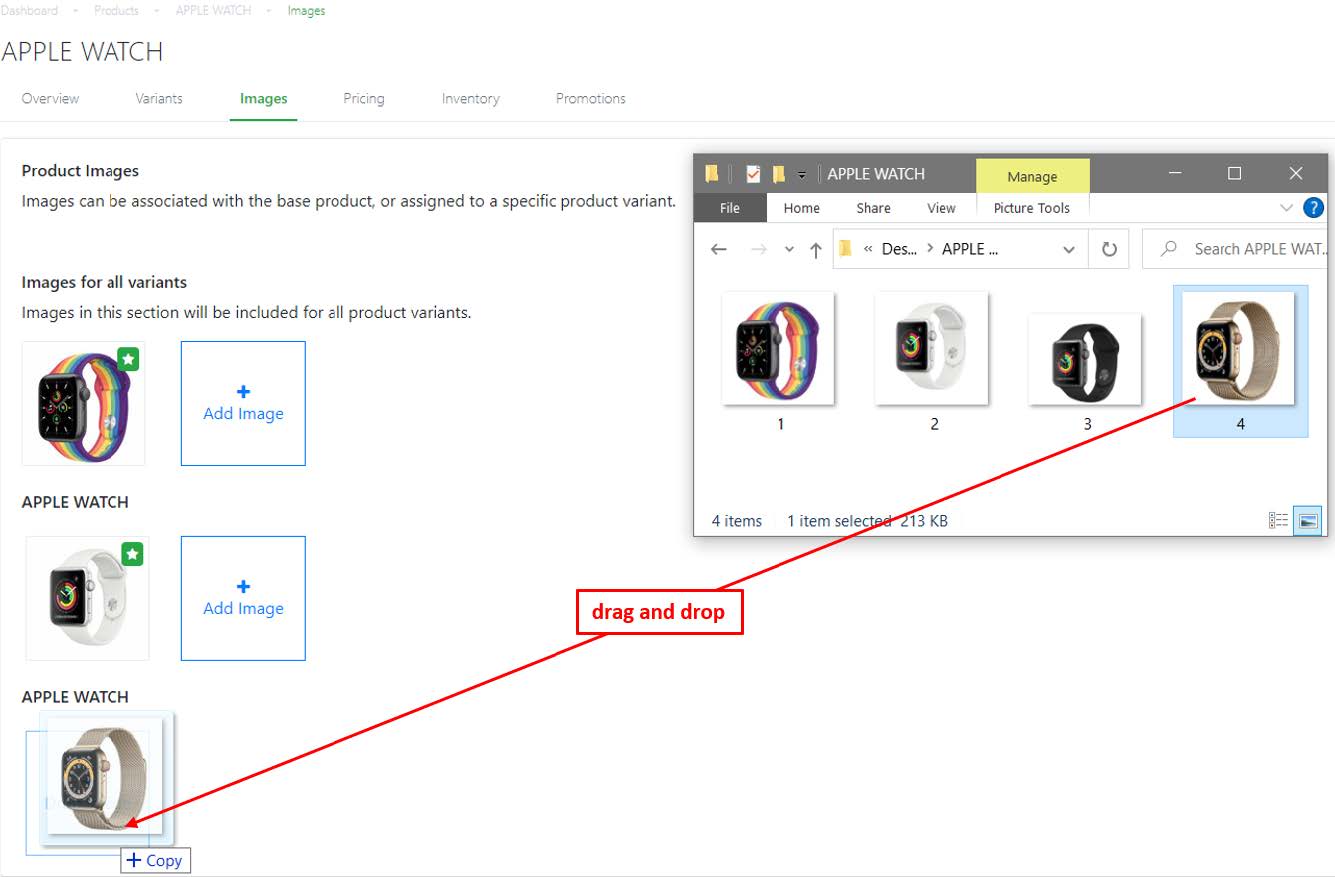
1. Access Product Configurations, and click on Images. Users are able to upload images for each variant associated with a product.
2. Similar to part A, users can utilize both ways to upload images. To upload image, users can either:
a. Click on + Add Image, a window will be shown for all variants to allow users to upload respective images.
b. Utilize the drag and drop function.
3. Once added, users are able to see images for all variants.
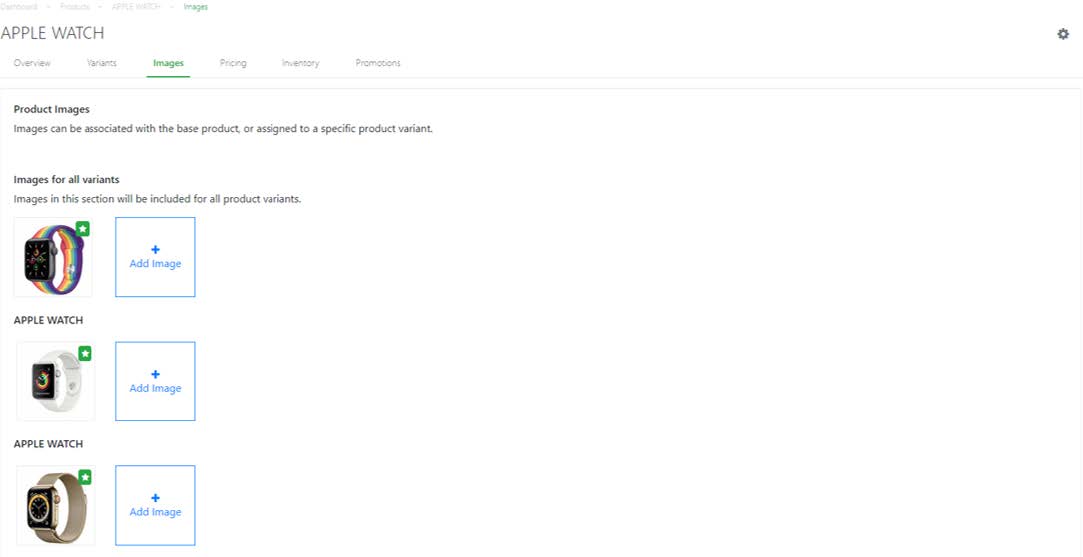
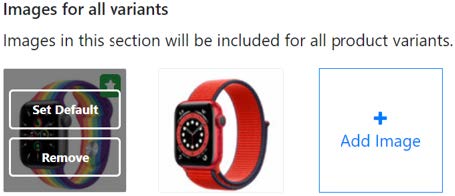
4. Under each image selection, users are able to upload multiple images, and set a specific image as default.
💡 The absolute maximum image size that you can upload is 5MB.
Under the Pricing tab in product configuration, users are able to view every pricing detail for the particular product.
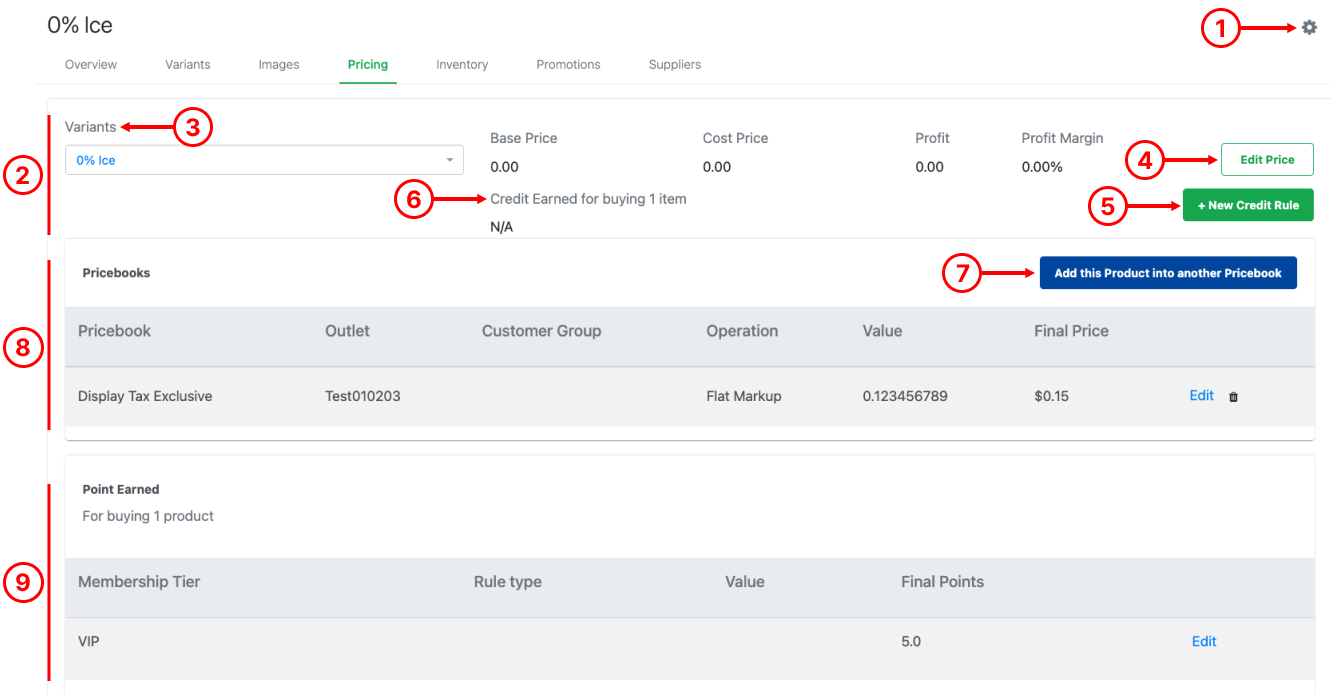
1. Gear Button (Edit)
Display the Edit Product window.
2. Variant Pricing
Details Shows the overall pricing details related for the variants chosen.
3. Variants dropdown list
Enables users to switch between different variants associated with the same products.
4. Edit Price Button
Displays Edit Product Variant window, which enables users to edit base price and cost price of the particular product variant.
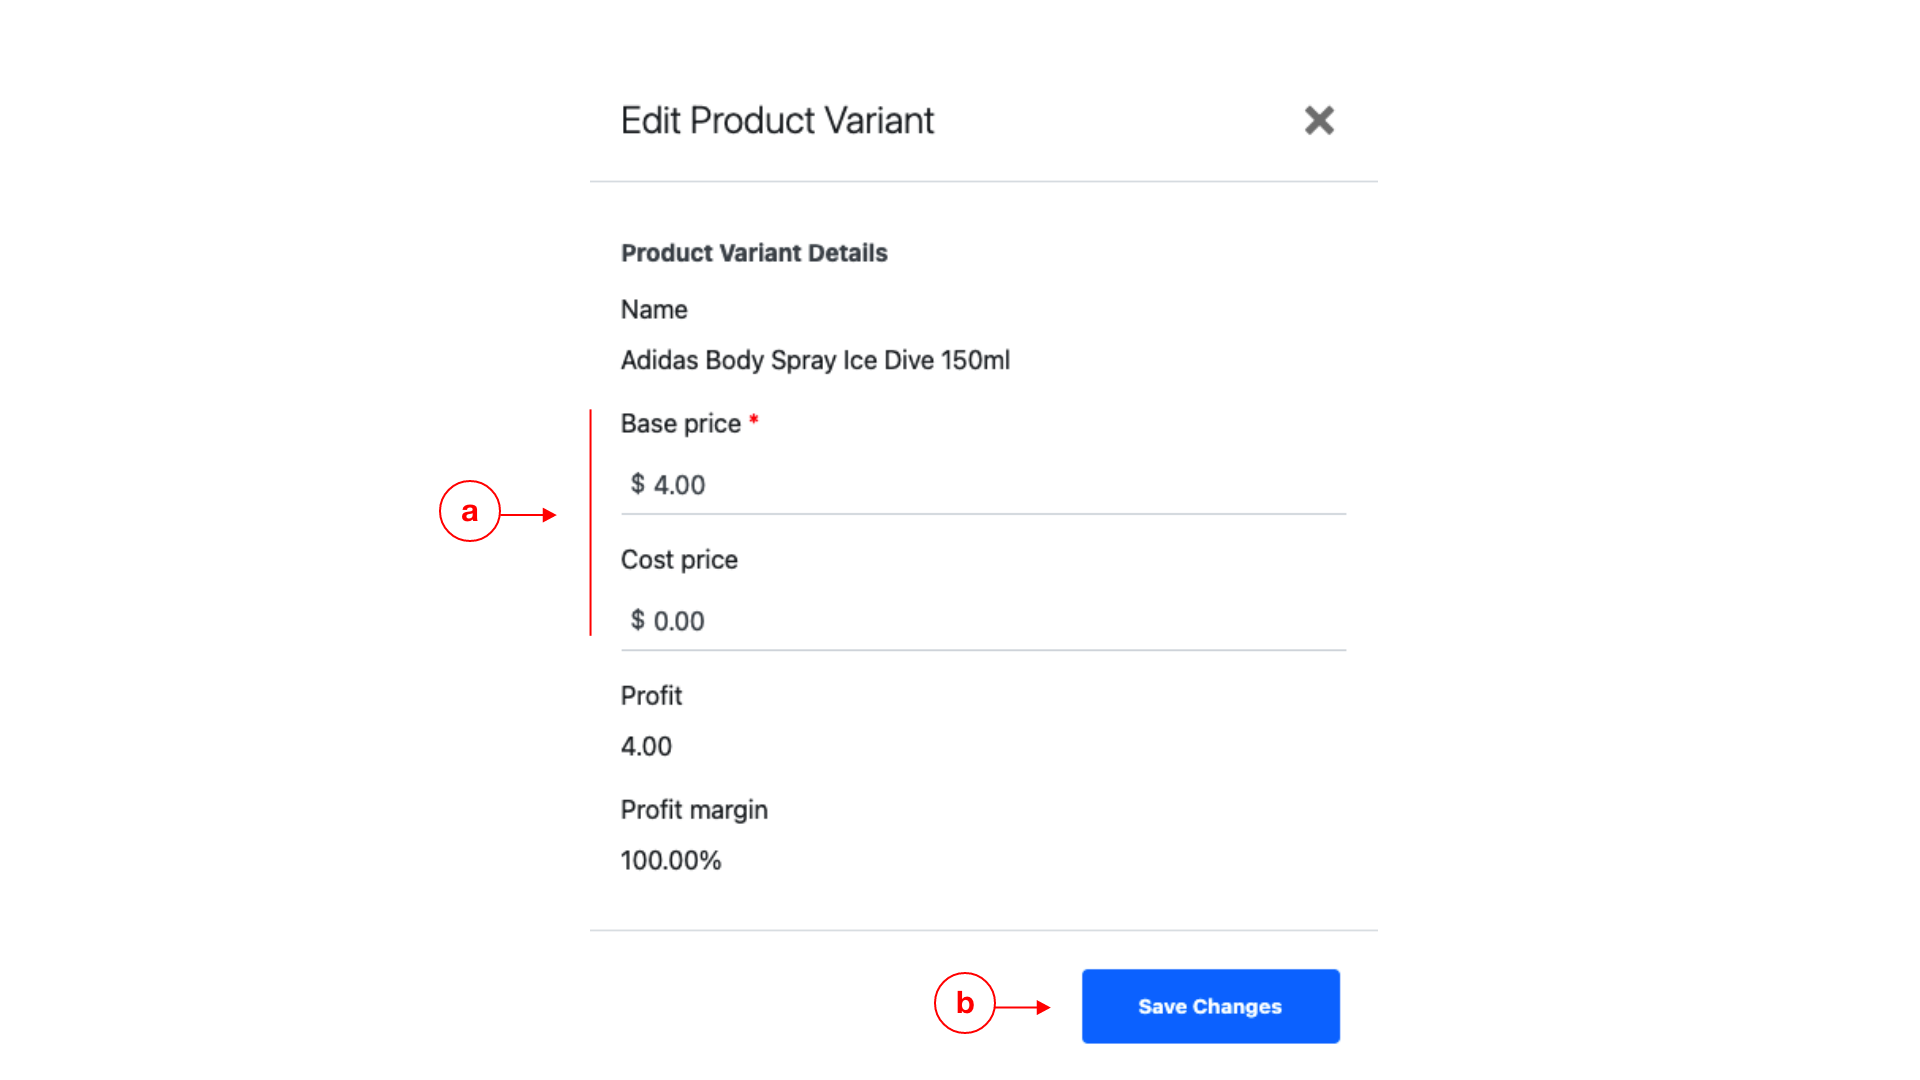
a. Edit Base Price (cannot be left blank) and Cost Price (optional).
b. Click on Save Changes once done.
5. New Credit Rule Button
Displays a New Credit Rule Window.
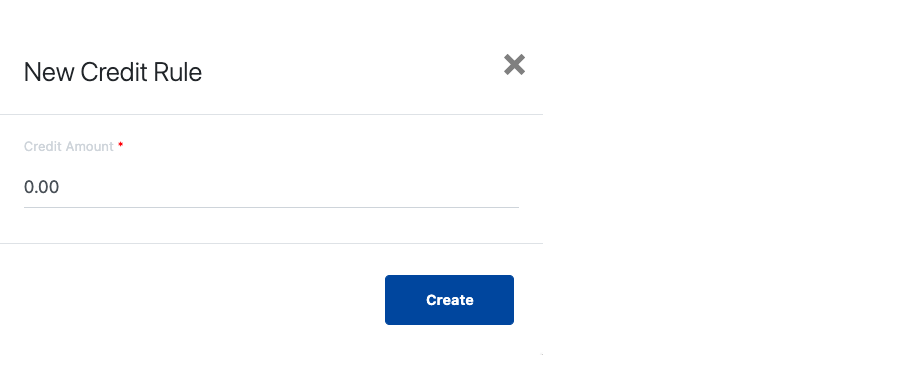
a. Enter Credit Amount.
b. Click on Create once done.
6. Credit Earned
Shows users the credit entitled for customers when a selected product variant is purchased.
7. Add this Product into another Pricebook
Displays Add to Pricebook window which enables users to assign the Product including all its variants to a Pricebook created.
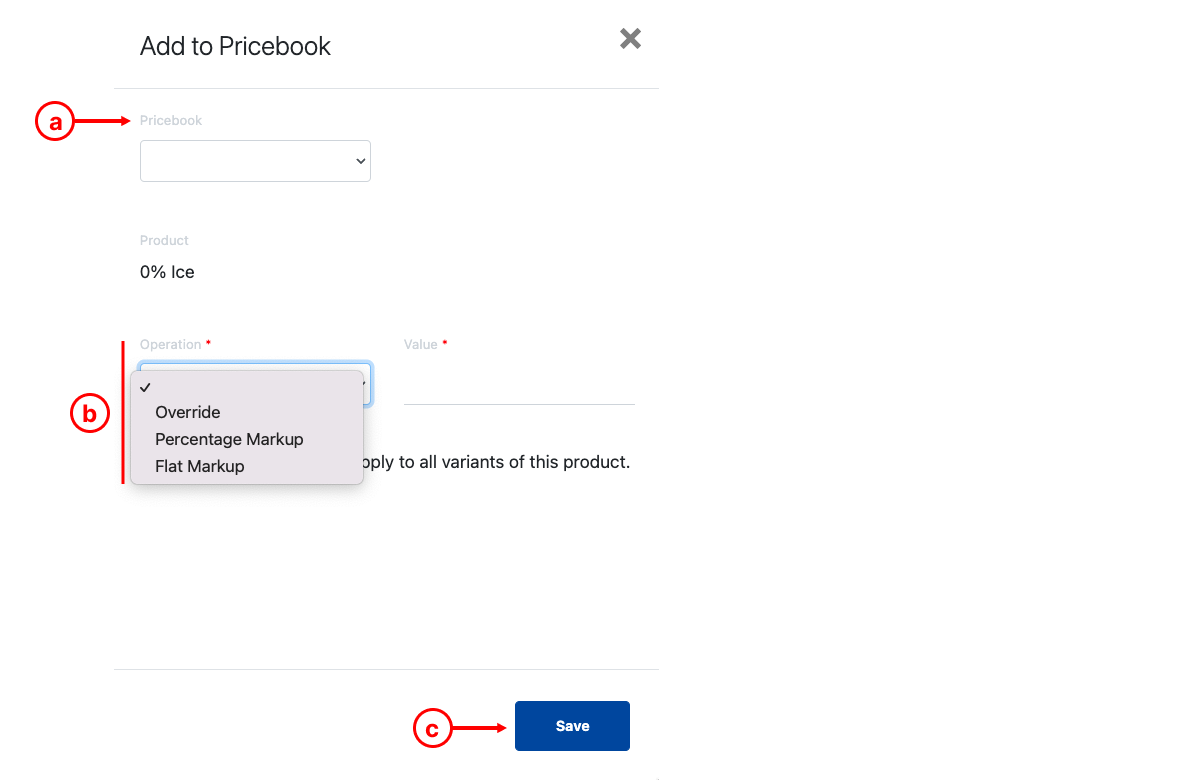
a. Pricebook drop-down list
Enables users to select a relevant pricebook which was created in the BACKEND PORTAL.
b. Operation and Value
-
-
- Override: Supersedes the pricing of all the variants with the value entered.
- Percentage Markup: Applies a fixed percentage markup for all the variants based on the value entered.
- Flat Markup: Applies a fixed dollar markup based on the value entered.
c. Click on Save to confirm changes.
For more information, see Price Books Page.
8. Pricebooks
Shows the pricebooks details in which all associated variants will be tied to.
For more information, see Price Books Page.
9. Points Earned
Provides a detailed breakdown on the points earned for each customer group. By default, values shown should be the same as those entered when a membership tier is created.
For more information, see Membership Page.
Click on the Edit button to edit the points.
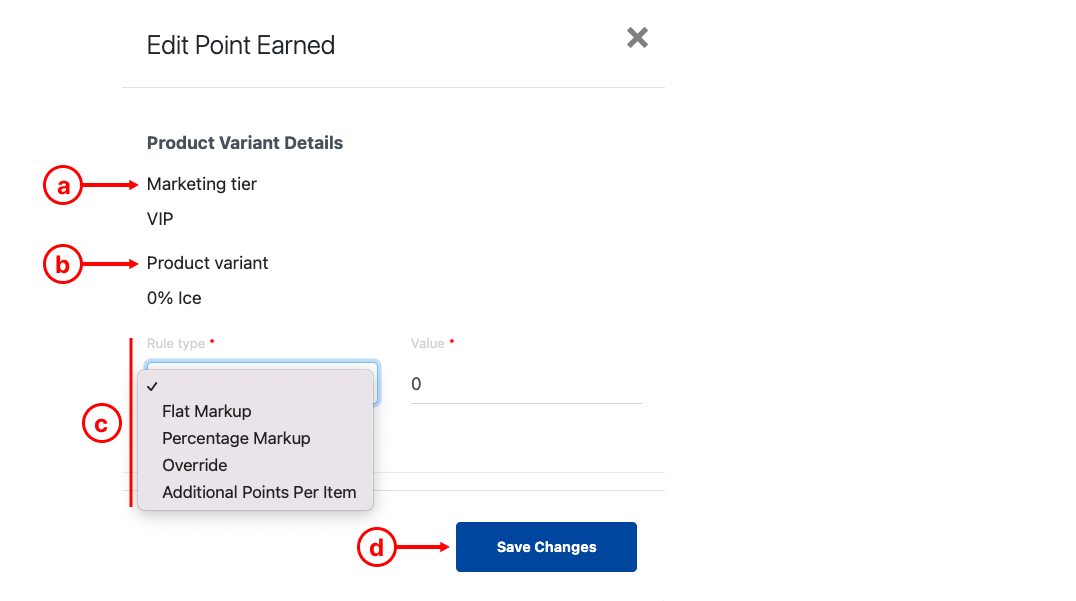
a. Shows the associated Membership Tier.
b. Shows the selected Product Variant, selected from Variants dropdown list
c. Points Earned Rule and Value
-
-
- Flat Markup: Applies a fixed value mark up on top of default points based on value entered.
- Percentage Markup: Applies a fixed percentage mark up on top of default points based on value entered.
- Override: Supersedes the default points with the value entered.
- Additional Points Per Item
d. Click on Save Changes once done.
Under the Inventory tab, details such as Cost Price, Supplier, Supplier Code, and Inventory Count and movements will be shown.
For more information, see Inventory.

1. Edit Product Button
Displays the Edit Product window (similar to Edit Product).
2. Variant Inventory Details
Shows the overall inventory details related to all variants associated with the product.
-
- Product Name and SKU.
- Cost Price.
- Supplier, Supplier Code and Supplier Note.
- On Hand: Current inventory level on-hand.
- Outgoing: Count of stock pending to be sent for a specific variant.
- Incoming: Count of stock pending to be received for a specific variant.
3. Edit Variant Inventory Button
Displays the Edit Variant Inventory Menu: Edit Supplier, Edit Cost Price, Edit Lead Time, Reset Stock.
-
- Edit Supplier
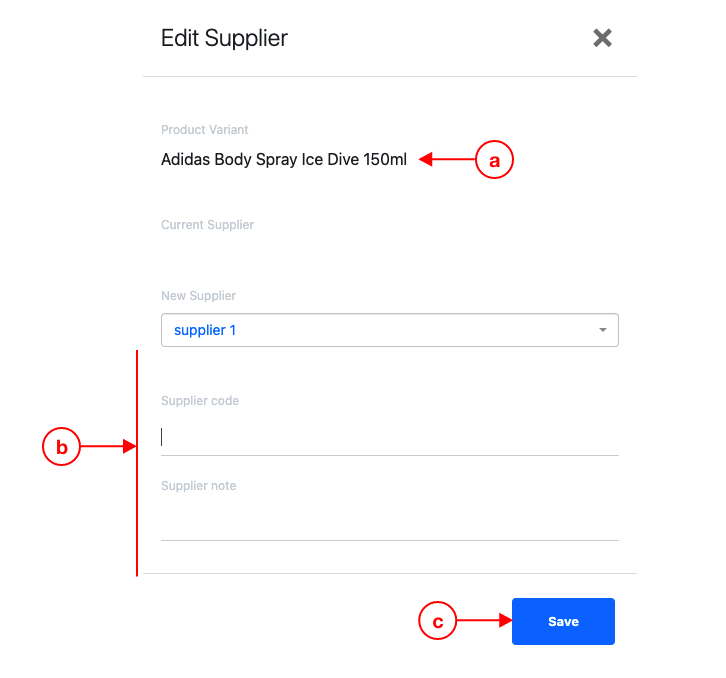
a. Select Supplier to replace current supplier.
b. Enter Supplier Code and Supplier Note (optional) as needed.
c. Click on Save once done.
For more information, see Suppliers.
-
- Edit Cost Price
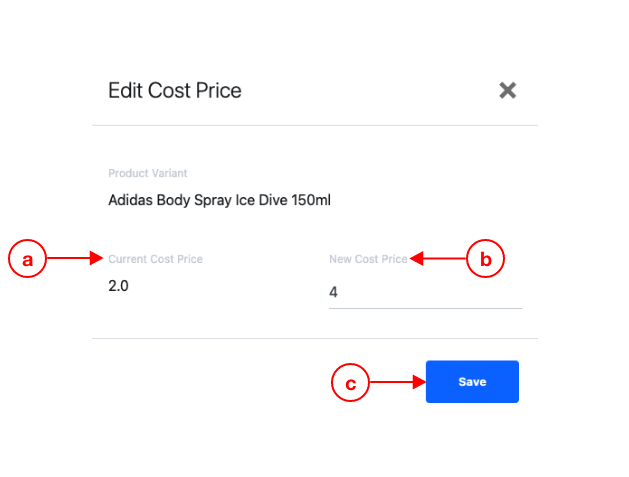
a. Shows the current cost price, if any.
b. Enter New Cost Price.
c. Click on Save once done.
💡 Lead Time means the duration for goods to be received from the point of ordering.
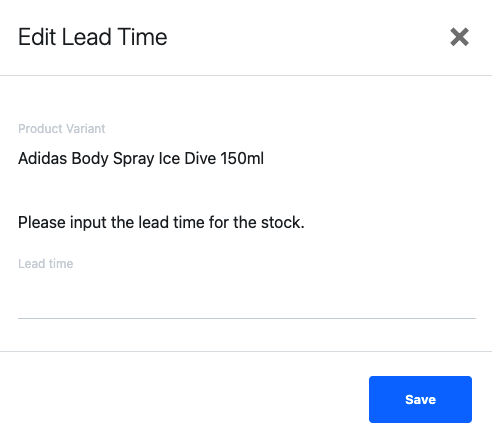
Enter Lead Time and click on Save once done.
-
- Reset Stock
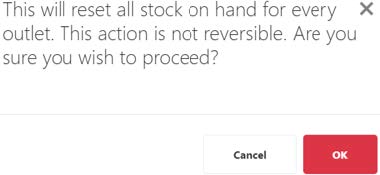
Prompts user to re-confirm resetting stock level.
Click OK to confirm reset stock level to zero.
Under the Promotions tab, users can see details of the promotions associated with the particular product.
For more information, see Promotions Overview.

1. Edit Product Button
Displays the Edit Product window.
2. Product Promotions
Shows the details of promotions related to the product.
-
- Promotion Name
- Start Date of the Promotion
- End Date of the Promotion
- Status of the Promotion: Upcoming, Current, Expired, Disabled
Under the Promotions tab, users are able to see all suppliers and associated cost prices tagged to this product.
💡 Prior to assigning a supplier, users will need to create the suppliers.
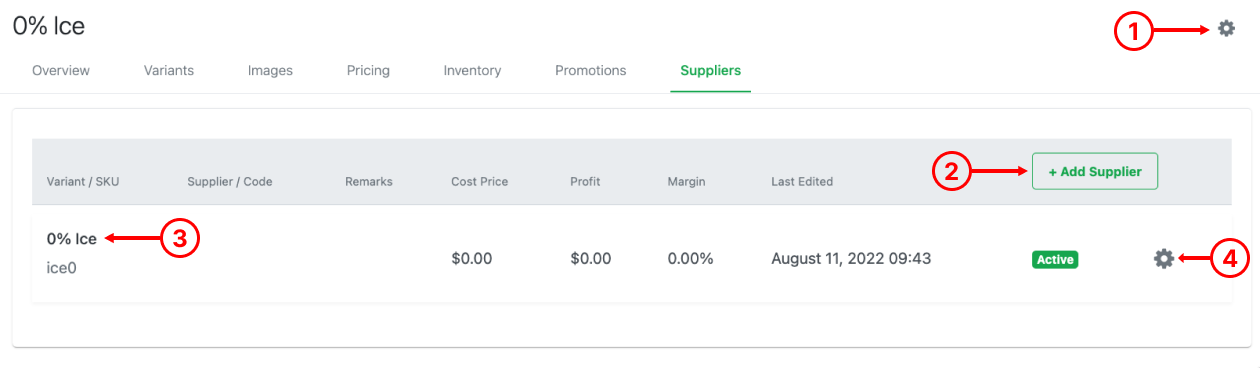
1. Edit Product Button
Displays the Edit Product window.
2. Add Another Supplier
Allows users to tag other supplier(s) to this product. Pops up a “Add Supplier” window.
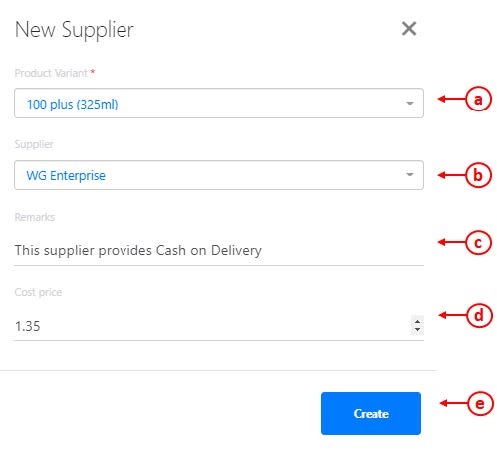
a. Select product variant (if this product is a multi-variants product)
b. Select a supplier to be tagged.
c. Insert remarks for this particular supplier.
d. Insert cost price from the Supplier
e. Once done, click on Create.
For more information, refer to assigning an active supplier after you have added a new supplier to the product.
3. Tagged Supplier(s)
Shows the details of suppliers tagged to the product.
-
- Product Name
- Supplier
- Supplier Code
- Remarks for the supplier
- Cost Price from the Supplier
- Profit and Margin
- Last Edited time
4. Edit Tagged Supplier
-
- Dropdown menu will be shown.
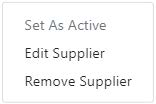
- Set As Active – Will enable active status for the supplier
- Edit Supplier – refer to point 2 above
- Remove Supplier -removes this supplier from the product.
