
This section describes managing customer data on the backend. Users will be guided on:
- Adding Customers
- Viewing Customer Data
- Exporting Customer Data
- Points and Credit Adjustment
- Bulk Import of Customer Data
From the EPOS Features Panel, click on Customers to access the Customers Main Page. At this page, users will see the list of customers and customers’ details registered in the database.
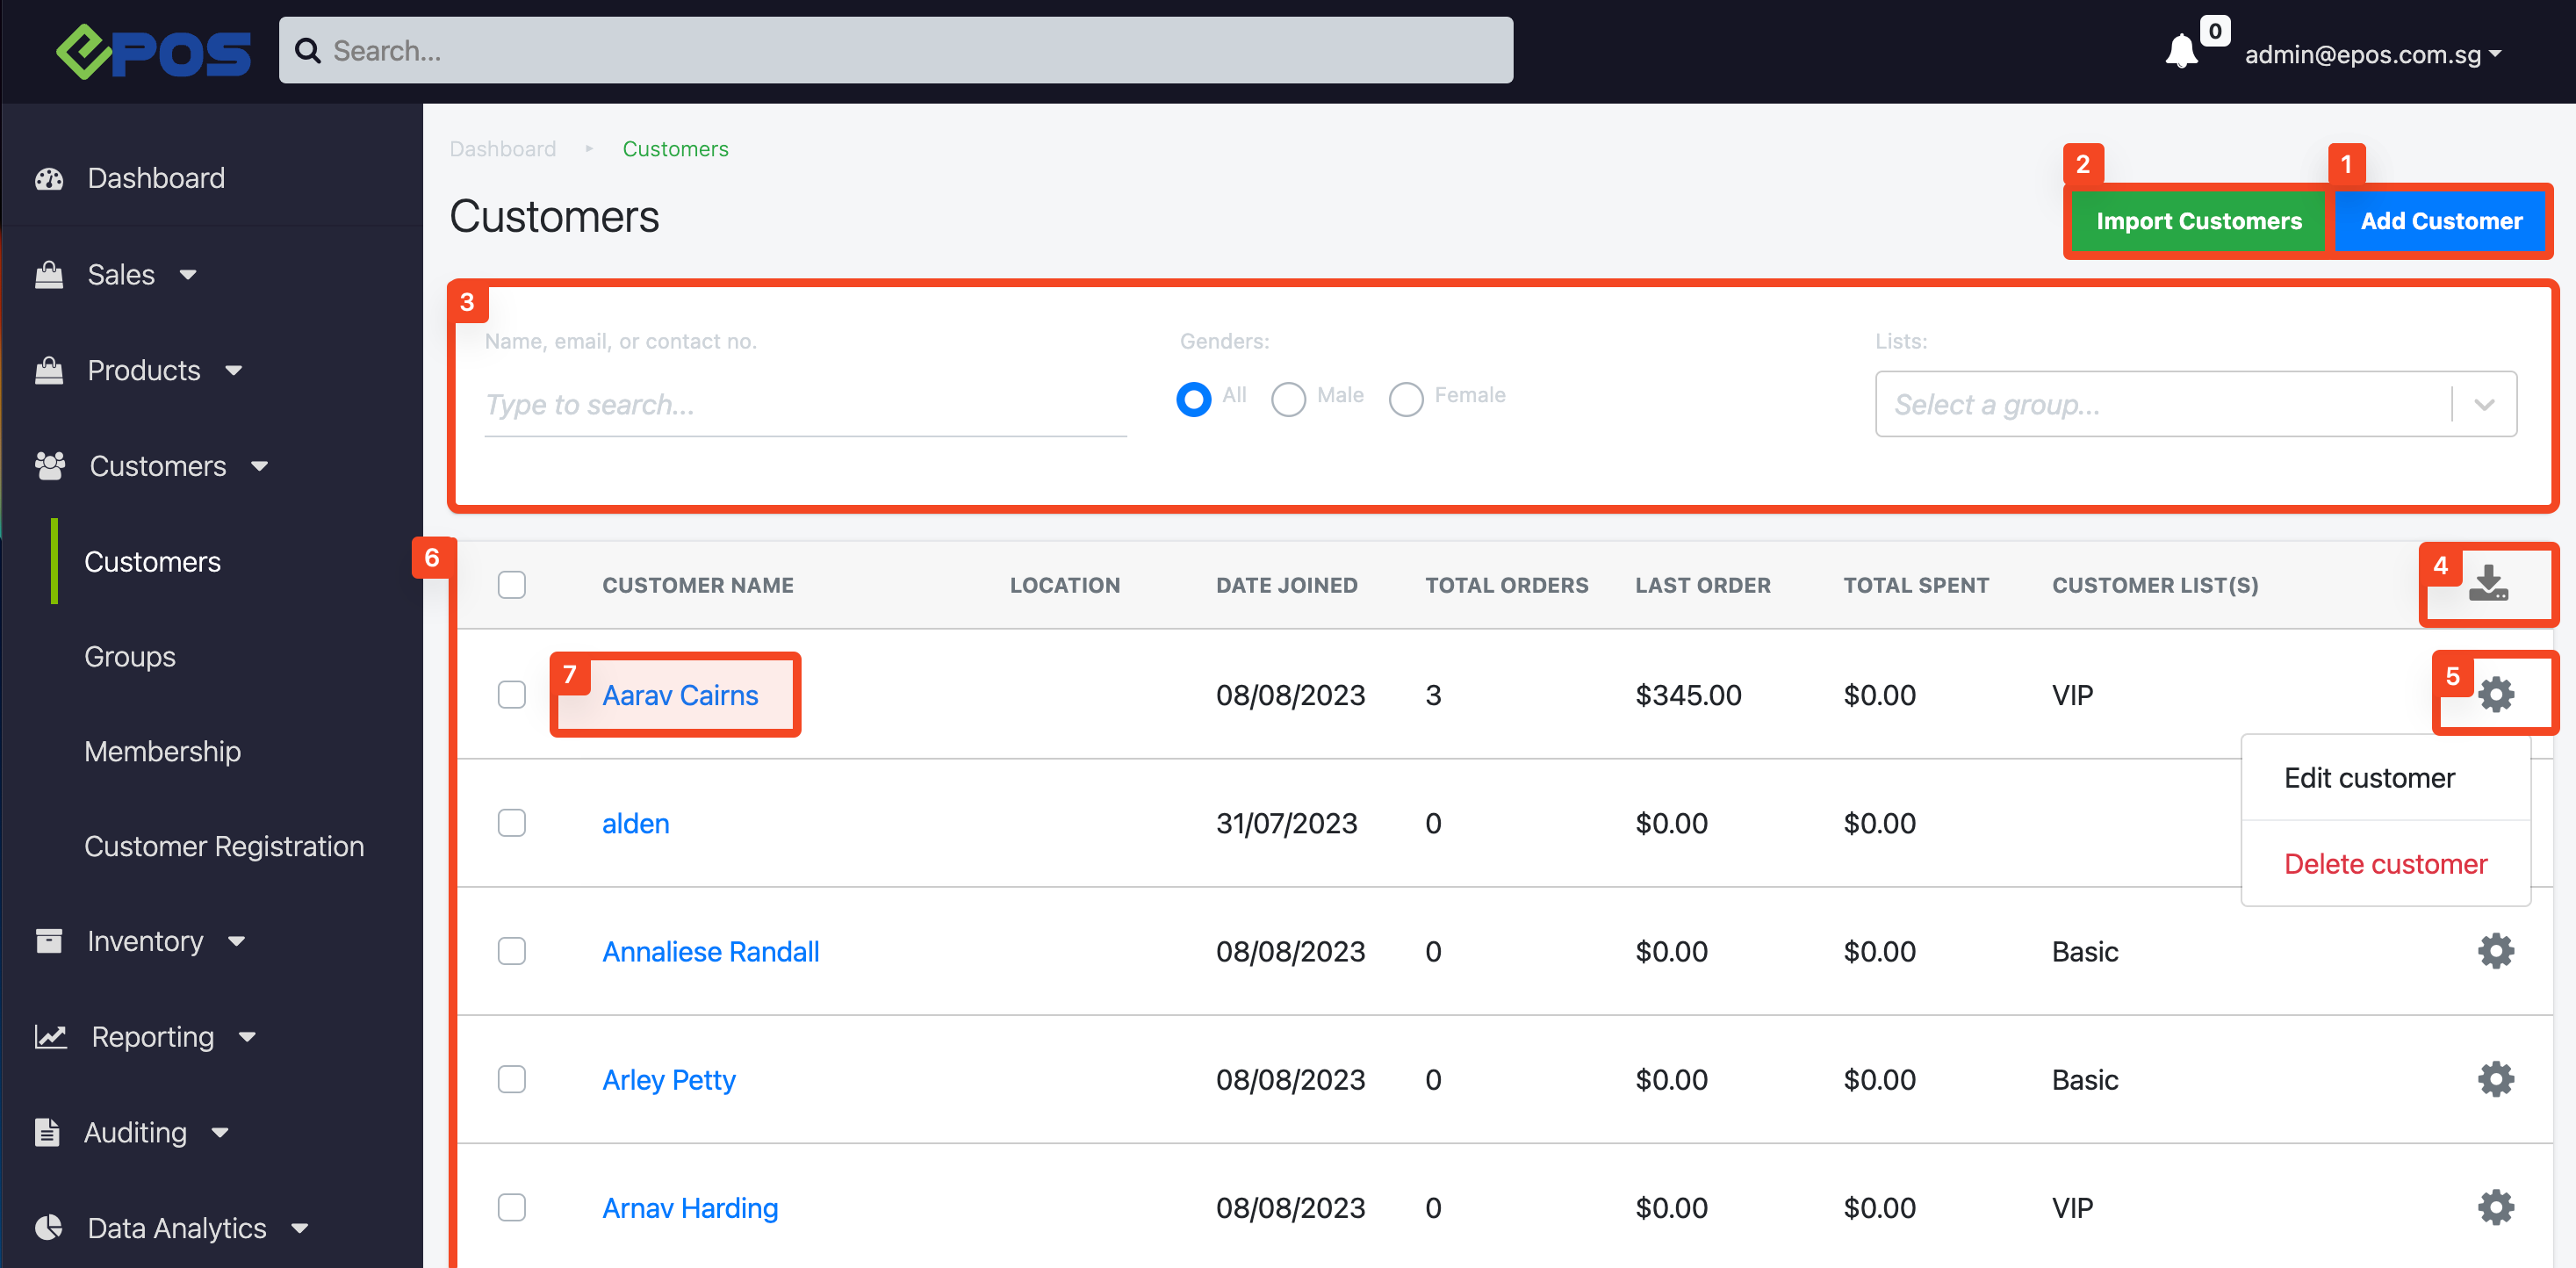
1. Adding a New Customer
Enables users to create a customer into the portal.
For more information, see Adding a New Customer.
2. Bulk Import Customer List
Enables users to create multiple customers simultaneously into the portal.
For more information, see Importing Customer List via Bulk Import.
3. Filter and Search
Provides users the ease to search for a particular customer through name, email address, contact numbers, lookup ID and filter them by gender and different customer groups or memberships.
4. Export Customer List
Download the list of selected customers and relevant information in CSV format.
5. Customer Settings
Users can access quick settings of a particular customer.
6. Customer List
Shows the entire list of customers registered into the portal based on the filter or search criteria defined by users.
7. Customer Configurations
Enables users to access customer details, e.g. Order History, Credit History,
To add a new customer, access the Customer main page and click on Add Customer.
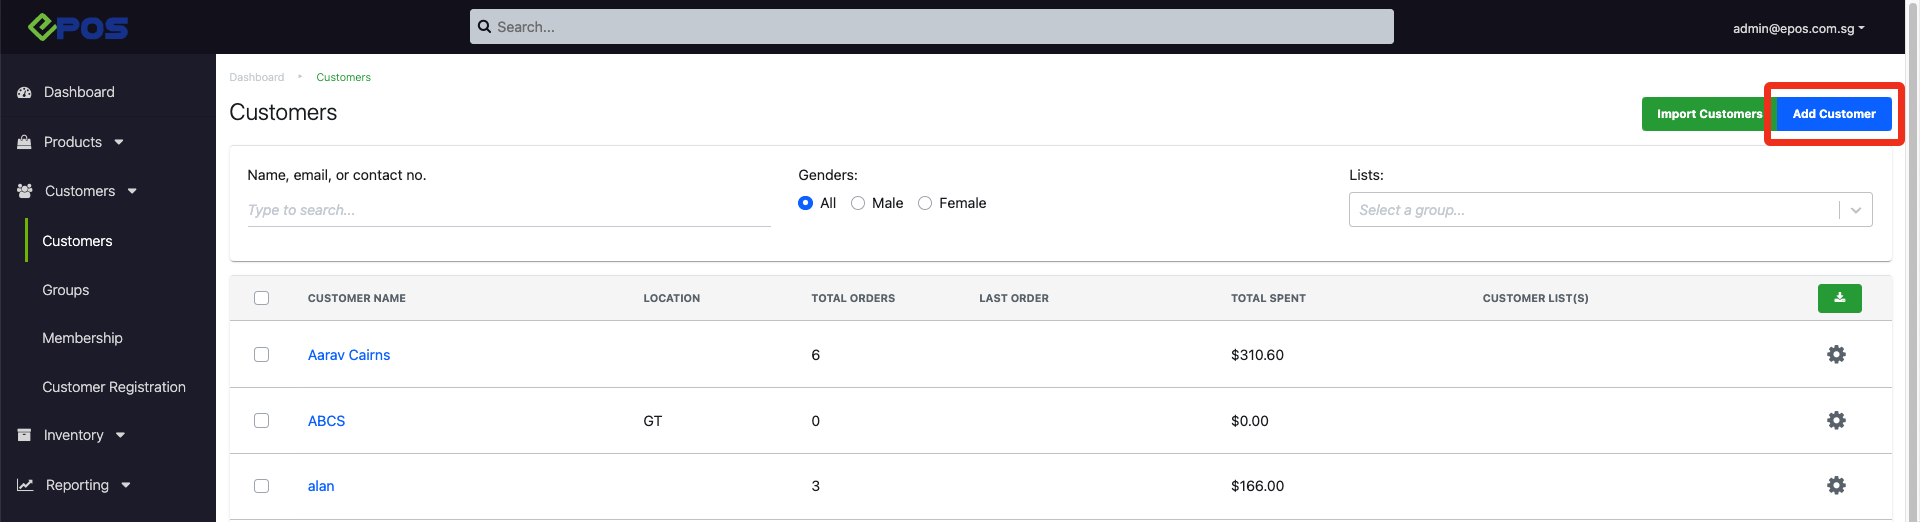
A window will be shown, fields marked with * are mandatory fields which should not be left blank.
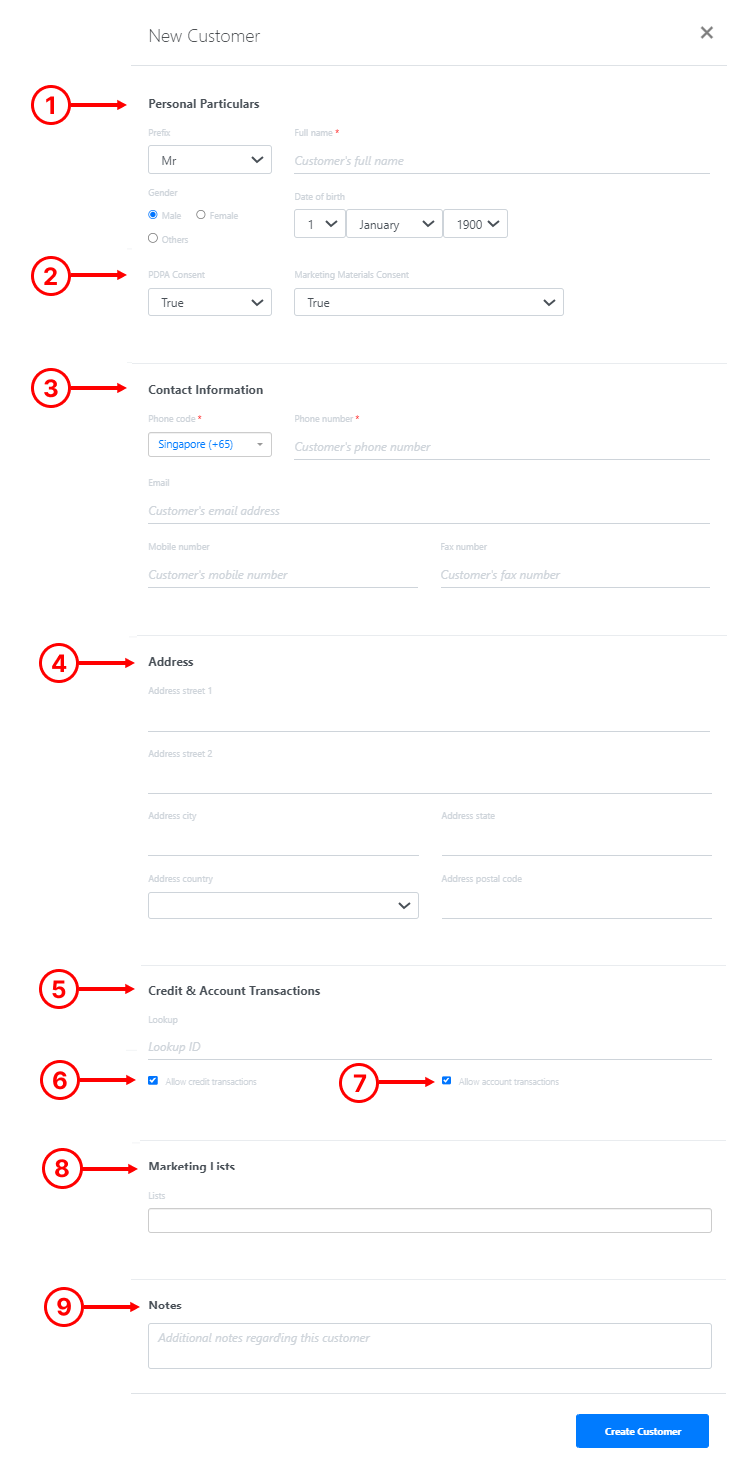
1. Personal Particulars
Ensure Customer’s name is entered. Select customer’s particulars as relevant.
2. PDPA and Marketing Materials consent
This field shows PDPA consent and marketing materials attributes. PDPA consent is enabled by default and cannot be disabled. For marketing materials, select ‘true’ to enable or ‘false’ to disable.
💡 The default setting is ‘true’.
3. Contact Information
Enter customer’s contact as applicable.
💡 Mobile Number & Phone Number can be used to retrieve Customer at the POS when needed.
4. Customer’s Address
This field is optional, users can choose to leave blank if not applicable.
5. Lookup ID
Allows users to assign specific customer ID for every customer.
6. Allow credit transaction
☑️ the checkbox to enable customers to purchase and spend credits.
To set up credit products, see Product Pricing.
7. Allow account transaction
☑️ the checkbox to enable customers to perform on-account transactions.
💡 Once enabled, customers’ payments can be owed and repaid in the future.
8. Marketing List
Allows users to assign customers to specific customer groups.
To create customer groups and assign customers, see Customer Groups.
9. Notes
Enter remarks for this customer if applicable.
10. Create Customer
Click on Create Customer to save all the information entered.
💡 If you wish to add multiple customers, you can make use of the Bulk Import function.
For more information, refer to Bulk Import Customers.
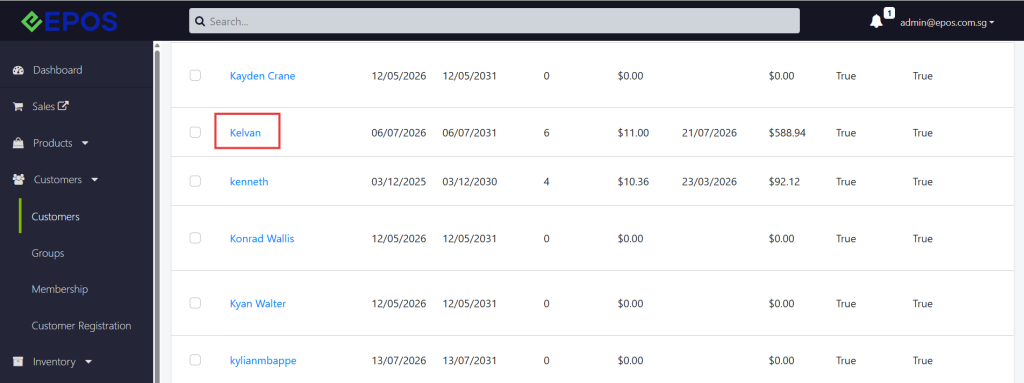
From the Customers Main Page, users can click to view customer information by clicking into the customer name
Overview Section
The Overview section provides a quick summary of the selected customer’s membership and account information. At a glance, you may view the customer’s spending activity, order count, credit balance, account balance, membership tier, current points, latest transaction, registration date, personal details, and consent status.
This section is useful for quickly checking a customer’s overall profile before reviewing more detailed records such as transaction history, points history, vouchers, or account activity.

Order History Section
The Order History section allows you to view the customer’s past purchase records within a selected date range.
You may use this section to check the customer’s previous orders, order status, purchase date and time, outlet, cashier, basket size, grand total, and remaining balance. This helps merchants review a customer’s spending activity and verify their transaction records when needed

Credit History Section
The Credit History section allows you to view the customer’s credit balance and credit-related activity.
You may use this section to check how credits were earned, deducted, or adjusted in the customer’s account. This helps merchants track credit movements and verify whether a customer’s credit balance is accurate.

Account History Section
The Account History section allows you to view the customer’s Buy Now, Pay Later transaction records and account balance.
This section is used to track invoice/order amounts, payments made, and outstanding account balance linked to the customer. It helps merchants review whether a customer has unpaid BNPL transactions, completed payments, or past account-related activity.

Point History Section
The Point History section allows you to view the customer’s points balance and points-related activity.
This section is used to track how points were earned, spent, or adjusted in the customer’s account. It helps merchants verify whether the customer’s current point balance is accurate and review the transactions linked to their points movement.

Packages Section
The Packages section allows you to view the customer’s purchased packages, remaining package balance, linked redemption products, and package usage history.
This section is useful for merchants who sell prepaid packages, session packages, bundles, or credit-based items. It helps merchants check what package the customer has purchased, when it expires, how much value is available, which products can be redeemed under the package, and how the package has been used over time.


Steps
1. Navigate to Customers
2. Key in the phone number of the customer whose points need to be adjusted
3. Click the customer’s name to enter his/her profile

4. Check the customer’s tiers as different tiers may have different base earning rate, e.g $1 = 10pts for Bronze, $1 = 12pts for Silver

Points Adjustment
5. Click Point History
6. Click Add Adjustment

7. Input the points. Possible to reduce point amount by adding a negative in front of the number too
8. Input adjustment reason. This will be visible in their members portal
9. Click Create Adjustment to complete the process

10. Adjustment is now completed!

NOTE: We reward points for the subtotal amount before the taxes
Therefore, if $1 = 10 points, using the receipt below as example, the points to be rewarded would be $50.20 x 10pts = 502pts

Credit adjustment
- Once in the customer’s profile, click Credit History

- Click Add Adjustment

11. Input the credit adjustment. Possible to reduce credit amount by adding a negative in front of the number too
12. Input adjustment reason. This will be visible in their members portal
13. Click Create Adjustment to complete the process

14. Adjustment is now completed!

Users will see members details in Membership Configurations under the Members tab.
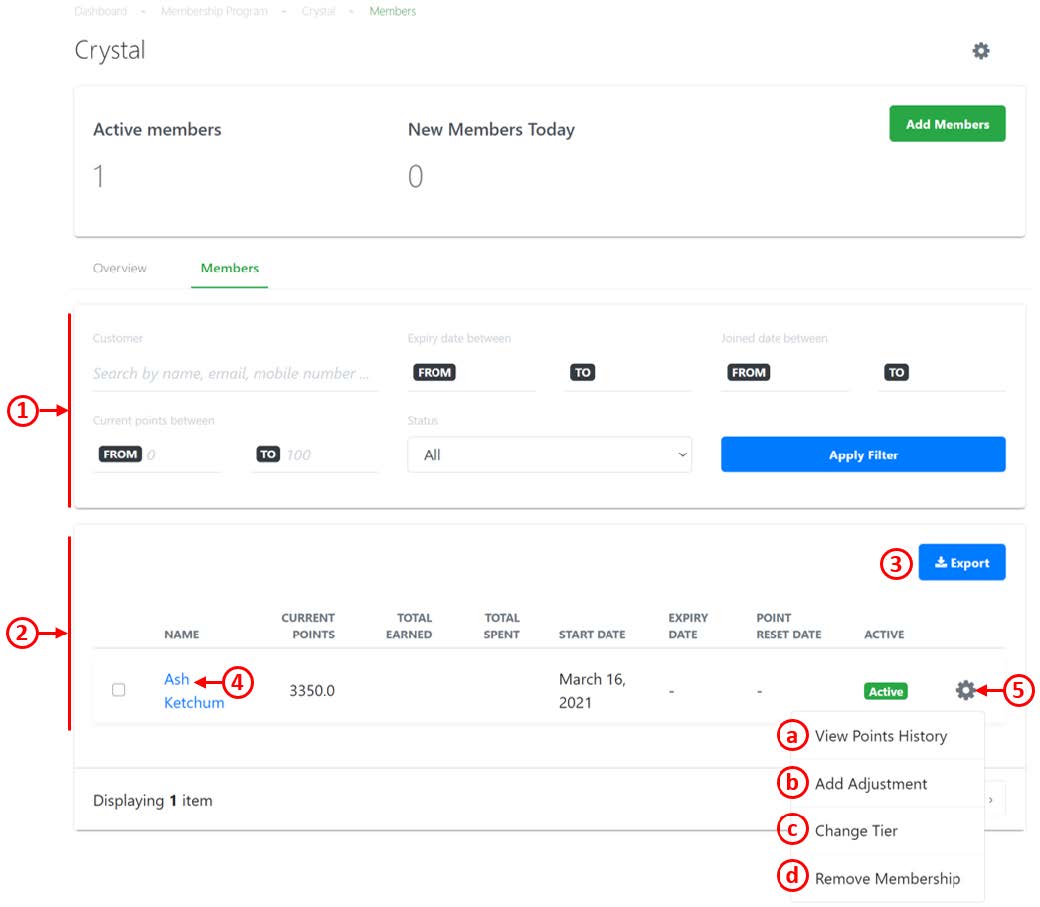
1. Filter and Search
Allows users to filter and search for customers in the membership.
2. Members List
Shows user the list of customers added to the membership tier and related details:
-
- Name of customer
- Current Points
- Total Points Earned
- Total Points Spent
- Start Date of membership
- Expiry Date of membership
- Point Reset Date
- Active Status
3. Export Members List
Download the list of selected members and relevant information in CSV format.
4. Customer Configuration
Directs users to the Customer Configuration page of a particular customer.
5. Quick Settings
a. View Points History: Directs user to Customer’s Point History.
b. Add Adjustment: Displays Add Adjustment window
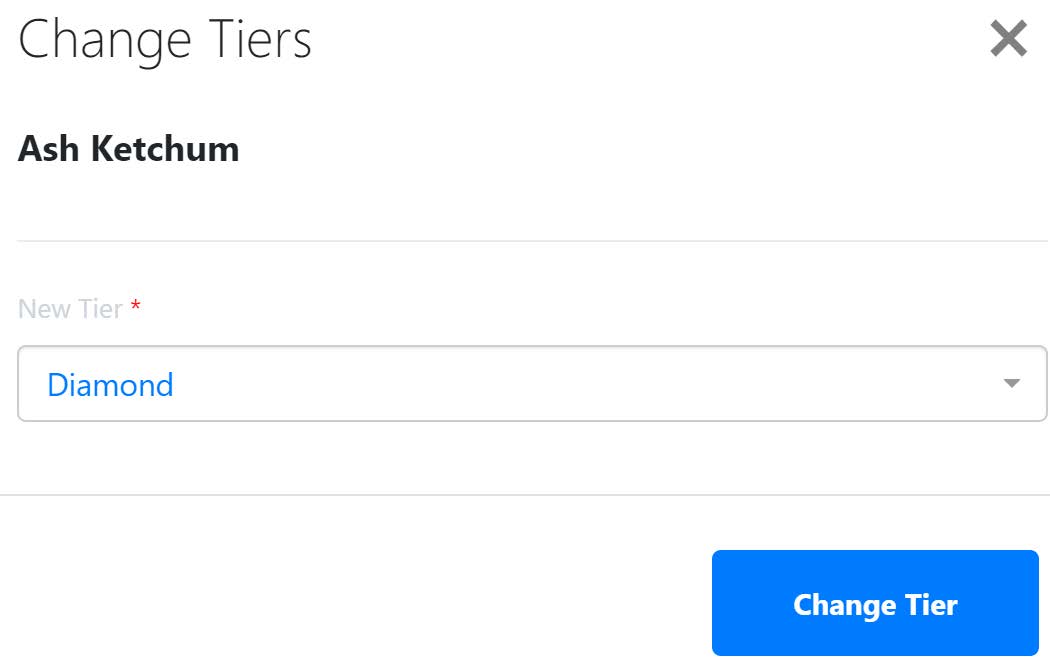
c. Change Tier: Allows users to change customer’s membership tier. Select a new membership tier then Click on Change Tier once done.
d. Remove Membership: Removes customer as a member.
To bulk import a list of customers, access Customers Main Page and click on Import Customers.
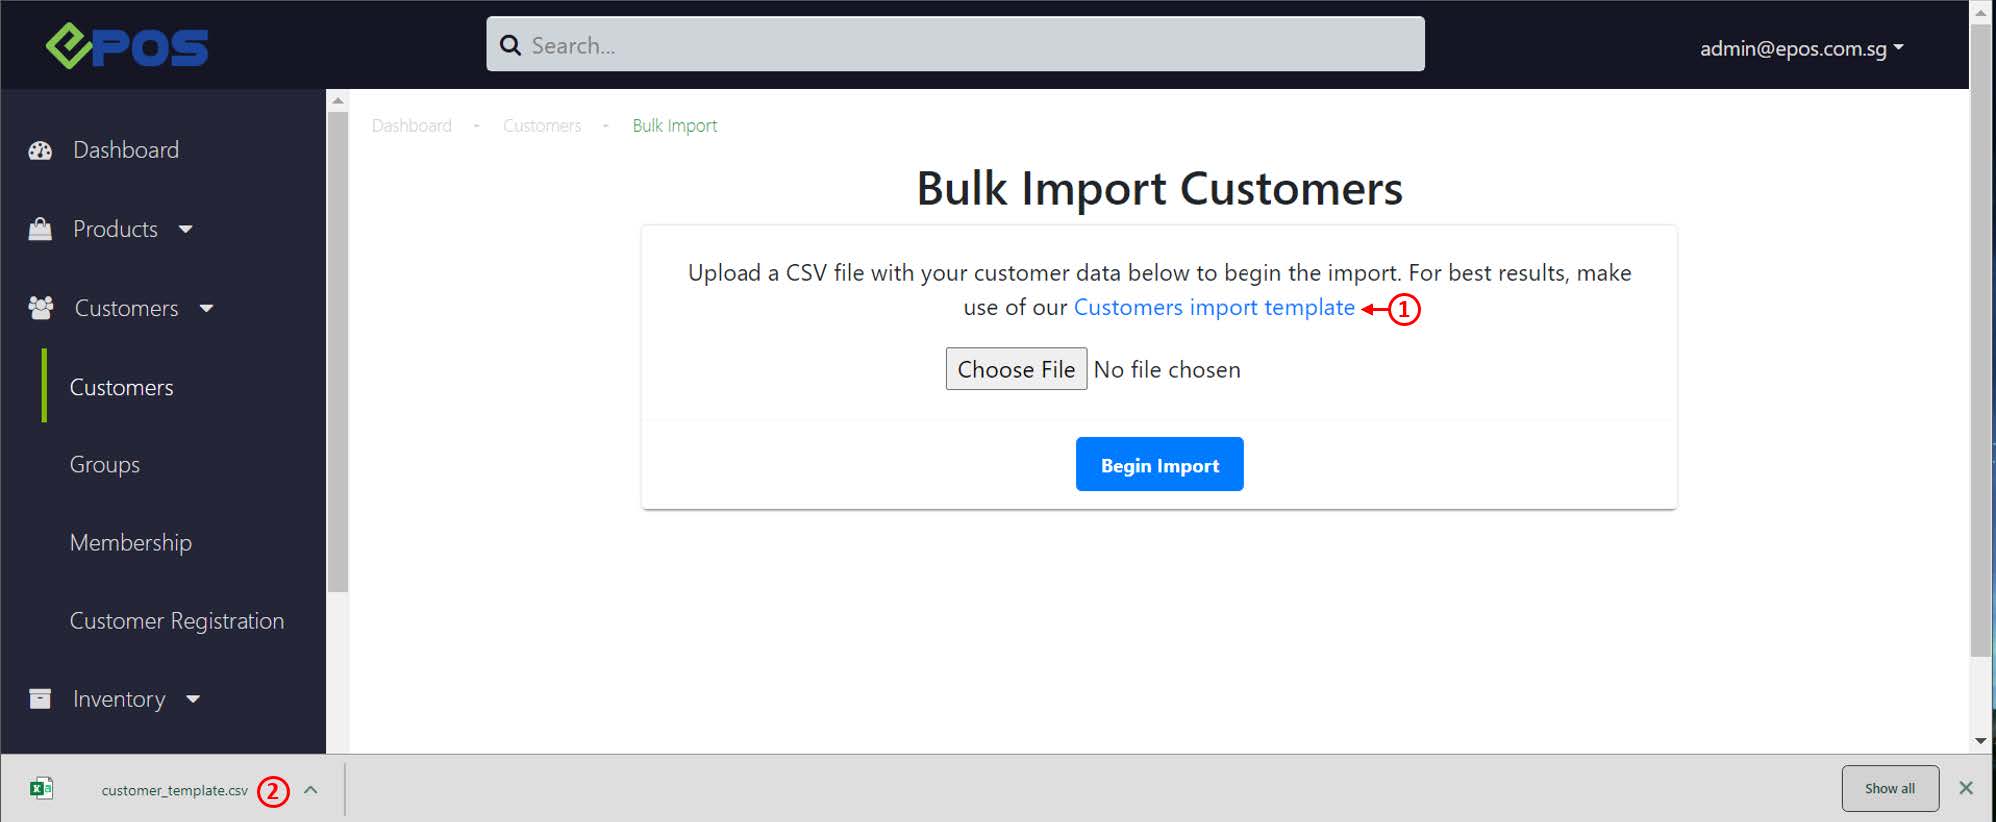
1. To download the Customer Import Template, via browser, directly click on the Customers import template.
2. Open up the downloaded customer_template.csv.
3. Remove all irrelevant data from the template.
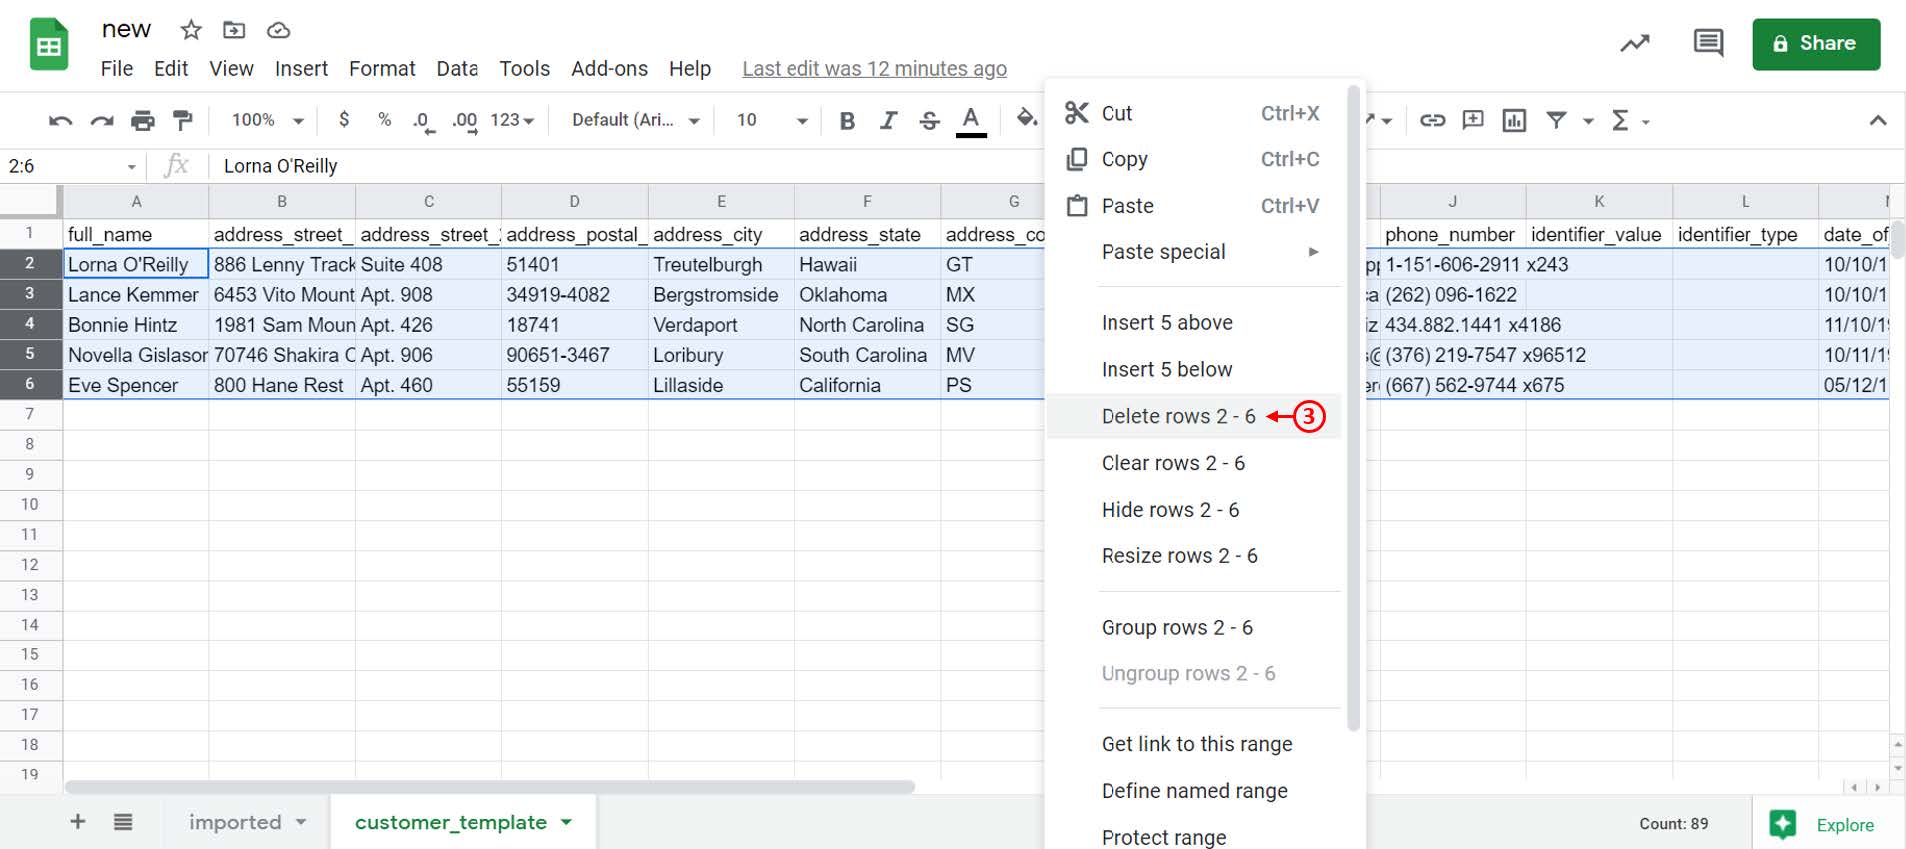
4. Refer to the Customer Bulk Import Column List to fill in the columns accordingly.
5. Save the CSV file once all data has been input into the spreadsheet.
6. To import customer data,
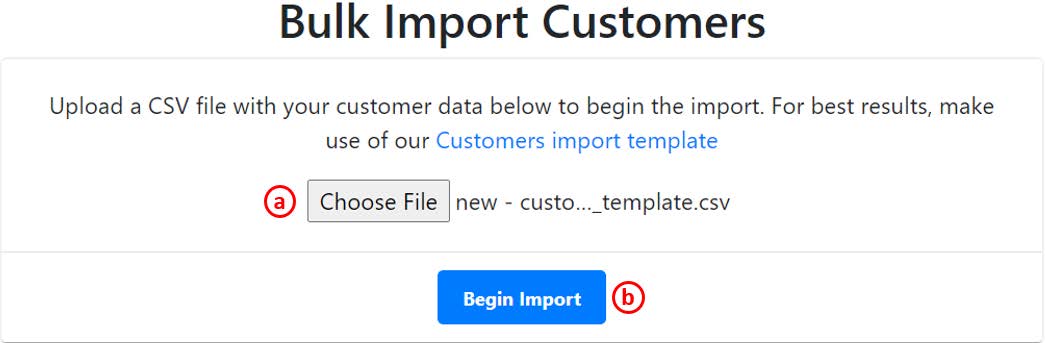
a. Click on Choose File to select the updated CSV file.
b. Click on Begin Import.
7. Once uploaded, users will be directed to this screen.
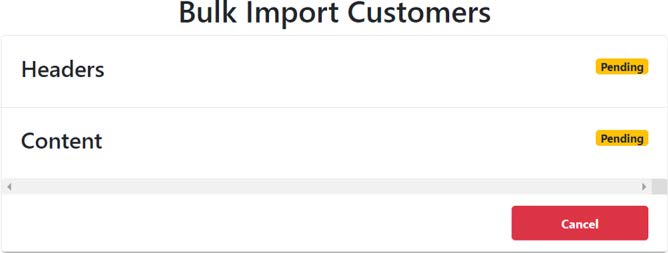
8. Wait until the Pending status turns Valid.
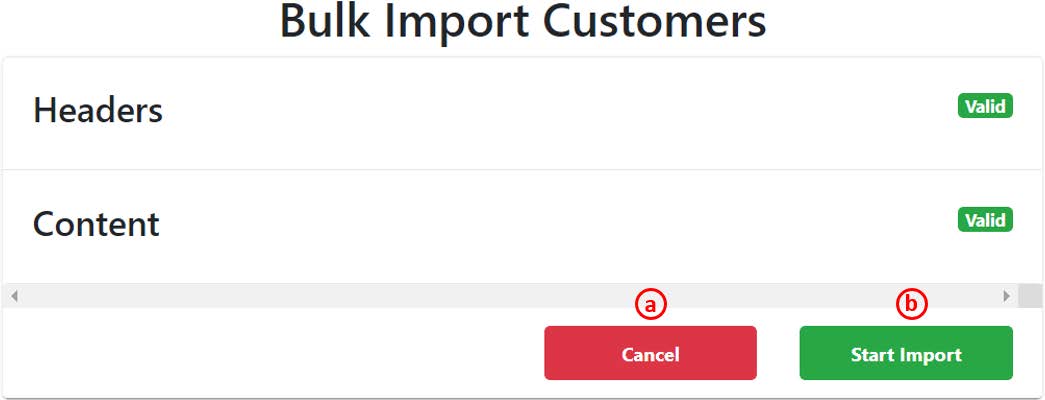
a. Click on Cancel Import to return to the previous page.
b. Click on Start Import to begin importing the customer data in the CSV file.
9. Should there be any Invalid status, users must take note of the error messages.
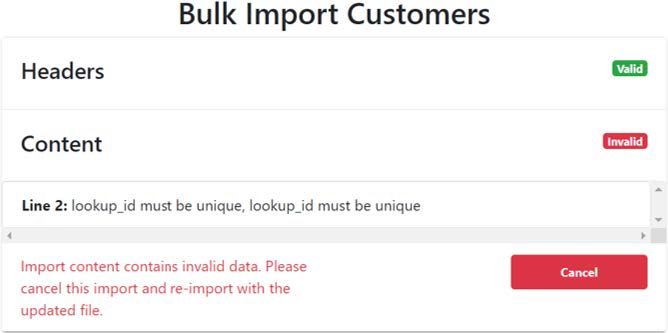
-
- Click on Cancel Import to return to the previous page.
- Users should amend the CSV file according to the remark given.
- Re-import the CSV file once done.
10. Users should take note of the common error messages, during the process of bulk importing customers data into the backend portal
-
- XYZ needs to be remapped, or ignored
It indicates that users used the wrong customer import template. Users shall refer to step 1 and step 2 above to download the right customer import template. - lookup_id must be unique
Each lookup id must be unique, users must ensure that there is no duplication.
Required field, unless added on POS/frontend. - Phone number has already been taken
Duplicated phone number is detected which exists in the backend portal. - date_of_birth should be in right format : DD/MM/YYYY
Users must enter correct date format, e.g. 08/10/1992 - membership_expiry_date must be on or after today
Users must enter the membership expiry date on or after today.
For more information on checking duplication, see Creating New Product with Bulk Import, Step 10.
- XYZ needs to be remapped, or ignored
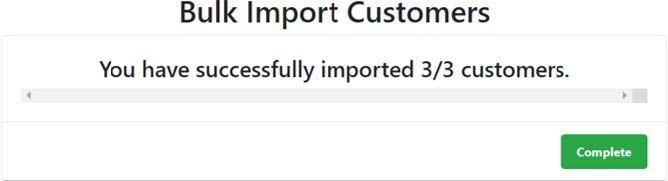
11. Upon successful import of customers, users will be prompted of the total number of customers imported. Click on Complete to return to the Customer main page.
Refer to the list below for the Customer Bulk Import Columns and the general guidelines to fill in the columns accordingly.
A*. full_name
Enter customer’s full name.
B. address_street_1
Enter customer address details.
C. address_street_2
Enter customer address details.
D. address_postal_code
Enter postal code of customer address.
E. address_city
Enter the city of customer address.
F. address_state
Enter the state of customer address.
G. address_country
Enter the country of customer address.
H. notes
Enter remarks, if needed.
I. email
Enter customer’s email address.
J. phone_code
Enter customer’s phone code.
K. phone_number
Enter customer’s phone number. (home, office number, etc.)
L. identifier_value
M. identifier_type
N. date_of_birth
Enter customer’s birthday in DD/MM/YY format.
O. gender
Enter male or female.
P. prefix
Enter Mr/ Mrs/ Ms/ Dr.
Q*. mobile_number
Enter customer’s mobile number.
💡 This information can be used to search for customers at POS.
R. fax_number
Enter customer’s fax number
S. lookup_id
Users can choose to enter ID number or phone number or membership ID.
T. membership_tier
Enter membership tier. For more information, see Membership Tier.
U. membership_point
Allow users to import membership points associated with the customer.
V. membership_expire_date
Enter membership tier expiry date in DD/MM/YY format.
W. credit_balance
Allow users to import credit balances associated with the customer.
X. customer_group_names
Enter the customer group. For more information, see Customer Groups.
Y. allow_credit_transactions
Only enter TRUE or FALSE.
-
- “TRUE” to allow customers to purchase and spend credits.
- “FALSE” or left blank to disallow.
Z. allow_account_transactions
Only enter TRUE or FALSE.
-
- “TRUE” to allow this field to enable customers perform on-account transactions.
- “FALSE” or left blank to disallow.
💡 Once enabled, customers’ payments can be owed and only to be cleared in the future.
AA. pdpa_consent
It is always “TRUE” by default. This means that when a user interacts with the system, the default assumption is that they have agreed to the terms of data collection and processing as required by the PDPA.
AB. marketing_materials_consent
Only enter TRUE or FALSE.
-
- “TRUE” to allow this field to enable customers perform on-account transactions.
- “FALSE” or left blank to indicate that the customer has not consented to receive marketing materials or communications.
* Compulsory fields
💡 Any optional columns which are not carrying any data can be deleted to enhance data import speed.